Resize the disk of an Ubuntu VM in PVE — the complete workflow from Web UI to guest OS
Preface When you manage a virtualized environment with Proxmox VE, running out of disk space is only a matter of time. Maybe your Ubuntu VM keeps pulling more Docker images, or maybe database logs fill up the root partition. In short, disk expansion is a must-have skill for PVE operations. This article walks through the entire process, from resizing the virtual disk in the PVE Web UI to expanding LVM inside the Ubuntu guest, step by step.
1 Why do we need to resize?
PVE usually allocates a fixed-size virtual disk when a VM is created, for example 32 GB. As the workload grows, that space may no longer be enough. Fortunately, PVE supports online disk expansion, and Ubuntu’s default LVM setup also supports dynamic logical volume expansion. Together, they make the process very convenient.
The whole workflow has two stages:
- PVE side: increase the virtual disk capacity in the Web UI, which is like swapping in a larger hard drive for the VM
- Ubuntu side: detect the new space inside the guest, then expand the partition, physical volume, logical volume, and filesystem
2 Prerequisites
| Item | Requirement |
|---|---|
| PVE version | 6.x / 7.x / 8.x |
| Guest OS | Ubuntu 20.04 / 22.04 / 24.04, installed with LVM |
| Disk controller | VirtIO SCSI or IDE, VirtIO SCSI recommended |
| Permissions | PVE Web admin + root inside the VM |
Tip: Ubuntu Server usually installs with LVM by default, and the root filesystem is commonly located at
/dev/mapper/ubuntu--vg-ubuntu--lv. If you used manual partitioning without LVM, you will need tools such asgrowpartinstead, and the workflow will be a little different.
3 Stage 1: Resize on the PVE side
3.1 Using the Web UI
- Log in to the PVE management interface (
https://<PVE_IP>:8006) - Select the target VM on the left, then open the Hardware tab
- Select the disk you want to expand, such as
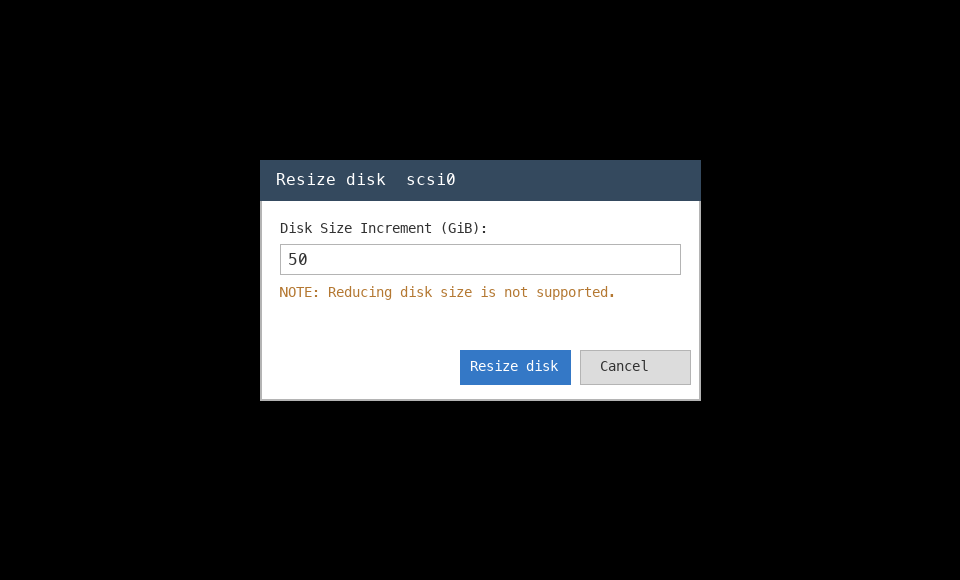
scsi0orvirtio0, and click Resize disk - In the dialog, enter the amount you want to add. Note that this is an increment, not the final size. For example, entering
50adds 50 GB - Click Resize disk to confirm
3.2 Using the command line (optional)
If you prefer the command line, SSH into the PVE host and run:
# Syntax: qm resize <vmid> <disk> <size>
# Example: add 50G to scsi0 for VM 100
qm resize 100 scsi0 +50G
After this, PVE has already increased the total size of the virtual disk. But the Ubuntu guest does not know that yet — just like replacing your computer’s hard drive with a larger one before the operating system notices the new space.
4 Stage 2: Resize inside the Ubuntu VM
Now SSH into the Ubuntu guest and run the following steps.
4.1 Check the current disk state
First, inspect the disk and partition information:
# View partition table information
parted -l

# View the disk device list
fdisk -l
You should see that the total size of /dev/sda (or /dev/vda, depending on the controller) has increased, but the existing partition still does not occupy the full disk.
The typical partition layout looks like this:
Device       Start      End  Sectors  Size Type
/dev/sda1     2048     4095     2048    1M BIOS boot
/dev/sda2     4096  3674111  3670016  1.8G Linux filesystem
/dev/sda3  3674112 67108830 63434719 30.2G Linux filesystem   ← this is the partition that holds the LVM physical volume
You can see that sda3 is still its original size, while the disk itself has already grown.
4.2 Expand the partition
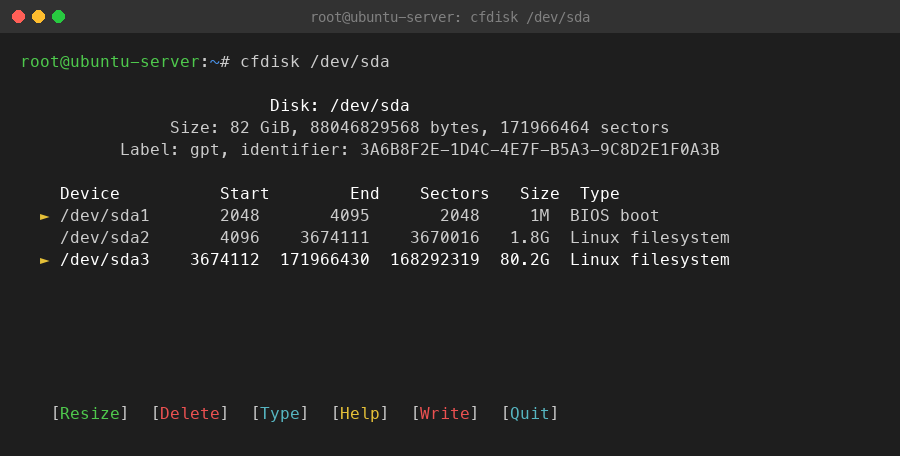
Use the interactive cfdisk tool to expand the sda3 partition:
cfdisk /dev/sda
Steps:
- Use the arrow keys to select the
/dev/sda3partition - Choose Resize
- It will show the maximum available space by default; press Enter to confirm
- Choose Write to write the partition table
- Type
yesto confirm - Choose Quit to exit
Why use
cfdiskinstead offdisk?cfdiskprovides a friendly text UI and is easier to use interactively. Of course, you can also do the same thing withfdiskorparted, butcfdiskis the most convenient choice for this kind of simple partition adjustment.
4.3 Expand the physical volume (PV)
After the partition is expanded, tell LVM’s physical volume to use the new partition size:
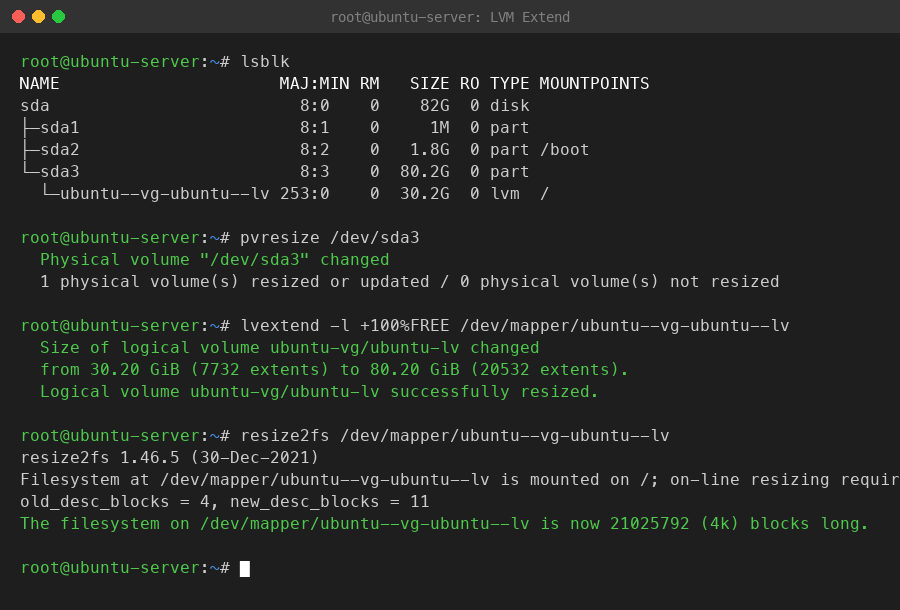
# Check the state before expansion
lsblk

# Expand the physical volume
pvresize /dev/sda3

# Confirm the result
lsblk
After pvresize, lsblk should show that sda3 has grown to the new size.
4.4 Expand the logical volume (LV)
Once the physical volume is expanded, the volume group’s free space grows as well. Now assign all newly available space to the root logical volume:
# Allocate all free space in the volume group to the logical volume
lvextend -l +100%FREE /dev/mapper/ubuntu--vg-ubuntu--lv
Parameter notes:
-l +100%FREE: use 100% of the remaining free space in the volume group/dev/mapper/ubuntu--vg-ubuntu--lv: Ubuntu’s default root logical volume path
Not sure about the logical volume path? Use
lvsorlvdisplayto check.
4.5 Expand the filesystem
After the logical volume is expanded, the filesystem still needs a manual resize before it can use the new space:
# Expand the ext4 filesystem, which is Ubuntu's default
resize2fs /dev/mapper/ubuntu--vg-ubuntu--lv
Note: If your filesystem is XFS instead of ext4, use
xfs_growfs /instead ofresize2fs.
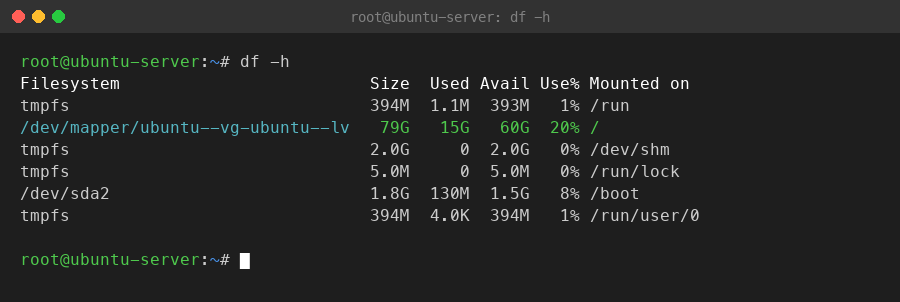
4.6 Verify the result
df -h
You should now see that the root filesystem has grown to the new size, and the available space has increased significantly.
5 Quick command reference
If you already know the workflow, here is the command summary you can run directly, assuming the PVE-side resize has already been done in the Web UI:
# 1. Check disk state
parted -l
fdisk -l

# 2. Expand the partition interactively
cfdisk /dev/sda

# 3. Expand the physical volume
pvresize /dev/sda3

# 4. Expand the logical volume
lvextend -l +100%FREE /dev/mapper/ubuntu--vg-ubuntu--lv

# 5. Expand the filesystem
resize2fs /dev/mapper/ubuntu--vg-ubuntu--lv

# 6. Verify
df -h
6 Common questions
Q1: df -h did not change after resizing?
Check whether you forgot the resize2fs step. lvextend only increases the block device size of the logical volume; the filesystem will not automatically follow.
Q2: pvresize reports Device not found?
Double-check the disk device name. If the VM uses a VirtIO controller, the device may be /dev/vda3 instead of /dev/sda3. Use lsblk to confirm.
Q3: Can I resize while the VM is running?
Yes. Both the PVE-side Resize and the Ubuntu-side LVM operations support online expansion, so there is no need to shut down or reboot. That is one of the main advantages of the LVM + VirtIO setup.
Q4: Can I shrink the disk?
PVE does not support shrinking virtual disks online. If you really need a smaller disk, the usual approach is to create a new smaller disk and migrate the data. That is why initial allocation does not need to be too conservative — expanding is easy, shrinking is hard.
7 Summary
PVE Web UI Resize → cfdisk expand partition → pvresize expand PV → lvextend expand LV → resize2fs expand filesystem
The whole process takes five steps and can be done online without downtime. The PVE + Ubuntu LVM combination makes disk resizing very straightforward: PVE handles the virtual hardware upgrade, while LVM inside Ubuntu adapts the software layer. Once you know this workflow, disk alerts do not have to be stressful anymore — you can finish the job in minutes with zero service interruption.