After Buying a Domain, Use Cloudflare Tunnel to Turn Home Services into Public HTTPS
Short version
The previous two posts covered the cheap-domain part and the Cloudflare DNS part: buy a low-cost
.xyzdomain for personal lab use, then move the domain to Cloudflare for nameservers, DNS, DDNS, email routing, and basic automation. This post continues with the next practical step: use Cloudflare Tunnel to expose an internal web service as a publichttps://hostname. The important point is that visitors use standard HTTPS on port 443, while your home router does not need to forward ports 80 or 443 and your origin IP does not need to be exposed.
This article follows these two posts:
- “Ten Years for 80 Yuan: Why I Prefer 6-Digit
.xyzDomains for Personal Sites”
Original link: https://mp.weixin.qq.com/s/tbefnWGFI0QBFlRVcYjVEw - “Do Not Waste That 80-Yuan Ten-Year Domain: Put It on Cloudflare First”
Original link: https://mp.weixin.qq.com/s/h0o-vtGB_zj1aptaumBztQ
Those posts already covered buying a cheap .xyz domain, moving nameservers to Cloudflare, creating DNS records, using DDNS, and setting up email-related records. This post assumes that your domain is already active on Cloudflare. We will focus on one thing: publishing an internal web service through Cloudflare Tunnel with a clean public HTTPS hostname.
All examples in this article use documentation placeholders such as example.xyz, nas.speedtest.example.xyz, 192.0.2.10, localhost, and <TUNNEL_TOKEN>. No real domain, account, token, zone ID, private network address, or personal information is included.
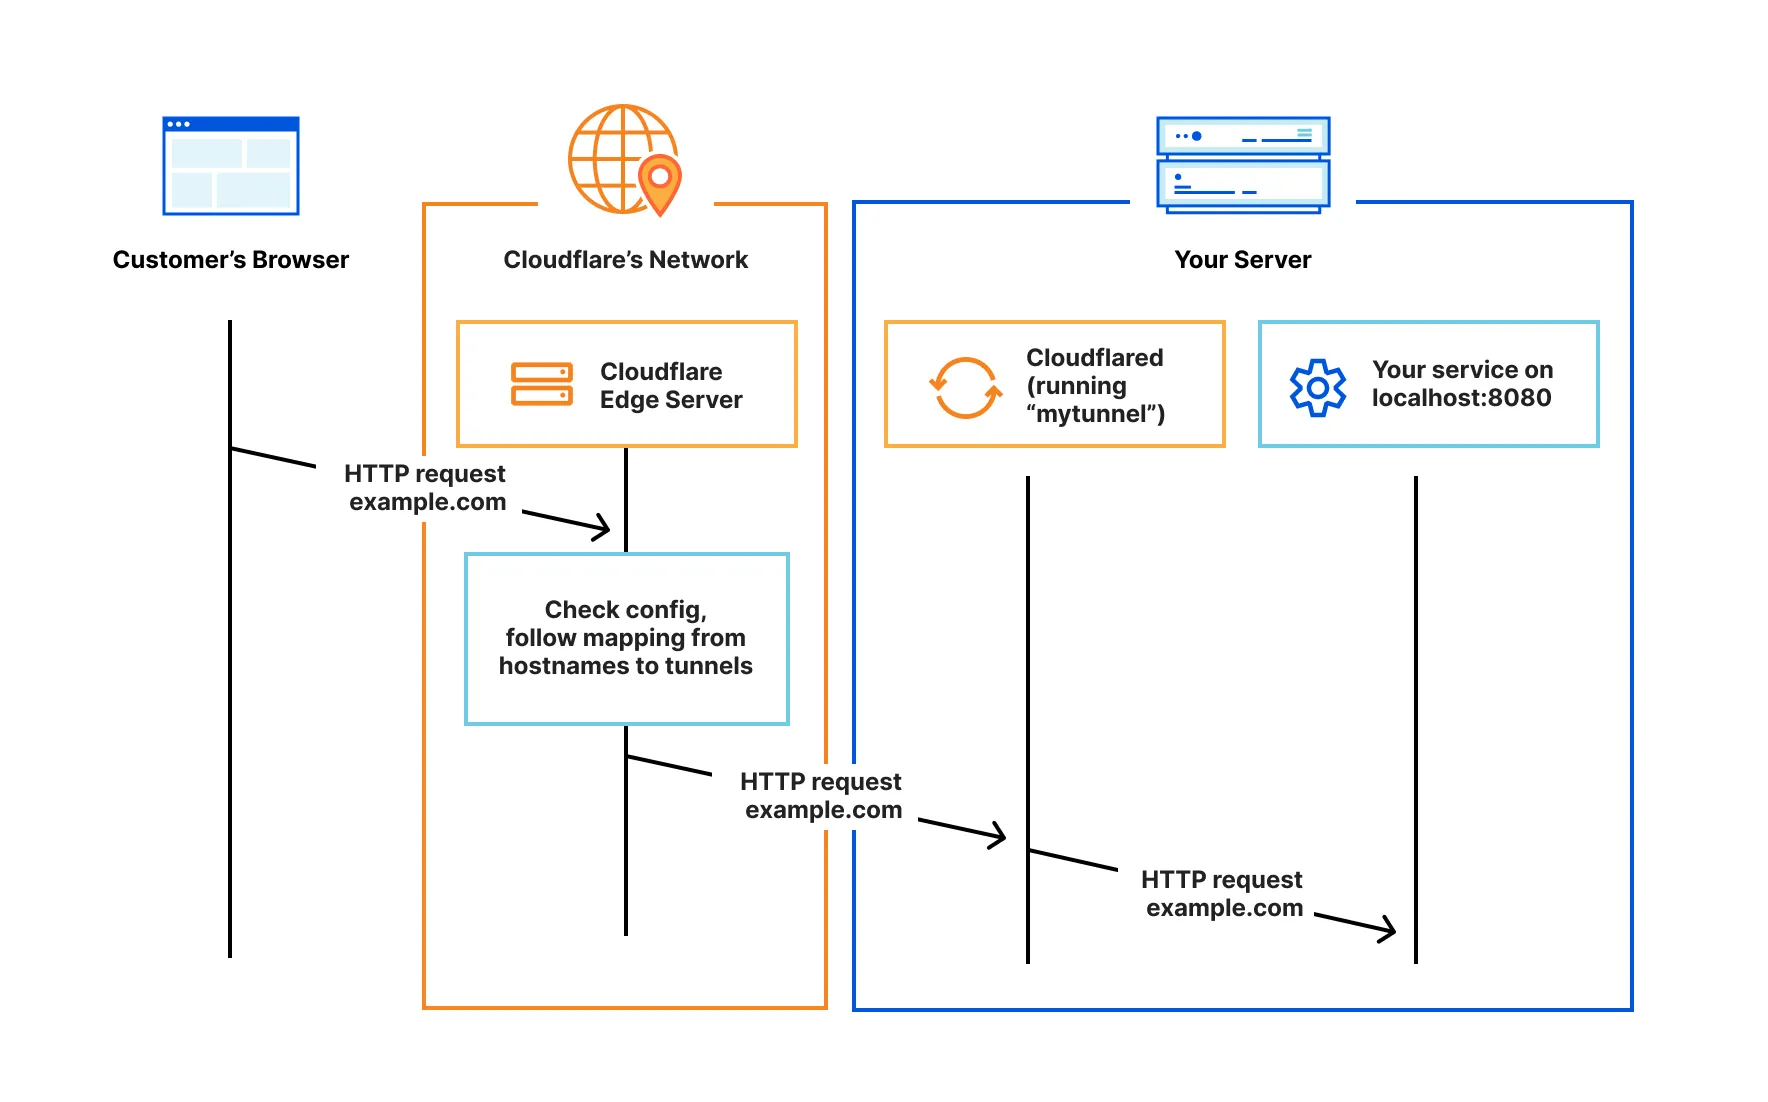
Figure 1: the official Cloudflare Docs “How it works” architecture. Public requests reach Cloudflare first, then return to the origin through outbound connections maintained by cloudflared. Image source: Cloudflare Docs.

Figure 2: visitors connect to Cloudflare over public HTTPS, while cloudflared creates an outbound connection from your internal machine to Cloudflare and forwards requests to the local service.
1. The key value of Cloudflare Tunnel: no public IP required
The key value of Cloudflare Tunnel is that it lets you publish internal web services as public HTTPS hostnames without a public origin IP, router port forwarding, or direct inbound access to your home network. You still need a domain managed by Cloudflare, but your home broadband, NAS, or internal server does not need a fixed public IP address.
A better way to describe the setup is:
Required: a domain already managed by Cloudflare
Not required: a fixed public IPv4 address at home
Not required: router port forwarding for 80 or 443
Not required: exposing the NAS or application origin IP to everyone
Traditional self-hosting usually looks like this: an A record points to your public IP, your router forwards port 443 to an internal reverse proxy, and the reverse proxy sends traffic to your NAS or application. This works, but it depends on several fragile assumptions. You need a public IP. The ISP must not block inbound traffic. Router rules must be correct. Certificates must be renewed. If the IP changes, DDNS must keep up. And the origin is still directly visible.
Cloudflare Tunnel changes the direction of the connection. You run a lightweight connector called cloudflared on an internal machine. That connector dials out to Cloudflare. Visitors access https://nas.speedtest.example.xyz; the request lands on Cloudflare’s edge and is then carried through the tunnel to your local service. From the visitor’s point of view, it is normal HTTPS. From your home network’s point of view, the service can still listen on localhost or a private address.
This is why Tunnel is attractive for home labs, NAS dashboards, Home Assistant, Uptime Kuma, development previews, temporary demos, webhook callbacks, and small internal tools.
2. What Cloudflare Tunnel does
Cloudflare’s documentation describes Tunnel as a way to connect your infrastructure to Cloudflare through the lightweight cloudflared daemon. In practice, you create a tunnel, run cloudflared, and map a public hostname to a local service URL such as http://localhost:8080.
The request path has four simple stages. First, a visitor opens a public hostname such as https://nas.speedtest.example.xyz; DNS and the public HTTPS edge are handled by Cloudflare. Second, Cloudflare matches that hostname to a Tunnel route. Third, the cloudflared connector inside your network has already created outbound long-lived connections to Cloudflare, so Cloudflare does not need to initiate an inbound connection to your home router. Fourth, cloudflared forwards the request to the real local service, such as http://localhost:8080 or http://192.0.2.10:5000.
The important detail is that Cloudflare is not directly dialing your private IP from the public Internet. The internal connector dials out first, and public requests return through that established tunnel. That is why no router port forwarding or fixed public origin IP is required.
In plain terms:
cloudflaredruns inside your home network or server.- It connects out to Cloudflare.
- Cloudflare receives the public HTTPS request and handles the edge certificate.
- You define which public hostname maps to which local service.
- One tunnel can publish multiple hostnames.
It feels like a reverse proxy, but the public reverse-proxy edge is Cloudflare rather than your router. It feels like tunneling, but it is integrated with Cloudflare DNS, HTTPS, Zero Trust, and Access.
There is one practical boundary: this article focuses on HTTP and HTTPS web services. Cloudflare also supports other service types, but non-HTTP services generally require client-side cloudflared or a different Access workflow. For a first setup, stay with normal web applications.
3. When to use it, and when to avoid it
Cloudflare Tunnel is a good fit when:
- You do not have a stable public IPv4 address.
- You do not want to open inbound ports on your router.
- You are publishing web services rather than raw databases or private management ports.
- You want public HTTPS without managing certificates on the home router.
- You want to hide the origin IP.
- You want multiple internal services under one domain structure.
It is not a reason to expose everything. Databases, Redis, router admin pages, hypervisor consoles, and SSH should not be casually published as public hostnames. Tunnel solves the entry path; it does not make an insecure application secure. For NAS panels, monitoring tools, photo libraries, and admin dashboards, add strong authentication and consider Cloudflare Access.

Figure 3: Tunnel simplifies the public entry point, but it does not replace authentication, authorization, audit logs, and backups.
4. Preparation checklist
Before creating the tunnel, check five things.
First, the domain should already be active on Cloudflare. You can verify the nameservers:
dig NS example.xyz +short
Second, the local service must already work from the machine that will run cloudflared:
curl -I http://localhost:8080
curl -I http://192.0.2.10:5000
If the local service is broken, Tunnel cannot fix it.
Third, the connector machine must have outbound Internet access. If it is behind a restrictive firewall, verify that it can reach Cloudflare as required by the official documentation.
Fourth, decide the hostname pattern. I recommend reusing the speedtest hostname idea from the earlier post:
nas.speedtest.example.xyz
photo.speedtest.example.xyz
status.speedtest.example.xyz
ha.speedtest.example.xyz
The point is to put speedtest in the hostname, not only in the path. Hostnames and SNI are visible earlier in the connection flow than an HTTPS path.
Fifth, plan secret handling. The tunnel connector token is sensitive. Do not screenshot it, paste it into public notes, commit it to Git, or bake it into a public script.
5. Recommended path: dashboard-managed tunnels
Cloudflare supports both dashboard-managed tunnels and locally managed CLI tunnels. For most personal setups, the dashboard path is easier:
- Log in to the Cloudflare dashboard.
- Open Zero Trust.
- Go to Networks / Tunnels.
- Create a tunnel.
- Choose the connector environment.
- Copy the install command.
- Run
cloudflaredon the internal machine. - Wait until the tunnel shows
Healthy. - Add a public hostname and map it to a local service.
- Open the final
https://URL.

Figure 4: create a Tunnel in Zero Trust. Use a generic name such as home-lab-web; avoid private device names in public writing.
6. Create the tunnel
The current dashboard path is generally:
Zero Trust -> Networks -> Tunnels -> Create Tunnel
Use a simple name such as:
home-lab-web
nas-tunnel
personal-services
After creation, Cloudflare asks you to choose the connector environment: Linux, Docker, macOS, or Windows. The dashboard then shows an install command containing a long token. In public documentation, always write it as <TUNNEL_TOKEN>.
7. Install and run cloudflared
Cloudflare provides several installation options. Linux can use the Cloudflare package repository or direct binary packages. macOS can use Homebrew. Windows can use winget. Docker has an official image.
For Linux systemd, the dashboard-managed route often looks like:
sudo cloudflared service install <TUNNEL_TOKEN>
sudo systemctl status cloudflared
Logs are useful when debugging:
journalctl -u cloudflared -f
For Docker Compose:
services:
  cloudflared:
    image: cloudflare/cloudflared:latest
    container_name: cloudflared
    restart: unless-stopped
    command: tunnel --no-autoupdate run --token ${TUNNEL_TOKEN}
    environment:
      - TZ=Asia/Shanghai
And .env:
TUNNEL_TOKEN=<TUNNEL_TOKEN>
Start it:
docker compose up -d
docker logs -f cloudflared
Do not commit .env. Also make sure the container can reach the service you want to publish. If the app is another container, use the Docker network and service name. If it is on the host or another internal machine, test the exact address from inside the connector environment.

Figure 5: systemd and Docker are both suitable for long-running cloudflared; the connector should restart automatically and keep its token private.
8. Wait for Healthy
After cloudflared starts, return to the Tunnel page. The tunnel should become Healthy. If it does not, fix the connector before touching DNS or public hostnames.
Check:
- Is the token complete?
- Is the system clock correct?
- Does the machine have outbound Internet access?
- Is the Docker container restarting?
- Do the logs show authentication or network errors?
- Is an outbound firewall blocking the connector?
A public hostname is useful only after the connector is online.
9. Add a public hostname
Open the tunnel and add a route or public hostname. Suppose the local service is on localhost:8080:
Subdomain: nas.speedtest
Domain: example.xyz
Path: leave empty
Service Type: HTTP
Service URL: http://localhost:8080
The public URL becomes:
https://nas.speedtest.example.xyz
If the service runs on another internal machine, use its private address:
Service URL: http://192.0.2.10:5000
If the origin service is already HTTPS, you can use an HTTPS service URL. Be careful with self-signed certificates and mismatched certificate names. For first-time setups, internal HTTP is often simpler: the visitor still gets public HTTPS to Cloudflare, and the connector carries the request to the local origin.

Figure 6: the public hostname maps the external HTTPS name to the local service URL.
When you create a route through the dashboard, Cloudflare can automatically create the DNS record pointing the hostname to the tunnel target. Locally managed tunnels can also create the CNAME with cloudflared tunnel route dns.
10. Why I like *.speedtest hostnames
The earlier NAS article discussed an empirical trick: putting speedtest in the hostname can sometimes improve external access on certain home broadband paths. It is not a promise and not a standard. It is simply cheap to test.
Recommended:
nas.speedtest.example.xyz
photo.speedtest.example.xyz
status.speedtest.example.xyz
Less useful if the goal is hostname-level signaling:
example.xyz/speedtest/nas

Figure 7: put speedtest in the hostname if you want to test this naming effect; a path segment is not the same signal.
Keep the claim modest. Configure both nas.example.xyz and nas.speedtest.example.xyz, point them to the same service, and test the same file or page from the same network. If the result is better, keep it. If not, do not build a theory around it.
11. A complete minimal example
Local service:
curl -I http://localhost:8080
Target public URL:
https://demo.speedtest.example.xyz
Steps:
- Create a tunnel named
home-lab-web. - Select Linux or Docker and copy the connector command.
- Run
cloudflaredon the internal machine. - Confirm
Healthyin the dashboard. - Add a public hostname:
Subdomain: demo.speedtest
Domain: example.xyz
Service Type: HTTP
Service URL: http://localhost:8080
- Test:
curl -I https://demo.speedtest.example.xyz
A 200, 301, 302, or another expected application status means the main path is working. Then test the browser, login flow, static assets, uploads, and WebSocket behavior.
12. Locally managed CLI tunnels
If you prefer local configuration files, the CLI workflow looks like this:
cloudflared tunnel login
cloudflared tunnel create home-lab-web
cloudflared tunnel list
Configuration file:
tunnel: <Tunnel-UUID>
credentials-file: /root/.cloudflared/<Tunnel-UUID>.json

ingress:
  - hostname: demo.speedtest.example.xyz
    service: http://localhost:8080
  - hostname: nas.speedtest.example.xyz
    service: http://192.0.2.10:5000
  - service: http_status:404
Create DNS routes:
cloudflared tunnel route dns home-lab-web demo.speedtest.example.xyz
cloudflared tunnel route dns home-lab-web nas.speedtest.example.xyz
Run:
cloudflared tunnel run home-lab-web
Install as a service when ready:
cloudflared service install
systemctl start cloudflared
systemctl status cloudflared
The CLI path is clean and versionable, but it is easier to stumble on certificate files, credential paths, config paths, and systemd user directories. The official documentation notes that running service installation with sudo may change $HOME to /root; if your config is under a normal user’s home directory, pass the config path explicitly.
13. Token, Tunnel ID, and DNS CNAME
Do not confuse these three.
The connector token is sensitive and is used by cloudflared to connect to your tunnel.
The Tunnel ID is a UUID. It is used to form the <UUID>.cfargotunnel.com target.
The DNS CNAME maps your hostname to that target:
CNAME demo.speedtest.example.xyz -> <UUID>.cfargotunnel.com
Cloudflare documents that the cfargotunnel.com subdomain only proxies traffic for DNS records in the same Cloudflare account. Knowing the UUID is not the same as having the connector token.

Figure 8: the token belongs to the connector, the Tunnel ID appears in the CNAME target, and the public hostname maps users to the local service.
14. Verification checklist
Debug by layers.
Local service:
curl -I http://localhost:8080
Connector:
systemctl status cloudflared
journalctl -u cloudflared -n 100 --no-pager
or Docker:
docker ps
docker logs --tail=100 cloudflared
DNS:
dig CNAME demo.speedtest.example.xyz +short
Public HTTPS:
curl -I https://demo.speedtest.example.xyz

Figure 9: check the local service, connector, Cloudflare tunnel state, DNS record, public HTTPS, and application behavior separately.
Common symptoms:
1016: DNS points to a tunnel but Cloudflare cannot reach a usable origin.502or1033: connector or service URL problem; check protocol, port, and local service state.- Certificate errors: often caused by HTTPS origins with self-signed or mismatched certificates.
- Page loads but assets fail: base URL, reverse proxy path, or application-generated URLs are wrong.
- Login loops: cookie domain, SameSite, HTTPS detection, or reverse proxy headers may be wrong.
15. Do you still need Nginx, Caddy, Lucky, or Traefik?
Not always. For one service, Tunnel can point directly to it:
demo.speedtest.example.xyz -> http://localhost:8080
If you already run an internal reverse proxy, keep it:
Cloudflare Tunnel -> Caddy / Nginx -> NAS / App / Dashboard
This centralizes local routing, but adds one more layer to debug. For the first test, point Tunnel directly at a simple service. After it works, integrate your internal reverse proxy.
Preserve the Host header when applications depend on the external hostname. OAuth callbacks, generated links, WebSocket upgrades, and cookie settings often depend on correct external URL detection.
16. Security notes
Tunnel does not make weak applications safe. Anything public will eventually be scanned.
At minimum:
- Use strong passwords and two-factor authentication.
- Do not publish router admin pages, hypervisors, databases, or Redis directly.
- Put NAS, photo libraries, and monitoring tools behind Cloudflare Access.
- Publish only necessary hostnames and paths.
- Update applications, NAS firmware, Docker images, and
cloudflared. - Rotate or delete tokens if they are exposed.
- Keep backups; Tunnel is not a backup strategy.
Cloudflare Access is especially useful for personal-only services. It can require an identity check before the request reaches your application.
17. Compared with DDNS, port forwarding, and FRP
DDNS solves changing IP addresses, but still assumes that inbound access to your public IP is possible.
Port forwarding is simple, but it exposes the origin and depends on ISP and router behavior.
FRP and similar tools work well when you operate your own public relay server.
Cloudflare Tunnel is different because it combines domain, HTTPS, tunnel, edge protection, and optional access control in the Cloudflare ecosystem. If your domain is already on Cloudflare, the incremental cost and complexity are low.
The trade-off is dependency on Cloudflare’s network. Performance varies by region and ISP, especially in China. Keep a fallback path for important services.
18. Recommended rollout order
For a first deployment:
- Start with a low-risk web service.
- Create one dashboard-managed tunnel.
- Run
cloudflaredwith Docker or systemd. - Add
demo.speedtest.example.xyz. - Test with
curl -Iand a browser. - Add NAS, photos, or Home Assistant only after the first service is stable.
- Add Cloudflare Access for admin-like services.
- Keep both a normal hostname and a
speedtesthostname for comparison. - Document your naming pattern and token handling.
- Periodically check tunnel health, logs, and updates.
Do not publish everything at once. Tunnel makes publishing easy; that is exactly why the scope should stay deliberate.
19. A practical hostname template
For example.xyz:
status.example.xyz              public status page
blog.example.xyz                static blog or public page
demo.speedtest.example.xyz      temporary demo
nas.speedtest.example.xyz       NAS web entry, preferably behind Access
photo.speedtest.example.xyz     photo library, preferably behind Access
ha.speedtest.example.xyz        Home Assistant, preferably behind Access
admin.example.xyz               not recommended as a naked public service
For comparison tests:
nas.example.xyz
nas.speedtest.example.xyz
Point both to the same tunnel and service URL, then test the same resource from the same network.
20. Conclusion
The first post solved the cost problem: a cheap .xyz domain is enough for many personal lab scenarios. The second post solved the control-plane problem: put the domain on Cloudflare for DNS, DDNS, email routing, and automation.
Cloudflare Tunnel solves the next problem: how to make an internal web service reachable over public HTTPS without a public origin IP and without router port forwarding.
The minimal formula is:
Cloudflare-managed domain
+ one Tunnel
+ one cloudflared connector
+ one public hostname
+ one local web service
= one public HTTPS URL
Add a speedtest hostname if you want to test the path behavior discussed in the earlier NAS article. But keep expectations realistic and verify with real comparisons.
Most importantly, keep the security boundary clear. Tunnel makes the entry point simple. It does not remove the need for authentication, access control, logs, updates, and backups. Use it with restraint and it becomes one of the most valuable things you can do with a cheap long-term personal domain.
Sources and references
- Cloudflare Tunnel documentation: https://developers.cloudflare.com/tunnel/
- Cloudflare Tunnel Setup: https://developers.cloudflare.com/tunnel/setup/
- Cloudflare Tunnel Routing: https://developers.cloudflare.com/tunnel/routing/
- cloudflared Downloads: https://developers.cloudflare.com/tunnel/downloads/
- Locally managed tunnel and Linux service docs: https://developers.cloudflare.com/tunnel/advanced/local-management/create-local-tunnel/ and https://developers.cloudflare.com/tunnel/advanced/local-management/as-a-service/linux/
- Previous domain article: https://mp.weixin.qq.com/s/tbefnWGFI0QBFlRVcYjVEw
- Previous Cloudflare domain article: https://mp.weixin.qq.com/s/h0o-vtGB_zj1aptaumBztQ
- Previous speedtest hostname article: https://mp.weixin.qq.com/s/7Jz6us_o2TafY9TovlwOPA