Forget Bloated VPNs! Step-by-Step EasyTier Setup on Ubuntu 26.04 for a Decentralized Virtual LAN
TL;DR
In today’s multi-device environment, virtual private networking has become an absolute necessity. While classic tools like ZeroTier and Tailscale are excellent, they are fundamentally constrained by centralized controllers and overseas relay servers, leading to slow handshakes and lower NAT hole-punching success rates. On the other hand, self-hosting frp or nps requires a public IP address, and all traffic must pass through the proxy server, severely limiting bandwidth.
EasyTier is a completely decentralized virtual LAN tool written in Rust. Its defining feature is peer symmetry (peer-to-peer equivalence). Once nodes are introduced, they maintain stable P2P communication even if the initial bootstrap/relay server goes offline. Even more exciting, it natively supports subnet proxying (network-to-network) and a built-in WireGuard portal. This step-by-step guide will walk you through installing, configuring, and managing the latest EasyTier via Systemd on the newly released Ubuntu 26.04 LTS.
All configurations, commands, and network topologies in this article use generic placeholders and do not contain any real private or sensitive information.
1. Why Choose EasyTier?
After experimenting with various remote networking options, EasyTier stands out for several reasons:
- Fully Decentralized: No hard dependency on centralized cloud consoles. All nodes are equal peers.
- Fast Hole Punching & High Performance: Powered by Rust and the Tokio asynchronous runtime, EasyTier delivers stellar network performance with minimal CPU and memory footprints. In networks supporting FullCone NAT, its P2P success rate is remarkably high. Even when direct connections fail, traffic is seamlessly relayed via self-hosted or community bootstrap nodes.
- Ultra-Simple Deployment: Provided as a statically-linked single binary with zero dynamic library dependencies. Just unzip and run.
- Rich Set of Features:
- Subnet Proxy: Allows a node to share its entire physical local subnet (e.g.,
192.168.1.0/24) with all other virtual nodes, avoiding the need to install clients on every single device. - Built-in WireGuard Support: An EasyTier node can act as a WireGuard gateway, enabling mobile devices like iPhones or Androids to join the virtual network using native WireGuard applications.
- Subnet Proxy: Allows a node to share its entire physical local subnet (e.g.,
Below are the official GUI configuration page and status visualization examples:
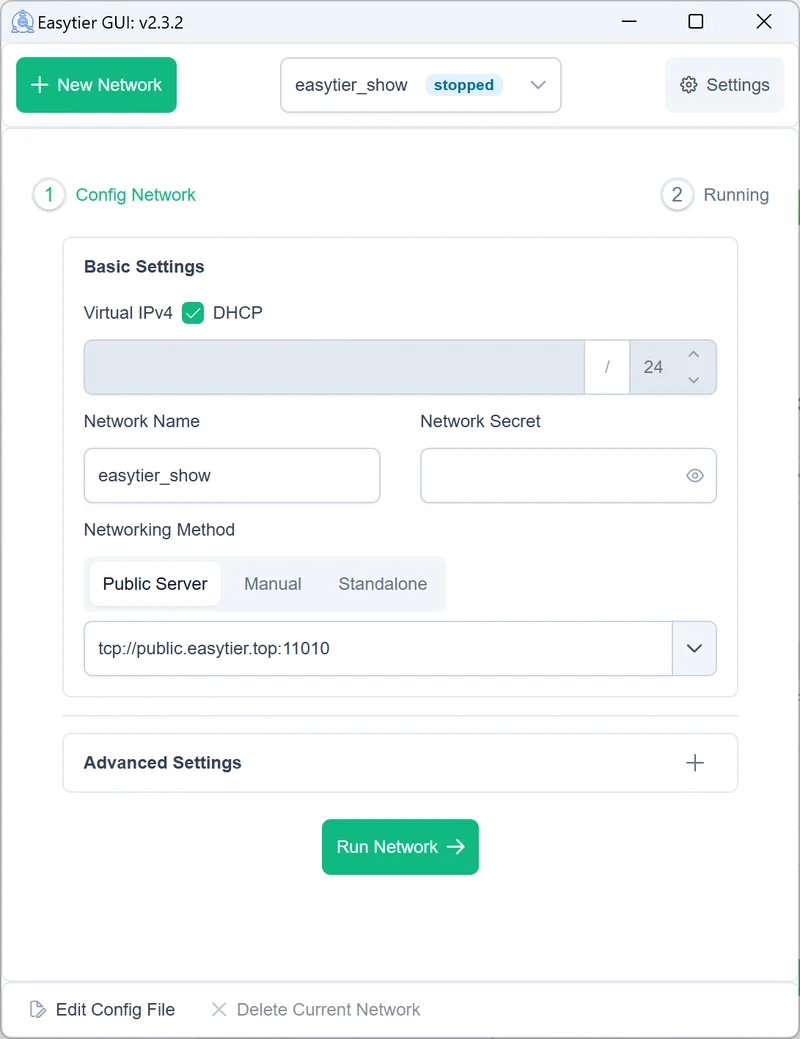
Figure 1: EasyTier official client configuration interface
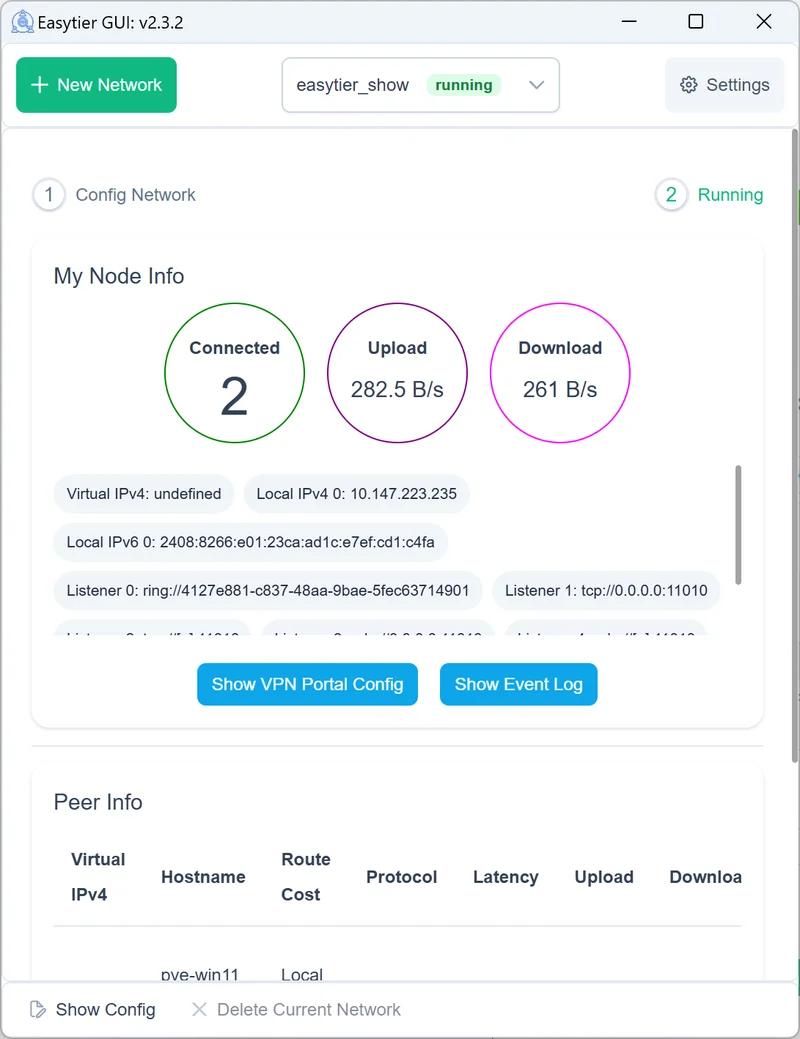
Figure 2: EasyTier official client connection state overview
2. Prerequisites & Network Parameters
Before starting, ensure your Ubuntu 26.04 instance has internet access. If your machine is behind a strict firewall, ensure it is at least allowed to initiate outbound UDP and TCP connections.
For the purpose of this tutorial, we will use the following hypothetical network plan:
- Virtual Network Subnet:
10.144.144.0/24 - Ubuntu 26.04 Virtual IP:
10.144.144.1 - Peer Device Virtual IP:
10.144.144.2 - Network Name:
my_secure_net - Network Secret:
my_super_secret_password
3. Installing EasyTier on Ubuntu 26.04
On Ubuntu 26.04, we can install EasyTier using the official one-click script or by manually downloading the compiled binary. Using the quick script is highly recommended since it automatically configures Systemd services.
Method 1: Using the Official Shell Script (Recommended)
Run the following command in your terminal:
curl -fsSL "https://github.com/EasyTier/EasyTier/blob/main/script/install.sh?raw=true" | sudo bash -s install
Note: If you run into network timeout issues due to local firewalls or rate limits, the script will automatically fallback to a GitHub proxy mirror (such as
ghfast.top) to download the release package.
The script automates the following steps:
- Detects your CPU architecture (e.g.,
x86_64oraarch64). - Downloads the latest zip package from GitHub Releases.
- Extracts the executables to
/opt/easytier/. - Creates a default, template configuration file at
/opt/easytier/config/default.conf. - Creates a template Systemd service file
/etc/systemd/system/easytier@.service. - Installs symlinks
/usr/sbin/easytier-coreand/usr/sbin/easytier-cliin your PATH. - Installs and starts the
easytier@defaultservice.
Once the script finishes, check that the installation succeeded by running:
easytier-core --version
easytier-cli --version
Method 2: Manual Binary Installation
If you prefer full control, you can fetch and unpack the binaries manually.
- Go to the EasyTier GitHub Releases page to locate the latest download link (e.g.,
v2.1.3). - Download and unpack:
wget https://github.com/EasyTier/EasyTier/releases/download/v2.1.3/easytier-linux-x86_64-v2.1.3.zip unzip easytier-linux-x86_64-v2.1.3.zip -d /opt/easytier - Set permissions and create system links:
chmod +x /opt/easytier/easytier-core /opt/easytier/easytier-cli
sudo ln -s /opt/easytier/easytier-core /usr/sbin/easytier-core
sudo ln -s /opt/easytier/easytier-cli /usr/sbin/easytier-cli
4. Understanding the EasyTier Configuration File
If you used the installation script, the configuration directory is located at /opt/easytier/config/. The script registers a parameterized Systemd unit (easytier@.service), meaning you can run multiple independent EasyTier configurations concurrently.
For example, /opt/easytier/config/default.conf map to the easytier@default.service system daemon. If you create a new configuration /opt/easytier/config/office.conf, you can start it by running systemctl start easytier@office.
Here is a comprehensive /opt/easytier/config/default.conf configuration template designed for production use. You can edit it using your favorite text editor:
# A descriptive name to identify this specific local instance
instance_name = "default"

# The virtual IPv4 address assigned to this node. Set to "" if using DHCP.
# Here we assign the static IP 10.144.144.1 with a 24-bit subnet mask
ipv4 = "10.144.144.1"

# Automatically request an IP from the virtual network's DHCP server
dhcp = false

# Listen addresses for incoming connections. Supports UDP, TCP, WG, and WebSockets.
listeners = [
    "tcp://0.0.0.0:11010",
    "udp://0.0.0.0:11010",
    "wg://0.0.0.0:11011",
    "ws://0.0.0.0:11011/",
    "wss://0.0.0.0:11012/",
]

# Static peer nodes used as entry points to bootstrap your virtual network.
# If you don't run a public VPS, use the community/official shared server:
[[peer]]
uri = "tcp://public.easytier.top:11010"

# Virtual network credentials. Only nodes matching these values can communicate.
[network_identity]
network_name = "my_secure_net"
network_secret = "my_super_secret_password"

# Operational flags and performance tweaks
[flags]
# Preferred transport protocol. Falls back to tcp if udp is blocked.
default_protocol = "udp"
# Custom virtual network interface name (defaults to et_xxxx if empty)
dev_name = ""
# Enable AES-GCM data encryption
enable_encryption = true
# Enable IPv6 capability
enable_ipv6 = true
# Maximum Transmission Unit (MTU), usually 1380-1420 works best
mtu = 1380
# Minimize latency by selecting routes based on physical ping
latency_first = false
# Act as an exit node for virtual network traffic
enable_exit_node = false
# Run in peer/relay mode without creating a TUN virtual interface
no_tun = false
# Restrict nodes to only establish direct P2P connections
p2p_only = false
Save and close the file.
5. Systemd Daemon Administration
To ensure EasyTier runs continuously as a stable background daemon on Ubuntu, we utilize Systemd.
The installation script writes the service template to /etc/systemd/system/easytier@.service. Let’s inspect it:
# /etc/systemd/system/easytier@.service
[Unit]
Description=EasyTier Service (Instance %i)
Wants=network.target
After=network.target network.service
StartLimitIntervalSec=0

[Service]
Type=simple
WorkingDirectory=/opt/easytier
ExecStart=/opt/easytier/easytier-core -c /opt/easytier/config/%i.conf
Restart=always
RestartSec=1s

[Install]
WantedBy=multi-user.target
5.1 Service Control Commands
After updating /opt/easytier/config/default.conf, execute these commands to launch the service:
# Reload the Systemd daemon to pick up configuration changes
sudo systemctl daemon-reload

# Enable and start the 'default' configuration instance
sudo systemctl enable easytier@default --now
5.2 Checking Service Status
Confirm that the service is running successfully:
sudo systemctl status easytier@default
If the console shows active (running), EasyTier is successfully running in the background.
5.3 Configuring the UFW Firewall
EasyTier listens on port 11010 (UDP and TCP) by default. If your Ubuntu firewall (UFW) is active, make sure you allow traffic on this port. Otherwise, direct P2P connections will fail, forcing all traffic to go through slow relay servers.
sudo ufw allow 11010/tcp
sudo ufw allow 11010/udp
sudo ufw reload
6. Verifying Connectivity and CLI Usage
EasyTier bundles a comprehensive command-line client called easytier-cli that allows you to inspect current connections, network paths, and active routing.
6.1 View Local Node State
Inspect the configuration and ID of your active local node:
easytier-cli node
6.2 View Active Peers
Once you set up another node (like a Windows desktop or another Linux system) using the exact same network_name and network_secret pointing to the same bootstrap server, both nodes will establish direct handshakes within seconds.
Verify this by running:
easytier-cli peer
You should see output similar to this:
| ipv4         | hostname       | cost  | lat_ms | loss_rate | rx_bytes | tx_bytes | tunnel_proto | nat_type | id         | version         |
| ------------ | -------------- | ----- | ------ | --------- | -------- | -------- | ------------ | -------- | ---------- | --------------- |
| 10.144.144.1 | ubuntu-2604    | Local | *      | *         | *        | *        | udp          | FullCone | 439804259  | 2.1.3-70e69a38~ |
| 10.144.144.2 | win-desktop    | p2p   | 5.12   | 0         | 112.3 kB | 94.4 kB  | udp          | FullCone | 390879727  | 2.1.3-70e69a38~ |
If the cost column displays p2p, your nodes have successfully established a direct peer-to-peer UDP link. All data travels directly between your devices, bypassing intermediate relay servers for absolute maximum speed.
6.3 View Network Routing Table
easytier-cli route
This details the paths to all nodes inside your virtual private network.

Figure 3: easytier-cli output showing active routes and proxy_cidrs
7. Advanced Network Architectures
Beyond standard device-to-device configurations, EasyTier offers several advanced networking options.
7.1 Subnet Proxy (Site-to-Site LAN Bridging)
If you want to share a local physical network segment (such as 192.168.1.0/24 behind your Ubuntu 26.04 node) with all other remote virtual nodes (allowing them to access local NAS, printers, etc., without installing EasyTier on those local systems), configure a Subnet Proxy:
Add the local network definition to your config file:
# Inside [flags] or in the global scope of default.conf
# Share the local 192.168.1.0/24 network segment
proxy_cidrs = [ "192.168.1.0/24" ]
Save and restart the daemon:
sudo systemctl restart easytier@default
All peers in the virtual LAN (e.g., 10.144.144.2) will automatically inherit a route routing 192.168.1.0/24 packets through 10.144.144.1.
Note: For this to work, IP forwarding must be enabled on the Ubuntu node. Enable temporarily:
echo 1 | sudo tee /proc/sys/net/ipv4/ip_forwardEnable permanently: Edit/etc/sysctl.conf, uncommentnet.ipv4.ip_forward=1, then runsudo sysctl -p.
7.2 Built-in WireGuard Portal (Mobile Client Integration)
EasyTier does not offer dedicated iOS or Android apps, but it includes an outstanding WireGuard Portal feature. The Ubuntu EasyTier instance acts as a WireGuard server, allowing standard WireGuard mobile clients to join the virtual LAN.
Update your configuration listeners list:
# Add the wg listener port and assignment pool
listeners = [
    "tcp://0.0.0.0:11010",
    "udp://0.0.0.0:11010",
    "wg://0.0.0.0:11013/10.14.14.0/24",  # Allocate 10.14.14.0/24 to WireGuard mobile peers
]
Restart the service:
sudo systemctl restart easytier@default
Generate the peer configuration for your mobile device:
easytier-cli vpn-portal
The terminal will print out a standard WireGuard peer configuration template. Simply import it into your mobile app or encode it as a QR code for quick setup:
[Interface]
PrivateKey = <ClientPrivateKey>
Address = 10.14.14.2/24
DNS = 1.1.1.1

[Peer]
PublicKey = <ServerPublicKey>
Endpoint = <YOUR_PUBLIC_IP_OR_DOMAIN>:11013
AllowedIPs = 10.144.144.0/24, 192.168.1.0/24
PersistentKeepalive = 25
8. Troubleshooting & Performance Tips
8.1 P2P connection fails, status says ‘relay’?
- Firewall issue: Confirm UDP and TCP ports (
11010) are wide open on the host machine. - Symmetric NATs: If both endpoints are behind symmetric NAT firewalls, direct UDP hole punching is difficult. Solve this by routing through a self-hosted VPS bootstrap node, or enabling UPnP on your local routers.
8.2 High Latency or Packet Loss?
- Change transport protocols. Force TCP or WebSockets inside the config file
flagsblock if your internet service provider (ISP) limits or throttles UDP traffic. - Enable
latency_first = trueto force low-latency routes at the expense of higher network control bandwidth.
9. Conclusion
EasyTier is a state-of-the-art virtual private networking solution. Thanks to its decentralized architecture, subnet proxy capabilities, and WireGuard bridge portal, it resolves many of the pain points of modern SD-WAN technologies. When combined with a stable Ubuntu 26.04 LTS base, EasyTier is an ideal tool for home servers, remote system administration, development environments, and gaming.
Deploy your EasyTier virtual LAN today! If you have any questions or encounter issues during configuration, let us know in the comments below.