Online expansion of Ubuntu/CentOS disk root directory & modification of partition inode number
When Ubuntu is used as a server system, the system disk may not have enough space. If apt apt is used, the root directory will be full. Granted, adding a disk/partition and mounting it is a solution, but it doesn’t solve all problems (like apt). At the same time, some servers running on cloud platforms do not have good means of operating disks offline. At this time, online expansion is extremely necessary.
**Data is priceless! Before performing any operations on the disk, be sure to make a backup! **
0. Brief operation steps
#系统分区扩容
parted -l
fdisk -l
cfdisk

#扩容块(sda3)
lsblk
pvresize /dev/sda3
lsblk

#扩容lv和vg(Ubuntu)
lvextend -l +100%FREE /dev/mapper/ubuntu--vg-ubuntu--lv
resize2fs /dev/mapper/ubuntu--vg-ubuntu--lv
df -h

#扩容lv和vg(CentOS)
lvextend -l +100%FREE /dev/mapper/centos-root
resize2fs /dev/mapper/centos-root
df -h
1. Online expansion of disk root directory
Operating environment: Proxmox VE virtualization / Ubuntu 22.04.5 LTS / GPT partition table / ext4 partition
1.1 Increase physical disk capacity
There is nothing much to say about this part. The virtual machine can be modified in the settings, and the cloud platform can be modified in the corresponding platform. After modification, Ubuntu should be able to recognize the new capacity directly.
1.2 Merge capacity into partitions
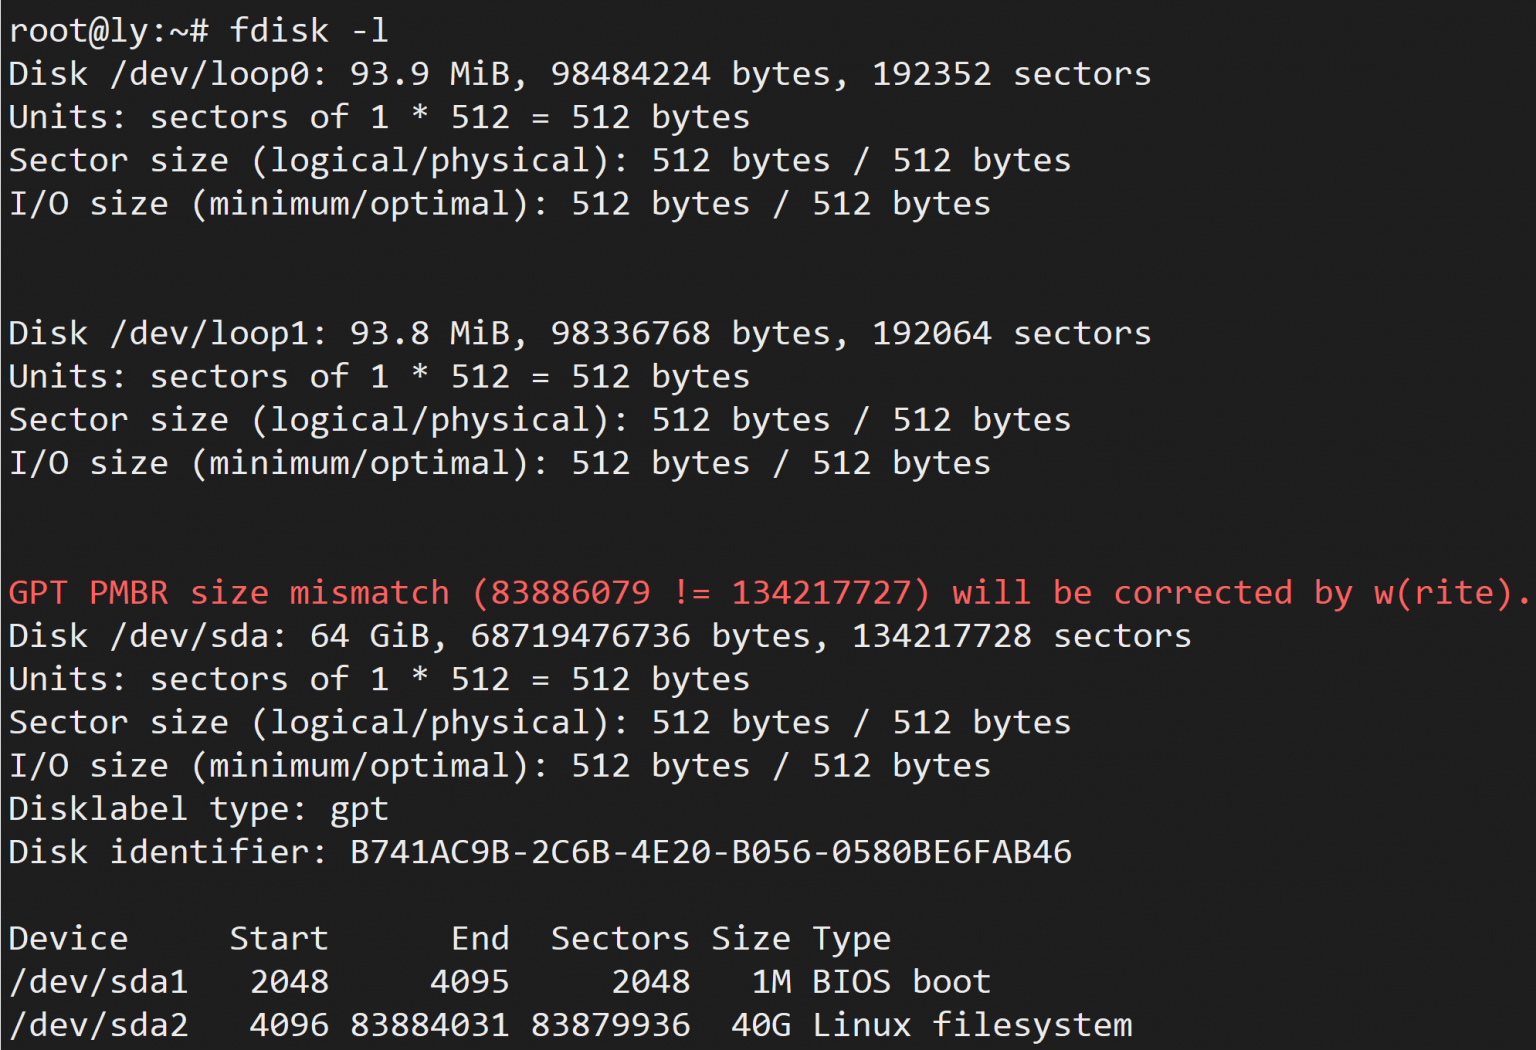
First run the fdisk -l command to see if the disk capacity is recognized:
As you can see from the picture above, the disk capacity has been correctly identified as 64GiB, but the disk capacity recorded in the partition table is still 40GiB before expansion (see the red prompt, the error has been identified), and the partition size is also the same 40G.
1.3 Repair partition table
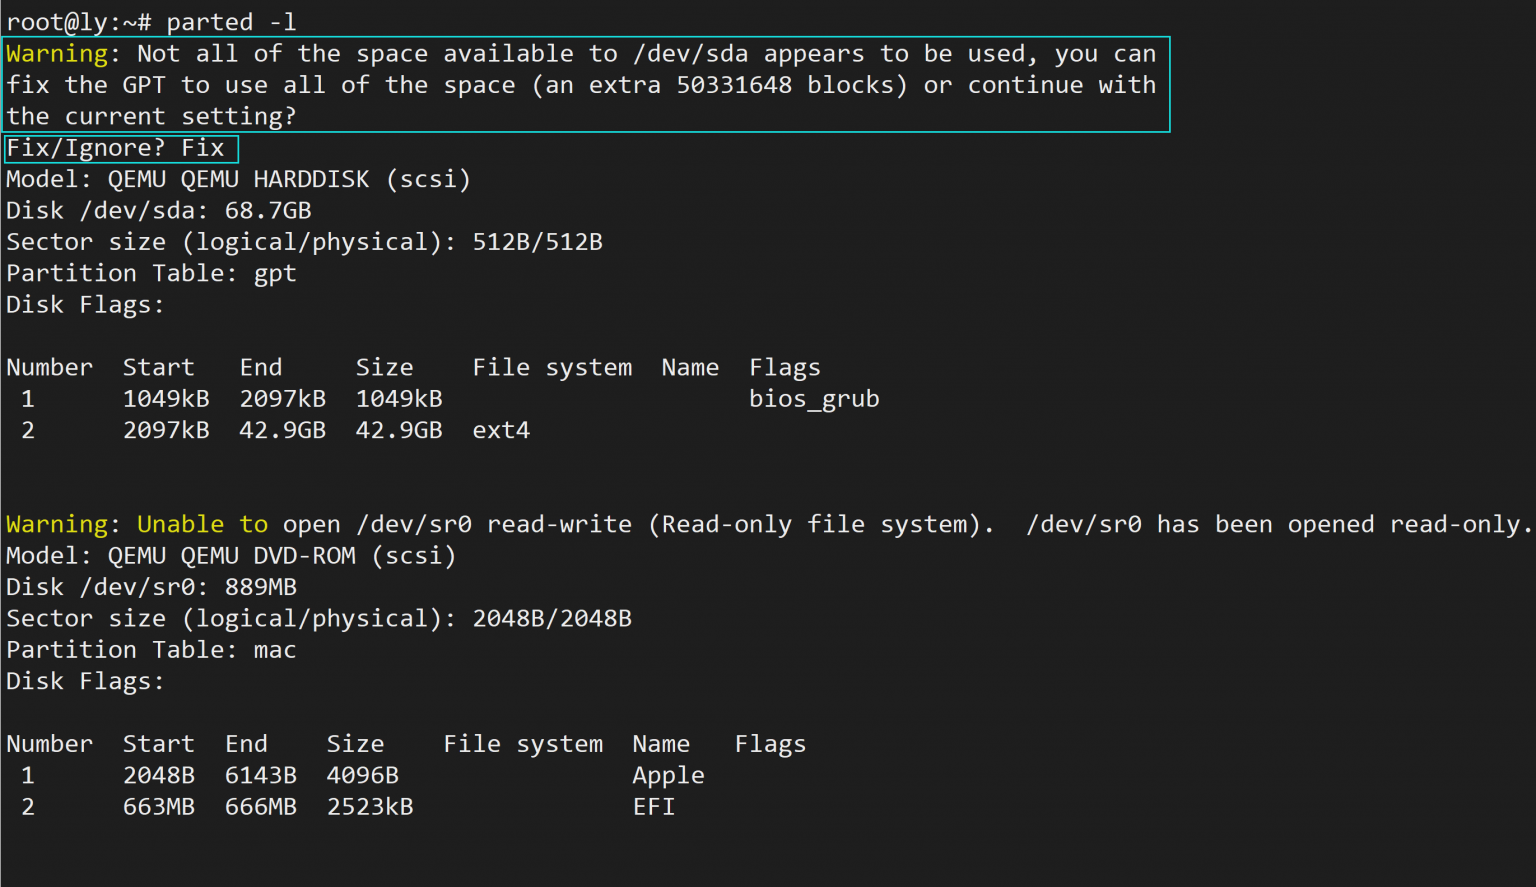
Run parted -l to view the partition status.
parted will immediately prompt that the disk space is not fully used. Enter Fix here and press Enter to repair the GPT partition table.
As you can see from the picture above, the disk capacity recorded in the partition table is normal.
1.3.1 Check and recharge
Run the lsblk command to see the changes
Run the pvresize /dev/sda3 command to “recharge” the increased capacity of partition into the PV
1.4 Expanding partitions
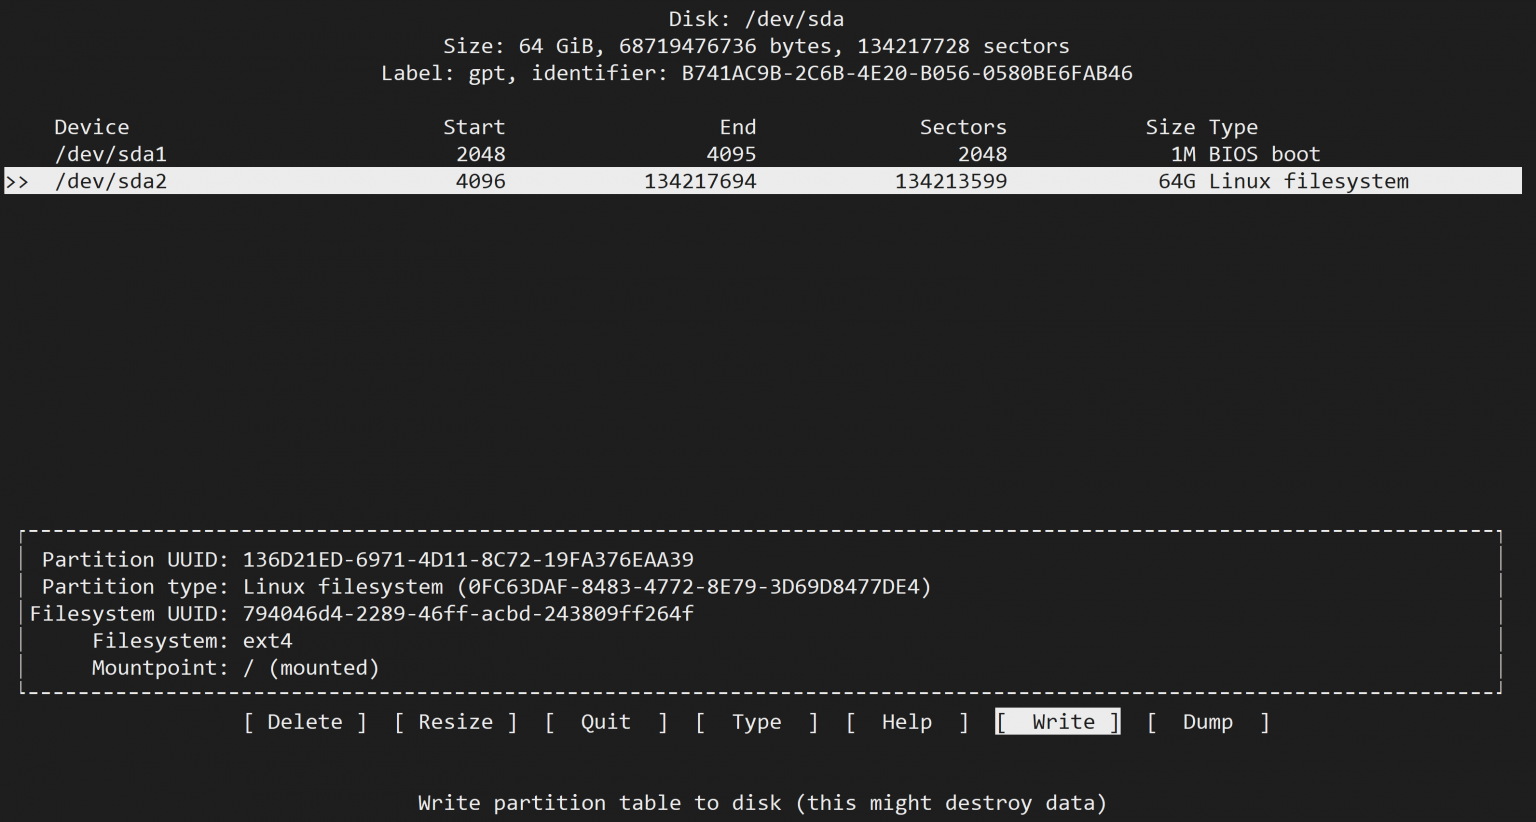
Now you can merge the free disk capacity into the partition. Here we use cfdisk, which has a more friendly interface and operation.
Press the up and down keys to select the partition to be expanded, then press the left and right keys to select the Resize operation and press Enter. cfdisk should automatically fill in the total capacity of this partition and unallocated space. You can also enter the expanded size yourself and press Enter.
The sda2 partition in the picture below has been changed to 64G, and the partition expansion is completed. But at this point all operations are done in memory only and we need to select Write to save the changes to the partition table. Exit cfdisk after writing.
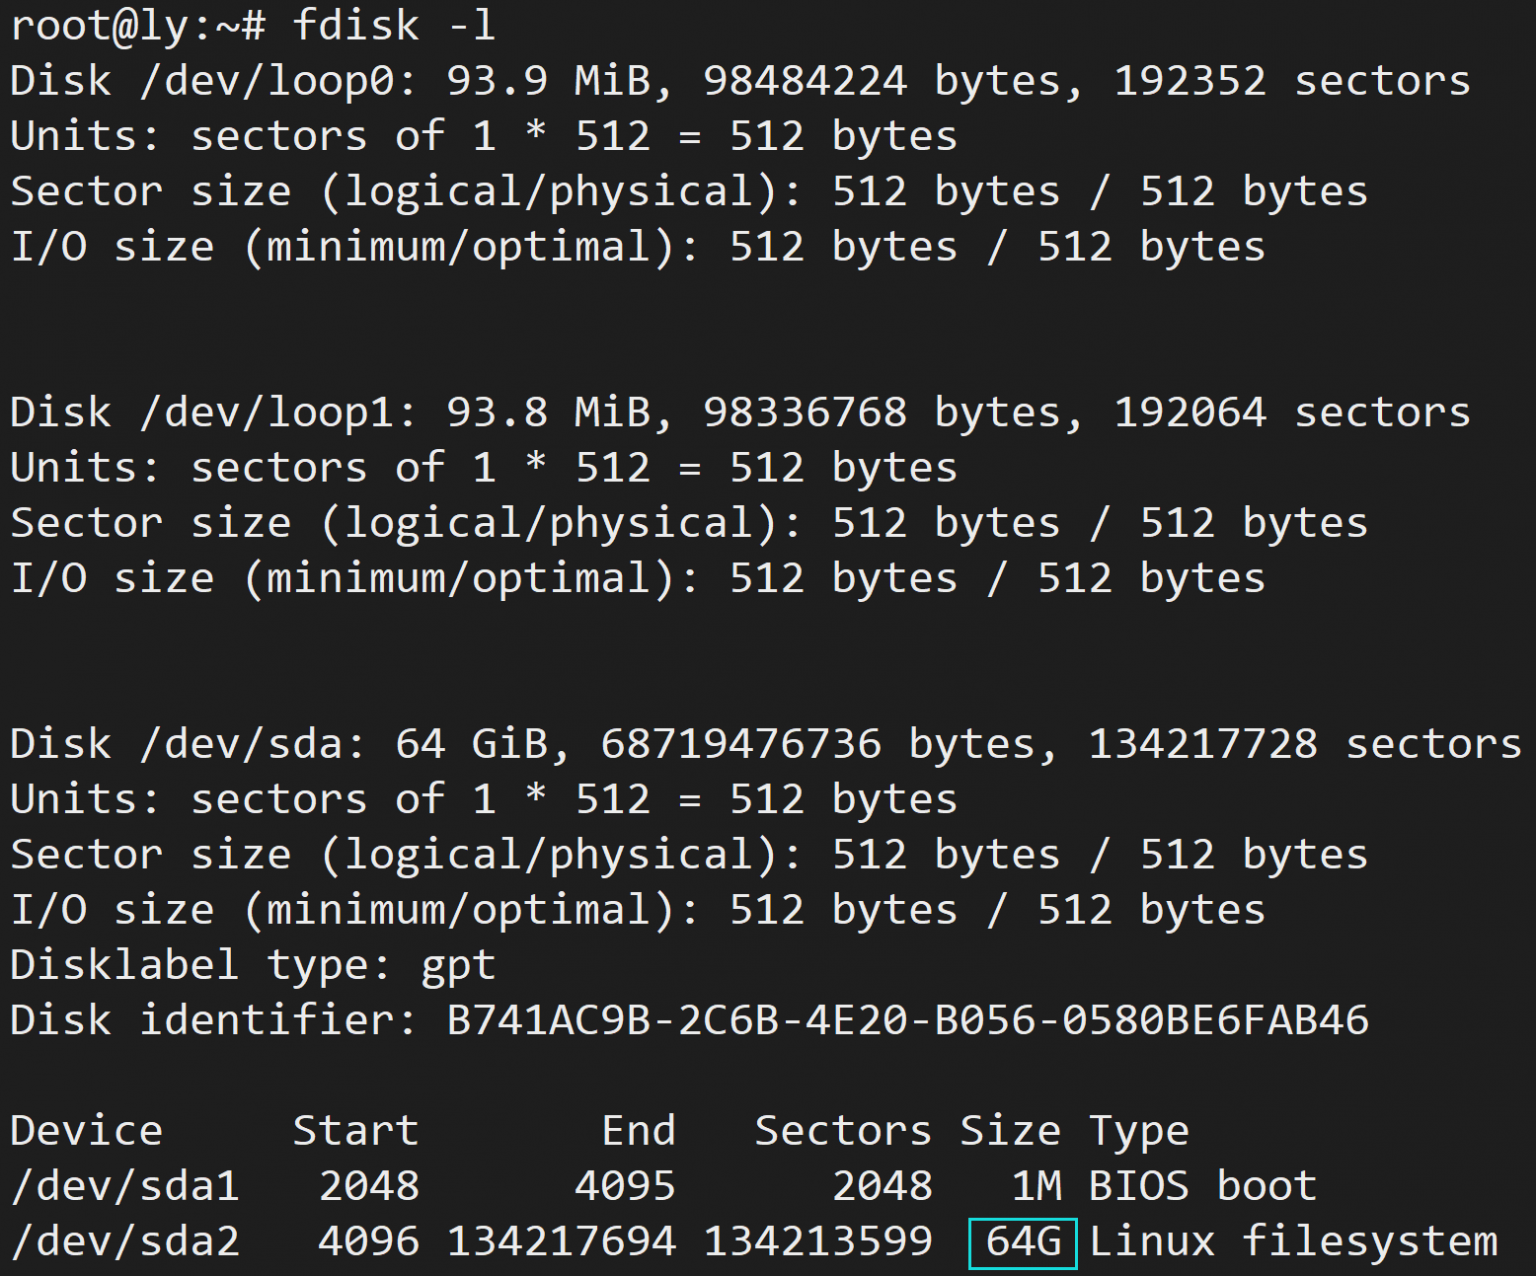
Execute fdisk -l again, it can be seen that the partition capacity has changed to 64G.

1.5 Expanding the file system
The expansion is not over at this point, because the partition capacity recorded by the file system is still 40G, and we need to let the file system know that the partition has been expanded.
You need to use resize2fs here. Taking my disk sda2 as an example, execute the following command:
Just wait for the operation to complete. According to the above figure, we have completed the online expansion of the file system.
If the following error message appears when executing the resize2fs -p /dev/sda2 command
Check the /dev/centos/root file system and find it is xfs, as follows;
The tips are as follows:
To resize the xfs file system, use the following command:
The tips are as follows:
Run df -h again to view the mount point and find that the size has changed.

resize2fs -p /dev/sda2
2. Logical partition expansion
Show current capacity The result is displayed as
resize2fs 1.42.9 (28-Dec-2013)
resize2fs: Bad magic number in super-block while trying to open /dev/centos/root
Couldn't find valid filesystem superblock.
# mount |grep root
/dev/mapper/centos-root on / type xfs (rw,relatime,attr2,inode64,noquota)
# xfs_growfs /dev/mapper/centos-root
meta-data=/dev/mapper/centos-root isize=256 agcount=4, agsize=3276800 blks
 = sectsz=512 attr=2, projid32bit=1
 = crc=0 finobt=0
data = bsize=4096 blocks=13107200, imaxpct=25
 = sunit=0 swidth=0 blks
naming =version 2 bsize=4096 ascii-ci=0 ftype=0
log =internal bsize=4096 blocks=6400, version=2
 = sectsz=512 sunit=0 blks, lazy-count=1
realtime =none extsz=4096 blocks=0, rtextents=0
data blocks changed from 13107200 to 39336960
2.2 Select all expansion
Extend the logical boundaries of a logical volume
vgdisplay
  --- Volume group ---
  VG Name               ubuntu-vg
  System ID
  Format                lvm2
  Metadata Areas        1
  Metadata Sequence No  2
  VG Access             read/write
  VG Status             resizable
  MAX LV                0
  Cur LV                1
  Open LV               1
  Max PV                0
  Cur PV                1
  Act PV                1
  VG Size               <96.95 GiB
  PE Size               4.00 MiB
  Total PE              24818
  Alloc PE / Size       12409 / 48.47 GiB
  Free  PE / Size       12409 / 48.47 GiB
  VG UUID               0r0B09-AHil-bc9D-fXtF-o3Y3-MjZj-T10Sf9
2.3 Use the resizefs2 command to reload the size of the logical volume to take effect.
lvextend -l +100%FREE /dev/mapper/ubuntu--vg-ubuntu--lv
3. Modify disk inode
**For the ext4 file system, the inode will be hard-coded during formatting. If you want to modify it, you must reformat it and lose all data. Please be careful. **
File systems such as xfs provide dynamic expansion capabilities for inodes.
resize2fs /dev/mapper/ubuntu--vg-ubuntu--lv
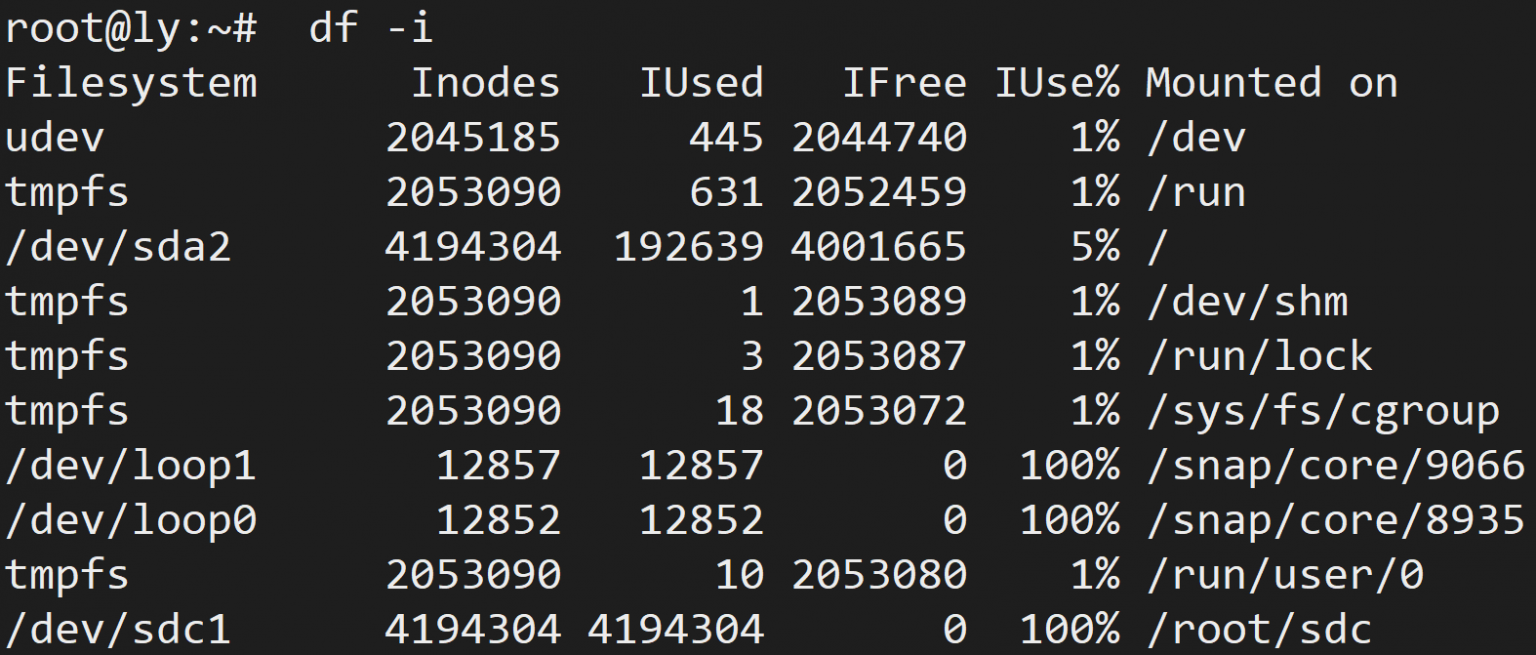
3.1 Check disk inode status
Run df -i to view the inode usage of each partition.
As you can see from the picture above, my sdc1 partition has used up all 4,194,304 inodes, now showing 无法写入任何数据 and prompting 磁盘已满 (even though there is still free space).
3.2 Reformat the partition
When formatting a partition, you can use the -N parameter to specify the number of inodes. Taking the example of formatting sdb1 as an ext4 partition with 16,777,216 inodes, execute the following command: mkfs will prompt that the disk already has a formatted file system. After confirmation, just wait for the formatting to complete.
3.3 Check the number of inodes
Run the following command:
The result is as shown below. You can see that the Inode count item has changed to the value we specified.
mkfs.ext4 /dev/sdb1 -N 16777216
source


dump2fs -h /dev/sdb1 | grep node