Stop Using Old Methods! Deploying the Latest Docker CE on Ubuntu 26.04 LTS with Ultra-fast Mirror Setup
Foreword
With the official release of Ubuntu 26.04 LTS (Resolute Raccoon), developers and system administrators worldwide are upgrading their development, testing, and production environments to this long-term support version. However, setting up Docker—the cornerstone of modern containerization and microservices architecture—on a brand-new LTS release can sometimes present unexpected friction.
If you are still relying on legacy commands like
apt-get install docker.io, or copy-pasting outdated tutorials meant for Ubuntu 20.04 or 22.04, you are likely to run into issues. These issues range from outdated software packages to APT repository format mismatches (especially with the widespread adoption of the new DEB822 format), or network timeouts when pulling images from container registries in restricted environments.This article provides a comprehensive, step-by-step, and highly detailed guide to installing Docker Community Edition (Docker CE) on Ubuntu 26.04 LTS. We will delve into modern DEB822 repository configurations, non-root system privilege separation, systemd service tweaks, and advanced network acceleration (both HTTP/HTTPS proxies and private registry mirrors).
1. Overall Installation and Configuration Lifecycle
Before executing any commands, it is essential to understand the complete installation and configuration workflow. Standardizing your deployment pipeline ensures predictability, security, and ease of troubleshooting.
The process is structured into six key phases:
- Clean-up: Removing pre-installed, distro-maintained, or conflicting container runtimes.
- Repository Setup: Migrating to the modern DEB822 source format and establishing GPG trust chains.
- Engine Installation: Installing the official Docker CE core packages and native plugins.
- Privilege Separation: Granting non-root access to specific users through Unix sockets without using
sudo. - Daemon Optimization: Configuring network settings, log limits, and proxies for optimal performance.
- Verification: Confirming overall runtime stability and standard behavior.
For a visual overview of this sequence, refer to Figure 1:
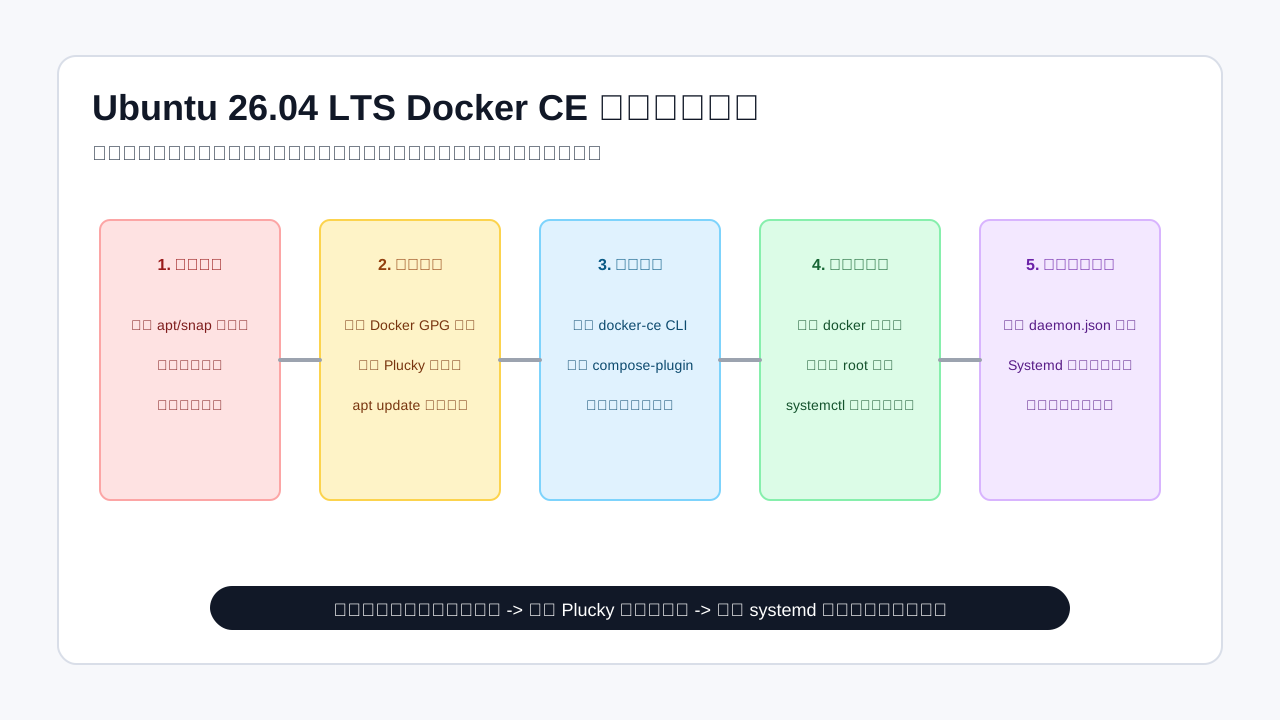 Figure 1: Standardized Docker-CE installation and configuration pipeline on Ubuntu 26.04 LTS
2. Step 1: Thorough Clean-up of Outdated and Conflicting Packages
Ubuntu 26.04 LTS includes native repository versions of container management software. These packages, such as docker.io, are maintained by Canonical/Ubuntu rather than the Docker team. They often lag behind in features, lack support for the latest plugins (like Buildx or Compose V2 integration), and can create configuration conflicts with the official Docker CE build.
Additionally, other container engines (like Podman) and runtimes (like Runc or older versions of Containerd) might be present on your system, which can conflict with the Docker binary pathing and systemd service descriptors.
2.1 Executing the Purge Command
To clean up all conflicting and outdated packages, run the following command in your terminal:
sudo apt-get remove -y \
  docker \
  docker-engine \
  docker.io \
  docker-doc \
  docker-compose \
  podman-docker \
  containerd \
  runc
2.2 Why is this Clean-up Step Mandatory?
- Binary Path and Link Collisions: Packages like
podman-dockerinstall a symbolic link that redirects thedockercommand topodman. This will break normal Docker CLI integrations and scripts that expect the standard Docker daemon socket. - Systemd Service Overlaps: Multiple packages might attempt to register services named
docker.serviceorcontainerd.service. This leads to active-standby conflicts or service mask failures where the operating system cannot determine which service daemon to prioritize. - Outdated Engine Versions: Distro-provided versions of Docker are often compiled with older versions of Go and lack performance improvements, security patches, and support for modern features like advanced overlay2 filesystem drivers, IPv6 NAT routing, and systemd-cgroup drivers.
3. Step 2: Configuring Docker’s Official APT Repository (DEB822 Standard)
Historically, APT repositories in Debian-based distributions were managed using a single-line format in /etc/apt/sources.list or /etc/apt/sources.list.d/. This older format looked like this:
deb [arch=amd64 signed-by=/path/to/key.gpg] https://download.docker.com/linux/ubuntu noble stable
Starting with modern versions of Ubuntu, the operating system has fully transitioned to the DEB822 format. Files in this format use a structured, multi-line Key: Value pair format. This is cleaner, easier to parse programmatically, and avoids cluttering configuration strings with inline brackets.
3.1 Establishing Repository Prerequisites and Keys
First, update the local package database and install the required tools to fetch repositories securely over HTTPS:
# Update local package indexes
sudo apt-get update

# Install essential certificates and trust tools
sudo apt-get install -y ca-certificates curl gnupg

# Create a secure directory to host the GPG keyring
sudo install -m 0755 -d /etc/apt/keyrings
Now, download the official Docker cryptographic GPG key, which is used by APT to verify the integrity of the downloaded packages:
# Fetch and write the Docker ASC key
sudo curl -fsSL https://download.docker.com/linux/ubuntu/gpg -o /etc/apt/keyrings/docker.asc

# Grant read access to all users (including the non-privileged _apt user)
sudo chmod a+r /etc/apt/keyrings/docker.asc
3.2 Constructing the DEB822 Source Configuration
Instead of writing to the main /etc/apt/sources.list file, it is a best practice to create a dedicated configuration file for Docker inside the /etc/apt/sources.list.d/ directory. The file must end with the .sources extension.
Below are two configuration templates: Option A for the official Docker repository, and Option B for a trusted cloud mirror (useful if your server’s network connection to Docker’s servers is unstable or slow).
Option A: Docker Official Repository (Recommended for Global/Direct Connections)
Run the following command to generate the configuration file:
sudo tee /etc/apt/sources.list.d/docker.sources << 'EOF'
Types: deb
URIs: https://download.docker.com/linux/ubuntu
Suites: resolute
Components: stable
Signed-By: /etc/apt/keyrings/docker.asc
EOF
Option B: Cloud Mirror Repository (Recommended for China or Throttled Cloud Regions)
If you are deploying on cloud servers located in regions with severe network restrictions or latency to international servers, configuring a local mirror (such as Alibaba Cloud’s mirror) will greatly speed up package downloads.
First, download the GPG key from the mirror:
sudo curl -fsSL https://mirrors.aliyun.com/docker-ce/linux/ubuntu/gpg -o /etc/apt/keyrings/docker-aliyun.asc
sudo chmod a+r /etc/apt/keyrings/docker-aliyun.asc
Then, write the DEB822 source configuration pointing to the mirror URL:
sudo tee /etc/apt/sources.list.d/docker.sources << 'EOF'
Types: deb
URIs: https://mirrors.aliyun.com/docker-ce/linux/ubuntu
Suites: resolute
Components: stable
Signed-By: /etc/apt/keyrings/docker-aliyun.asc
EOF
Deep-Dive Compatibility Tip:
Ubuntu 26.04 LTS uses the development codename
resolute(Resolute Raccoon). The repository source must match this codename.During the early release stages of a new LTS version, Docker’s official package repository servers might still be indexing the new release directory, which could lead to
404 Not Founderrors when runningapt update. Since Ubuntu versions maintain close binary compatibility, you can safely substituteresolutewith the previous LTS codenamenoble(Ubuntu 24.04) as a temporary workaround until theresolutepackages are fully populated.
4. Step 3: Installation and System Integration
With the new source definitions configured, we need to instruct APT to rebuild its cache and install the modern Docker engine stack.
4.1 Installing the Docker Suite
Run the following commands to update the local package metadata and install the core Docker components along with official utility plugins:
# Rebuild the APT package cache to include the new Docker repository
sudo apt-get update

# Install Docker CE and its plugins
sudo apt-get install -y \
  docker-ce \
  docker-ce-cli \
  containerd.io \
  docker-buildx-plugin \
  docker-compose-plugin
Let’s break down the role of each component installed here:
docker-ce: The Docker Community Edition daemon (Engine). This is the background service responsible for managing container lifecycles, virtual networks, resource constraints, and volume attachments.docker-ce-cli: The command-line client (docker). This acts as the user interface to communicate with the daemon via the REST API over Unix sockets.containerd.io: An industry-standard container runtime. It manages the low-level lifecycle of containers on the host (image transfer, execution, storage, and network attachment). Docker builds on top of Containerd.docker-buildx-plugin: A next-generation build engine. It supports advanced features like multi-architecture builds (compiling x86_64 and ARM64 in parallel), cache exporter options, and build secrets integration.docker-compose-plugin: The native CLI integration for Compose V2. Unlike Compose V1, which was a separate Python wrapper executable, Compose V2 is written in Go and is called directly as a subcommand of the Docker CLI (docker compose).
4.2 Verifying Service Status
Once the installation is complete, systemd automatically enables and starts the service. You can check the current status of the daemon by running:
systemctl status docker
An active, healthy service will output:
● docker.service - Docker Application Container Engine
     Loaded: loaded (/usr/lib/systemd/system/docker.service; enabled; preset: enabled)
     Active: active (running) since Tue 2026-05-26 10:05:00 UTC; 1min ago
...
You can also run basic version commands to verify that all components are responding correctly:
docker --version
docker compose version
5. Step 4: Non-Root User Privilege and Security Isolation (Best Practices)
By default, the Docker daemon binds to a local Unix socket (/var/run/docker.sock). For security reasons, this socket is owned by root, and users outside the root group must use sudo to write commands to it.
However, executing commands with sudo introduces several risks:
- Privilege Escalation: Running container instances with root-level system calls can allow malicious containers to compromise the host kernel.
- Permissions Clashes: Local directories mounted into a container via bind mounts will have their generated files owned by
root. This makes local file edits difficult for regular non-root host users. - Operational Overhead: Users must continuously enter password credentials to execute development commands.
To mitigate this, Docker allows you to delegate socket write privileges to members of a dedicated UNIX group named docker.
5.1 Permission Authentication Workflow
Refer to Figure 2 to understand how the system validates command executions over the local Unix socket:
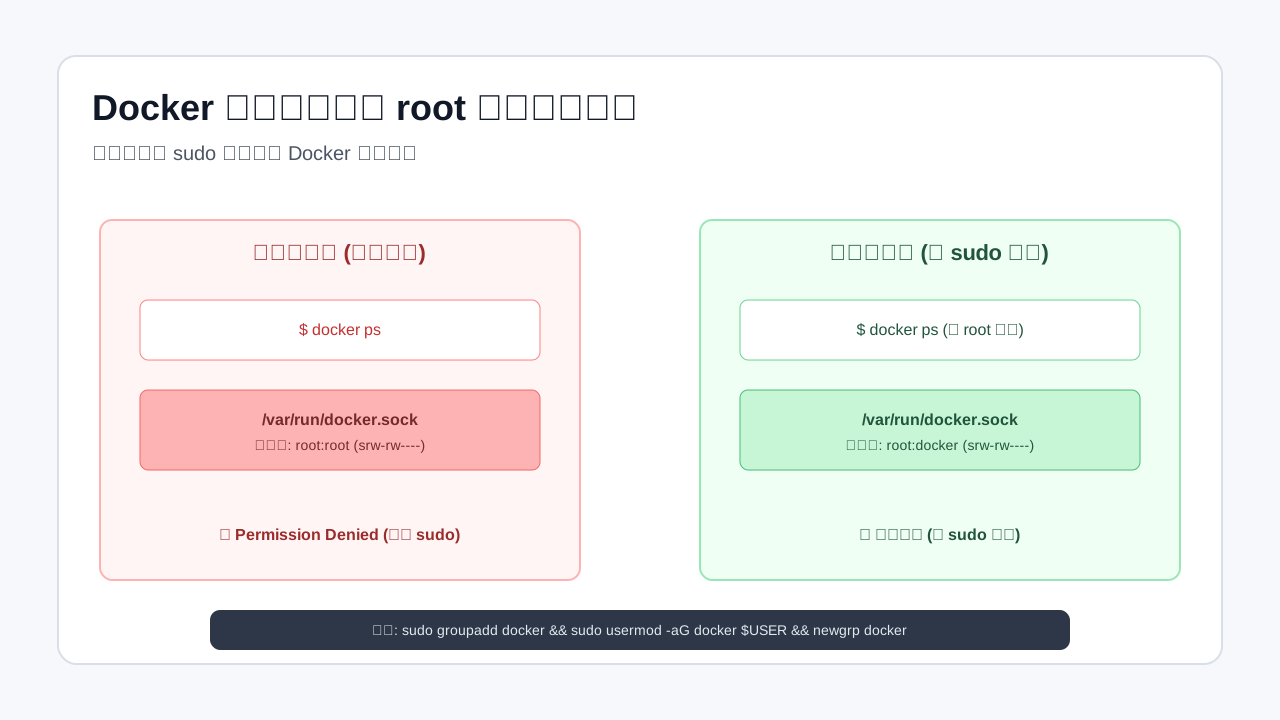 Figure 2: Unix Socket permissions check when a non-root user executes the Docker command line
5.2 Creating the Group and Adding Users
Run the following commands to set up group-based delegation:
# 1. Create the docker group if it doesn't already exist
sudo groupadd -f docker

# 2. Append the current active user ($USER) to the docker group
sudo usermod -aG docker $USER
5.3 Activating the Group Without Logging Out
For group membership updates to register across your operating system session, you would normally need to close your SSH terminal and log back in. If you want to apply these changes to your active terminal immediately without interrupting your current connection, run the following:
# Activate the docker group changes in the current shell session
newgrp docker
5.4 Confirming Non-Root Executions
Test the permission delegation by running a simple container without the sudo prefix:
docker run --rm hello-world
If the execution is successful, Docker will pull the image from the hub, run the container, print a welcome message, and exit immediately due to the --rm flag.
6. Step 5: Enterprise Network Optimization and Proxy Configuration
For production systems deployed behind corporate firewalls, in restricted cloud environments, or in regions where direct connections to international registries (like Docker Hub or GitHub Container Registry) are blocked or throttled, configuring network acceleration is essential.
Depending on your architecture, you have two primary approaches:
- Registry Mirrors: Forwarding image fetch requests to local caching repositories.
- Systemd Proxy Settings: Routing all external daemon traffic through a local proxy gateway.
Refer to Figure 3 for an architectural view of these two networking methods:
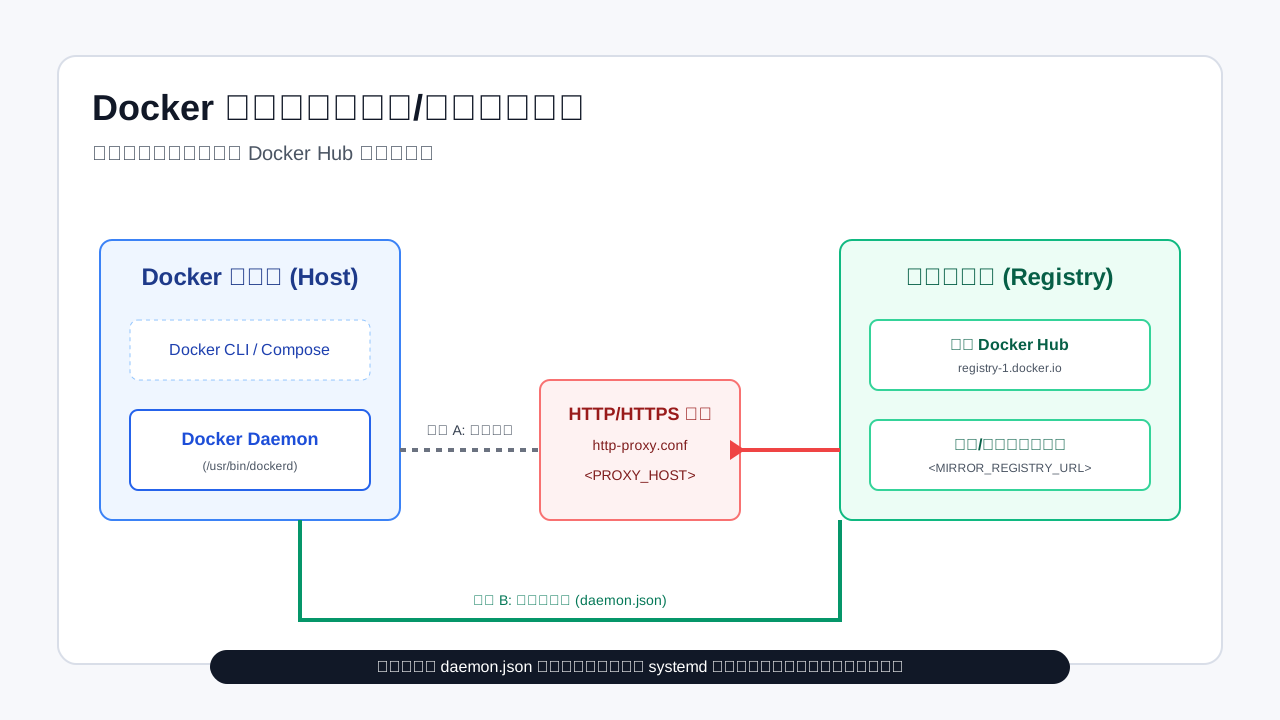 Figure 3: Docker daemon network request flow using either internal proxy environments or external caching mirrors
6.1 Method A: Configuring Private Registry Mirrors (daemon.json)
If you run an internal registry mirror (like Harbor) or use a trusted mirror provided by cloud hosts, you can configure it globally in the Docker daemon configuration file /etc/docker/daemon.json.
Run the following to write this configuration:
# Create the directory if it does not exist
sudo mkdir -p /etc/docker

# Write configurations including registry mirrors and log rotations
sudo tee /etc/docker/daemon.json << 'EOF'
{
  "registry-mirrors": [
    "https://your-private-mirror.example.com",
    "https://mirror.baidubce.com"
  ],
  "log-driver": "json-file",
  "log-opts": {
    "max-size": "50m",
    "max-file": "3"
  }
}
EOF
Production Log Safety Tip:
In addition to setting up repository mirrors, the configuration above includes strict log limiting rules:
log-driver: json-filewithmax-size: 50mandmax-file: 3.By default, Docker stores stdout/stderr logs indefinitely without rotation. For high-throughput applications, this will eventually exhaust all available disk inodes and storage capacity on the host machine. Setting limits ensures old logs are automatically rotated out, preventing system crashes.
After editing /etc/docker/daemon.json, reload the systemd manager and restart the service:
sudo systemctl daemon-reload
sudo systemctl restart docker
6.2 Method B: Systemd-Level HTTP/HTTPS Proxy (The Robust Tunnel)
When registry mirrors are unavailable or when your workloads require pulling images from private registries hosted abroad, routing the daemon’s traffic through a secure proxy tunnel is the most reliable approach.
It is important to note that environment variables configured in your current user shell (like export http_proxy=...) do not affect the Docker daemon. This is because the daemon runs as a background process managed by systemd, which isolates its execution environment from user-level terminal variables.
1. Creating the Systemd Drop-in Configuration
Create a dedicated override directory and write the proxy configuration variables into a drop-in file:
# Create the service configuration folder
sudo mkdir -p /etc/systemd/system/docker.service.d

# Write proxy configuration settings
sudo tee /etc/systemd/system/docker.service.d/http-proxy.conf << 'EOF'
[Service]
Environment="HTTP_PROXY=http://<PROXY_HOST>:<PORT>"
Environment="HTTPS_PROXY=http://<PROXY_HOST>:<PORT>"
Environment="NO_PROXY=localhost,127.0.0.1,10.x.x.x,192.168.x.x,*.local,*.internal"
EOF
Configuration Safety and Compliance Notes:
- Replace
<PROXY_HOST>and<PORT>with your specific local or network-accessible proxy configuration (e.g.,192.168.x.x:7890). Do not write credentials or production environment hostnames into these files.- The
NO_PROXYenvironment variable is critical. It defines exceptions that bypassing the proxy. Ensure that local loopbacks (127.0.0.1,localhost), internal subnet scopes (10.x.x.x,192.168.x.x), and local domain zones are listed. This prevents host-to-container calls, Docker network setups, and local private registries (like an internal Harbor server) from routing traffic through the proxy, which would cause connection failures.
2. Reloading and Restarting the Systemd Service
Apply the changes by updating the systemd configuration manager and restarting the Docker service:
# Reload unit files from disk
sudo systemctl daemon-reload

# Restart the Docker daemon service
sudo systemctl restart docker
3. Verifying Proxy Integration
To confirm that the proxy environment variables are correctly injected into the running daemon process, inspect the Docker information output:
docker info | grep -i proxy
A properly configured output will display the configuration settings as follows:
 HTTP Proxy: http://<PROXY_HOST>:<PORT>
 HTTPS Proxy: http://<PROXY_HOST>:<PORT>
 No Proxy: localhost,127.0.0.1,10.x.x.x,192.168.x.x,*.local,*.internal
7. Step 6: Docker Compose V2 Hands-on & Architecture Integration
Ubuntu 26.04 LTS deploys Compose V2 via the docker-compose-plugin. Compose V2 integrates directly into the Docker CLI, providing better runtime performance, standardized exit codes, and cross-platform compatibility.
7.1 Compose Yaml Deployment Template
Here is a standard docker-compose.yml template showing a production-ready web application topology. It deploys an Nginx web server fronting a simple mock API backend inside an isolated bridge network:
version: '3.8'

services:
  web-app:
    image: nginx:alpine
    container_name: demo-nginx
    ports:
      - "8080:80"
    volumes:
      - nginx-data:/usr/share/nginx/html
    networks:
      - app-network
    restart: always

  backend-api:
    image: alpine
    container_name: demo-backend
    command: sh -c "while true; do echo -e 'HTTP/1.1 200 OK\n\n Hello from Ubuntu 26.04 Docker!' | nc -l -p 8000; done"
    networks:
      - app-network
    restart: unless-stopped

networks:
  app-network:
    driver: bridge

volumes:
  nginx-data:
7.2 Command Line Interface Reference (V1 vs. V2)
With Compose V2, commands use a space instead of a hyphen. For example, instead of running docker-compose <command>, use docker compose <command>:
| Task / Lifecycle State | Legacy CLI (V1) | Modern CLI (V2) | Functional Description |
|---|---|---|---|
| Start Stack in Background | docker-compose up -d |
docker compose up -d |
Compiles, builds network interfaces, mounts volumes, and starts container definitions. |
| Inspect Active Project | docker-compose ps |
docker compose ps |
Displays CPU, memory status, mapped ports, and current health of stack containers. |
| Tail Active Console Output | docker-compose logs -f |
docker compose logs -f |
Standard output log streaming from all running services in the template. |
| Teardown Stack | docker-compose down |
docker compose down |
Safely stops containers, deletes dynamic endpoints, and cleans up local virtual networks. |
| Execute Command Inside | docker-compose exec <svc> sh |
docker compose exec <svc> sh |
Opens an interactive terminal session inside a running container. |
8. Step 7: Production Troubleshooting Guide
When running Docker on Ubuntu 26.04 LTS, you may encounter issues due to system updates, AppArmor policies, or DNS routing changes. Below are common issues and how to resolve them.
8.1 Issue A: Permission denied when connecting to /var/run/docker.sock
Symptoms
Executing a docker command outputs the following:
permission denied while trying to connect to the Docker daemon socket at unix:///var/run/docker.sock
Root Cause
The current user is not a member of the docker system group, or the group membership update hasn’t been applied to the current shell environment yet.
Solution
- Ensure the user has been added to the group:
groups $USER - If
dockeris not listed, add the user:sudo usermod -aG docker $USER - If the user is listed but you still receive the error, reload your terminal session or force-apply the user’s active groups:
exec su - $USER - Verify the permissions on the socket file:
The socket file should be owned by
ls -la /var/run/docker.sockrootand accessible by members of thedockergroup:srw-rw---- 1 root docker 0 May 26 10:00 /var/run/docker.sock
8.2 Issue B: DNS Resolution Failure inside Containers
Symptoms
Containers fail to resolve domain names (e.g., ping google.com fails), even though host-level DNS resolution is working correctly.
Root Cause
Ubuntu uses the systemd-resolved service to handle local DNS queries. It configures a local DNS stub resolver listening on the loopback address 127.0.0.53.
Docker containers cannot access the host’s loopback network interface. As a fallback, the Docker daemon assigns public DNS servers (like Google’s 8.8.8.8) to the container’s /etc/resolv.conf. If your host system is on a restricted network or behind a corporate firewall, requests to these public DNS servers will time out.
Solution
You can configure the Docker daemon to use your organization’s internal DNS servers or trusted local resolvers. Update /etc/docker/daemon.json and add the dns field:
{
  "dns": [
    "192.168.x.x",
    "8.8.8.8"
  ]
}
(Replace 192.168.x.x with your local gateway or internal DNS server IP).
Reload and restart the Docker service to apply the updates:
sudo systemctl daemon-reload
sudo systemctl restart docker
8.3 Issue C: AppArmor Violations Blocking Container Operations
Symptoms
System logs (dmesg or journalctl -u docker) display AppArmor audit messages, or containers fail to start with errors like:
docker: Error response from daemon: AppArmor enabled but write-profile failed: Permission denied.
Root Cause
Ubuntu 26.04 LTS enforces strict AppArmor access control policies. If system files are modified or the AppArmor profiles become desynchronized, the kernel security module will prevent Docker from creating or enforcing container isolation profiles.
Solution
- Check the status of AppArmor profiles on the host:
sudo aa-status - Reinstall and reload the default AppArmor parser profiles:
sudo apt-get install --reinstall -y apparmor sudo systemctl restart apparmor - If specific custom profiles are causing issues, you can run the container with the unconfined profile parameter during troubleshooting (note: this is not recommended for production environments):
docker run --security-opt apparmor=unconfined --rm -it alpine sh
8.4 Issue D: Storage Driver Failure and Disk Performance Degradation
Symptoms
Container operations are slow, or the daemon fails to start, logging errors related to storage-driver incompatibilities.
Root Cause
Ubuntu 26.04 LTS supports modern filesystems like EXT4, Btrfs, and ZFS. While Docker defaults to the high-performance overlay2 storage driver, running Docker on top of ZFS or dynamic LVM systems without matching configurations can cause layers to fail to register.
Solution
- Identify the host filesystem type:
df -T /var/lib/docker - Check the storage driver currently in use by Docker:
docker info | grep "Storage Driver" - If the host filesystem is ZFS, configure Docker to use the native
zfsstorage driver by updating/etc/docker/daemon.json:{ "storage-driver": "zfs" } - If you are using standard EXT4/XFS filesystems, ensure
overlay2is active and that your backing filesystem hasd_type=trueenabled (which is standard for modern installations).
9. Summary
Installing Docker Community Edition (Docker CE) on Ubuntu 26.04 LTS (Resolute Raccoon) using the modern DEB822 format is the most reliable, secure, and future-proof approach. Delegating socket access to the docker user group secures your local session by avoiding root-level execution overhead, while systemd proxy integration resolves registry access issues in restricted environments.
By following this guide, you can establish a clean, reproducible, and optimized container virtualization environment on Ubuntu 26.04 LTS. If you encounter any configuration issues or have optimizations to suggest, feel free to share them in the comments section below!