Stop Fragile Scripting on Proxmox VE! Deep Dive into PVE Assist: The Ultimate Industrial-Grade Toolkit Transforming Bare-Metal PVE into a Turnkey Homelab Powerhouse
Executive Summary (TL;DR)
- Farewell to the “System-Breaking Patch” Era: If you run Proxmox VE (PVE), you have undoubtedly copy-pasted mysterious one-liner Shell scripts from online forums—changing mirrors, silencing subscription nag dialogs, adding CPU temperature badges, and configuring GPU passthrough. However, with the release of PVE 9.x (based on Debian 13 Trixie and modern Linux kernels), legacy scripts that crudely overwrite core libraries, poll raw EC I/O ports, and rely on outdated DKMS frequently cause Web UI QEMU CPU menus to disappear, APT package manager syntax lockups, and unprovoked hardware system freezes.
- PVE Assist: The Modern Architectural Reboot for PVE 9: Maintained by the Quanshan engineering community, PVE Assist (stable release
v1.2.59) fundamentally scraps legacy, haphazard shell hacks. Re-engineered as a statically linked Go binary, it establishes an industrial-grade operational principle: “Any high-risk operation must be explicable, verifiable, and recoverable.”- Comprehensive Feature Upgrades:
- Seamless Domestic Mirror Switching: Native Deb822 structured format validation, high-speed mirror switching across top academic backbones (USTC, Tsinghua) and major cloud providers, and official
pve-firmwareprotection preventing accidentalproxmox-veuninstallation;- Non-Destructive Node Summary Enhancements: Safe reading of standard
hwmon/IPMI, real-time CPU package wattage (turbostat PkgWattwith millisecond timeout breaker), core temperature badges, dynamic per-thread frequency indicators, NVMe/SATA 0E early failure monitoring, and native support for laptop host battery telemetry;- Decoupled PCIe Passthrough & SR-IOV State Machine: Explicit bifurcation between whole-card VFIO passthrough and 1~7 virtual functions (VFs), pre-compiling DKMS against the next boot kernel and safeguarding VM edits with
qm digesttransaction locks;- Safe local-lvm Consolidation: Validates standalone node health and flattens fragmented storage into a unified, high-capacity file system.
- Production-Ready, Zero-Dependency Automation Toolbox: This guide provides cross-platform scripts for Windows 11, Ubuntu 26.04, and macOS 26, fully supporting both interactive human operation and programmatic inspection/remediation via AI Agents with JSON output.

Figure 1: Conceptual illustration. Transforming low-level, black-box hardware metrics into a comprehensive, real-time telemetry grid.
1. Problem Background: The Homelab Onboarding Nightmare
In modern homelabs, edge computing clusters, and small-to-medium enterprise virtualized environments, Proxmox VE (PVE) reigns supreme due to its open-source Debian heritage, lightweight LXC containers, and battle-tested KVM virtualization.
Yet, anyone who has installed PVE bare-metal has walked into these notorious initiation traps:
- Subscription Warning & Mirror Failures: Immediately upon logging into the Web GUI, a large
No valid subscriptionmodal blocks the screen. Runningapt updateimmediately aborts with401 Unauthorizedbecause the default installation references enterprise commercial repositories. - The “Blindfolded” Hardware Overview: Out-of-the-box, the node overview dashboard only shows logical CPU and RAM usage percentages. What are the CPU core temperatures? What frequency are the cores boosting to? How many watts is the CPU package drawing right now? How fast is the system fan spinning? Is your NVMe SSD accumulating uncorrectable errors? None of this is visible. On quiet fanless mini-PCs or passive industrial chassis, operating without temperature visibility feels like riding a motorcycle blindfolded.
- Puzzling Default Storage Ratios: The standard installer carves the main disk into a tiny
localdirectory (for ISO images and templates) and a cavernouslocal-lvmthin pool (strictly reserved for VM virtual disks). Newcomers trying to store several large ISOs quickly findlocalout-of-space, while hundreds of gigabytes lie idle right next door inlocal-lvm. - The Arcane Maze of GPU Passthrough and SR-IOV: Trying to pass an integrated GPU to Synology NAS for hardware transcoding, or slicing it into 3 virtual GPUs for Windows, FNOS, and Linux, is fraught with contradictory tutorials. One reboot after editing
/etc/modulesand tampering with GRUB parameters can render the machine unreachable on the network, or trigger host kernel panics.
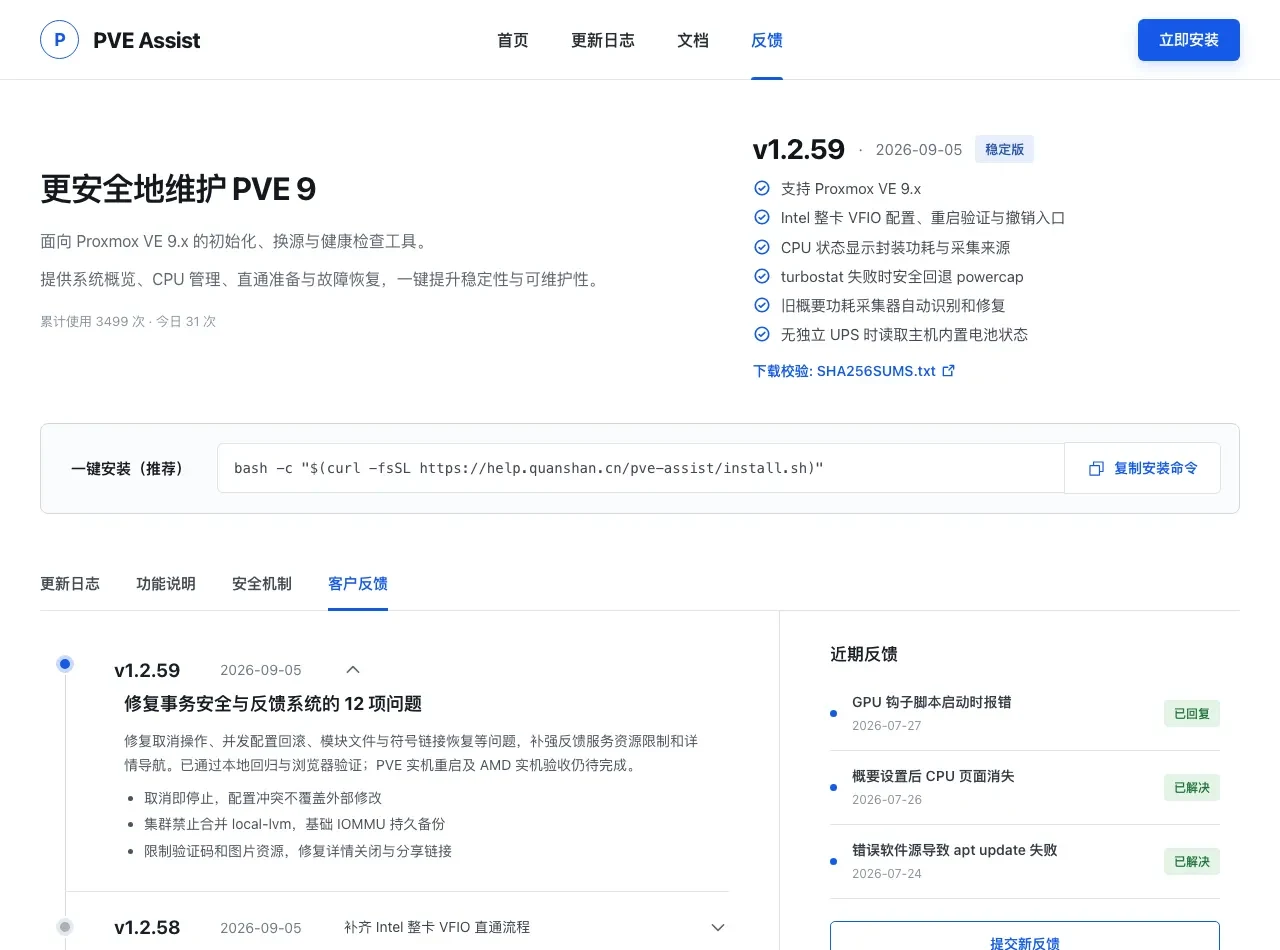
Figure 2: PVE Assist official release dashboard (v1.2.59 stable), featuring a clean, modular diagnostic interface.
To mitigate these pain points, many administrators turned to one-click scripts. In the PVE 6/7/8 era, community scripts like “Hu-Lao’s” pve_source were ubiquitous.
However, in PVE 9.x, these legacy scripts have become dangerous liabilities.
2. A 5th-Grader Analogy: Bare-Metal PVE vs. PVE Assist
To clearly explain the difference without getting bogged down in jargon, consider this everyday analogy:
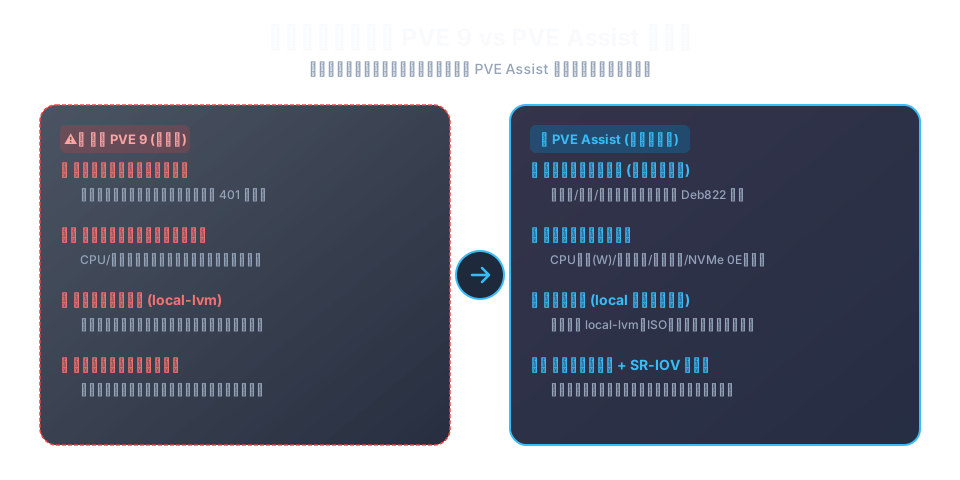
Figure 3: Everyday life analogy. Out-of-the-box PVE is like an unfinished commercial concrete shell, while PVE Assist is an elite turnkey smart-home engineering team.
1. Bare-Metal PVE is an “Unfinished Concrete Commercial Shell”
- Commercial Metering (Enterprise Repositories): Every time you turn on the water tap (
apt update), the meter checks for a commercial monthly subscription and cuts the valve if you lack one. - No Thermometer or Electric Meter (Missing Hardware Telemetry): You cannot tell how hot the rooms are or how much electricity the appliances are drawing without putting your bare hand against the concrete wall.
- Awkward Partition Walls (Rigid local vs local-lvm Separation): A high concrete wall splits the apartment in two. Big luggage won’t fit into the closet, even though the balcony sits completely vacant.
- Punching Holes for Custom Wiring (Blind Passthrough Hacks): Attempting to pull an electrical cable by hacking into the foundation risks cutting the building’s main power lines.
2. Traditional Hacks are “Unlicensed Cowboy Handymen”
- They enter with sledgehammers, blindly tearing down walls and ripping out existing utility lines without recording where anything went.
- To install a thermometer, they drill straight into the central circuit board’s silicon base (probing raw EC I/O ports
/dev/port). - It might work temporarily, but the moment building management pushes an official upgrade, water pipes burst, the handyman is nowhere to be found, and there is no blueprint to restore the building.
3. PVE Assist is a “Certified Turnkey Smart-Home Engineering Team”
- Strict On-Site Inspection (Version Gatekeeper): Before lifting a finger, they verify the blueprint. If your home is not a PVE 9 layout, they safely exit without touching a single screw.
- Digital Blueprint Archiving (Snapshots with Fingerprint Markers): Before modifying any configuration file, they take a full snapshot stamped with a unique marker. You can revert to pristine factory condition in one second.
- Municipal High-Speed Water Connections (Domestic Academic Mirrors): They connect your water mains to top university backbone networks while repairing legacy pipe joints (Deb822 standards).
- Smart Digital Dashboard (Non-Destructive Sensor Probing): They install touchless sensor panels that monitor wattage, core temperatures, fan RPM, and SSD health without ever touching delicate mainboard circuits.
- Dedicated Transit Lanes (Decoupled Passthrough & SR-IOV): Exclusive express lanes and multi-passenger train slices are planned separately, with kernel module compatibility verified ahead of time.
3. Incident Review: 4 Disasters Caused by Legacy Scripts on PVE 9
With Proxmox VE 9 transitioning to Debian 13 (Trixie) and modernized kernels, users relying on old scripts inevitably hit critical landmines.
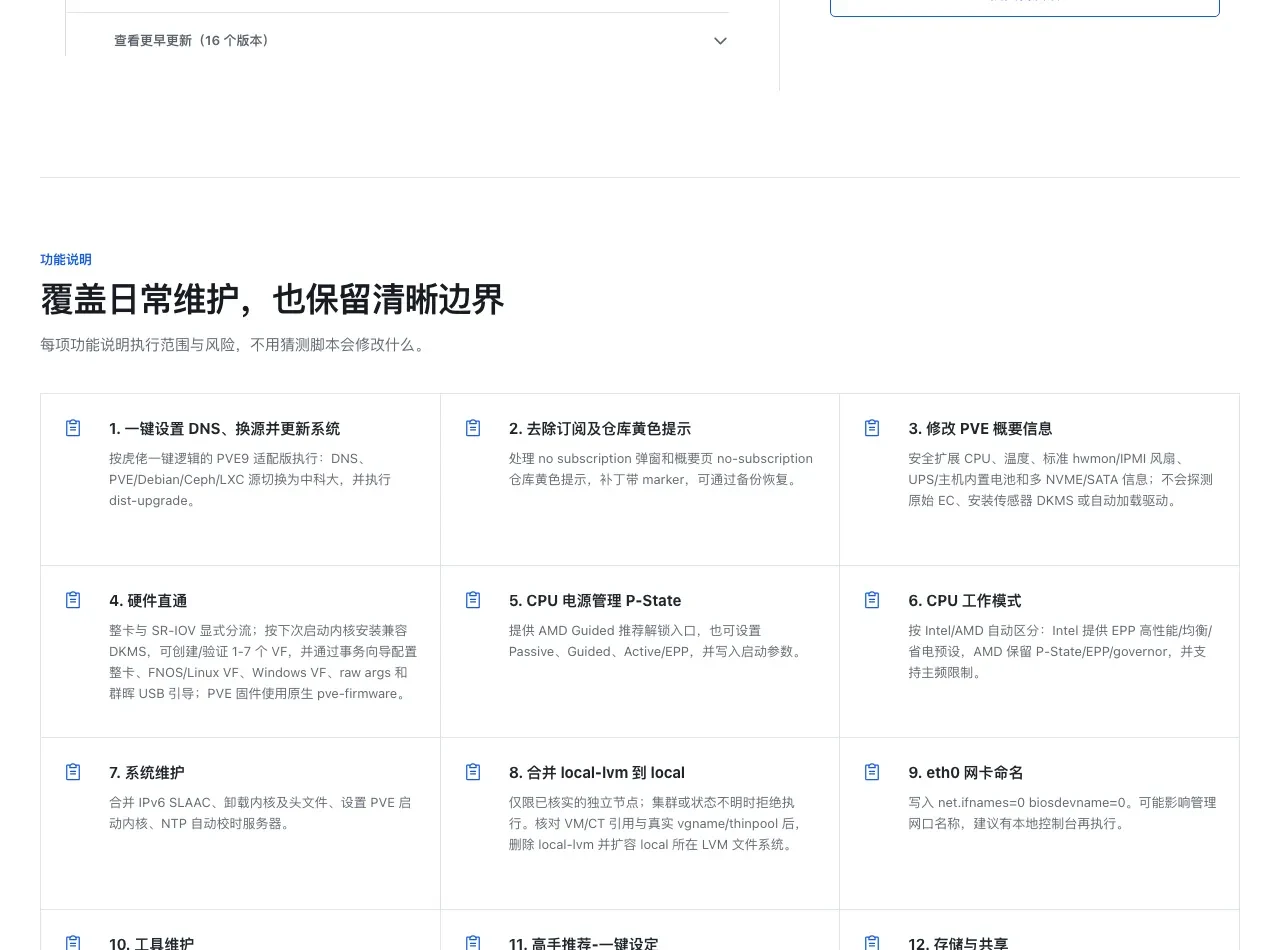
Figure 4: PVE Assist’s 12 modular capabilities, cleanly organized with unambiguous execution boundaries.
Incident 1: QEMU CPU Configuration Disappears from the Web GUI
- Symptom: After running a legacy temperature enhancement script, the node overview showed temperature gauges, but clicking
Hardware -> Processorson any virtual machine opened a blank dialog or crashed the Web UI. - Root Cause: The script used crude global regular expressions to prune old ExtJS summary components, inadvertently deleting Proxmox’s core
CPUcomponent definitions across the entire datacenter and VM creation wizard.
Incident 2: Malformed Deb822 Syntax Paralyzes apt update
- Symptom: After changing mirrors, running
apt updatethrew a fatal parser error:E: Malformed entry 1 in sources file /etc/apt/sources.list.d/debian.sources (Component) E: The list of sources could not be read. - Root Cause: Debian 13 enforced the Deb822 structured format (
.sourcesfiles), requiring the plural keyComponents:. Legacy scripts performed naive string substitutions that wrote the singularComponent:, completely disabling package management.
Incident 3: Blind Sensor Probing Triggers Random Host Hard Freezes
- Symptom: Low-power mini-PCs and network appliances running old scripts experienced random hard freezes and kernel crashes under load.
- Root Cause: To read fan RPM and motherboard sensors, older scripts ran
sensors-detect --auto, force-loaded unverified DKMS modules (e.g., buggy IT5571/IT87 modules), and wrote raw instructions to the motherboard’s Embedded Controller (EC) via/dev/port. Under virtualization load, this unmediated hardware contention locked up the system bus.
Incident 4: SR-IOV Passthrough Hits a “Ghost Kernel” after Reboot
- Symptom: Intel 12th–14th Gen iGPU SR-IOV worked during initial configuration, but after a scheduled reboot, every VM displayed a yellow triangle (Code 43) and host dmesg flooded with
i915missing module errors. - Root Cause: The system had received an automatic kernel update prior to running the script. The legacy script compiled DKMS against the currently active old kernel rather than the next boot kernel, leaving the newly booted system completely devoid of SR-IOV drivers.
4. Architectural Analysis: Why Legacy Scripting Failed
The underlying failure modes of script-based administration can be summarized as follows:
flowchart TD
    subgraph LegacyScript["Legacy Shell Scripting (Fragile)"]
        L1["Blind Execution without Version Guards"] --> L2["Crude sed/awk Overwriting Core Files"]
        L2 --> L3["Zero Concurrency Guards (Breaks on Multi-Admin Edit)"]
        L3 --> L4["Unsafe Probing (Direct EC /dev/port Writes)"]
        L4 --> L5["Irreversible Configuration Spoilage"]
    end

    subgraph PVEAssist["PVE Assist Architecture (Robust)"]
        P1["Version Gatekeeper (Strict PVE 9 Hard-Lock)"] --> P2["Atomic Transactions (qm digest Lock Guards)"]
        P2 --> P3["Fingerprinted Marker Snapshots for 1-Click Rollback"]
        P3 --> P4["Non-Destructive Telemetry (hwmon/IPMI + Circuit Breakers)"]
        P4 --> P5["Factory-Grade Self-Healing and Recovery"]
    end
- Disconnected Lifecycle: A shell script executes as a transient stream of string replacements. Once completed, it retains no state regarding which files were altered. Subsequent OS package upgrades inevitably collide with these unmanaged patches.
- Absence of State Machines & Rollbacks: If a 10-step shell script fails on step 8, the corrupted files written in steps 1 through 7 remain stranded on the filesystem, leaving the hypervisor in a broken state.
- Lack of Concurrency Protection: Editing VM PCIe assignments while a VM is running or while another administrator is modifying settings through the GUI risks corrupting the QEMU machine definition.
5. Under the Hood: PVE Assist’s Modernized Engineering
PVE Assist was engineered specifically to address these structural deficits. A review of its binary architecture reveals stringent safety design principles:
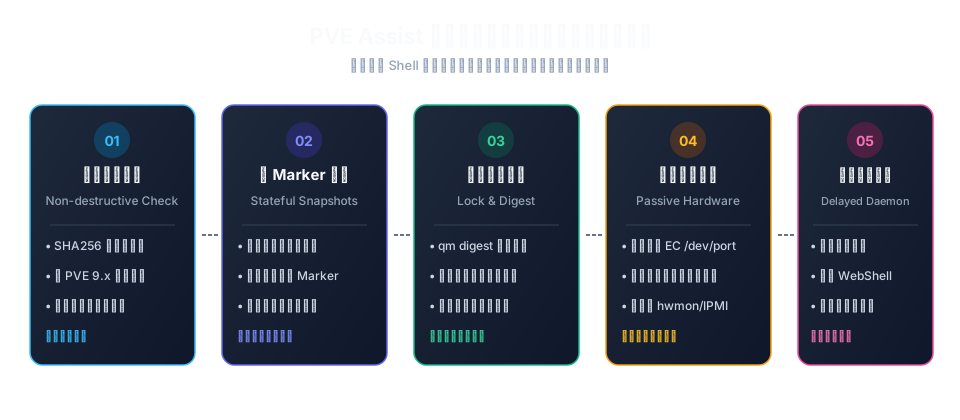
Figure 5: The five-layer safety defense model in PVE Assist, ensuring every modification is verifiable and reversable.
1. Strict Version Gatekeeping & Single-Binary Delivery
- Hardware & Release Gatekeeper: Before modifying a single byte, the installer inspects
dpkg-queryandpveversion. If the host is not running PVE 9.x, the program exits cleanly with zero side-effects. - Single Binary Distribution: Instead of littering the filesystem with disjointed scripts, the entire tool compiles into a standalone Go binary, residing cleanly at
/usr/local/bin/pve-assist.
2. Non-Destructive Telemetry & CPU Package Wattage
- Elimination of Dangerous Probes: PVE Assist strictly bans
sensors-detect, direct EC/dev/portprobing, and experimental DKMS sensor drivers. It exclusively queries kernel-standard/sys/class/hwmonand standard IPMI interfaces. - Native CPU Package Wattage (
PkgWatt): To provide accurate real-time power metrics, PVE Assist features a native collector:- It prioritizes kernel-level
turbostattelemetry to extractPkgWatt, bounded by strict sample-rate limits and execution timeouts; - If unavailable, it gracefully falls back to
powercapdifferential energy counters; - All collectors execute in sandboxed goroutines with circuit breakers—telemetry latency never degrades or blocks the Proxmox Web UI.
- It prioritizes kernel-level
- Laptop Host Battery Support: When PVE is installed on a laptop or portable host lacking an external UPS, PVE Assist automatically reads Linux standard
/sys/class/power_supplyinterfaces, displaying battery percentage, voltage, charging status, and estimated remaining runtime directly on the node summary.
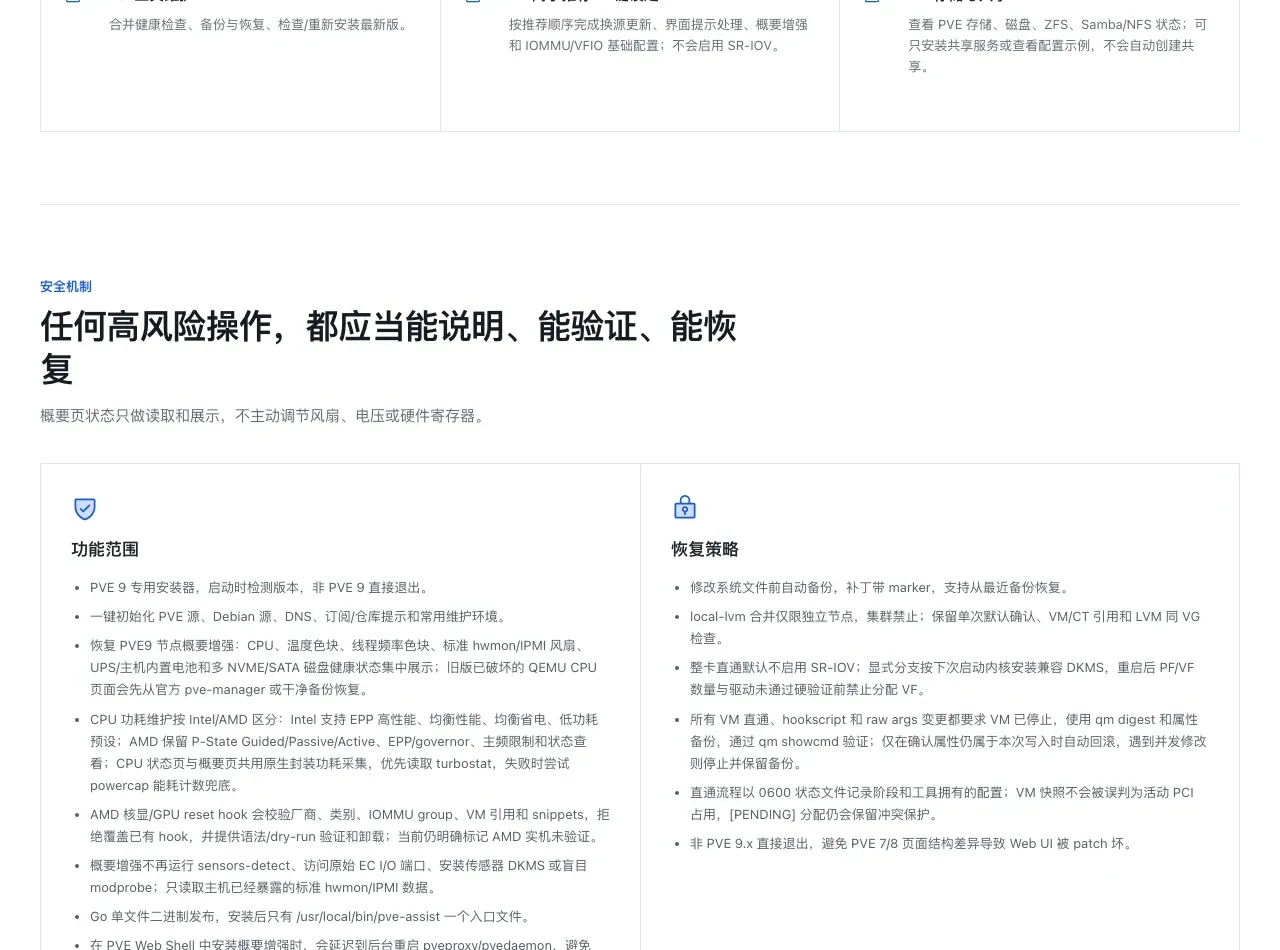
Figure 6: Official safety documentation highlighting the core philosophy: “Any high-risk operation must be explicable, verifiable, and recoverable.”
3. Bifurcated Passthrough & SR-IOV Transaction State Machine
- Explicit Route Separation: Whole-card VFIO passthrough and SR-IOV virtual slicing are strictly isolated. Whole-card passthrough strips conflicting SR-IOV parameters; conversely, the SR-IOV pipeline pre-builds DKMS modules against the next boot kernel before committing boot parameters.
qm digestTransaction Guard: All VM PCI modifications require the VM to be fully stopped. Before committing changes, PVE Assist verifies the QEMU configuration digest. If a concurrent external modification is detected, the operation safely aborts and preserves backups.
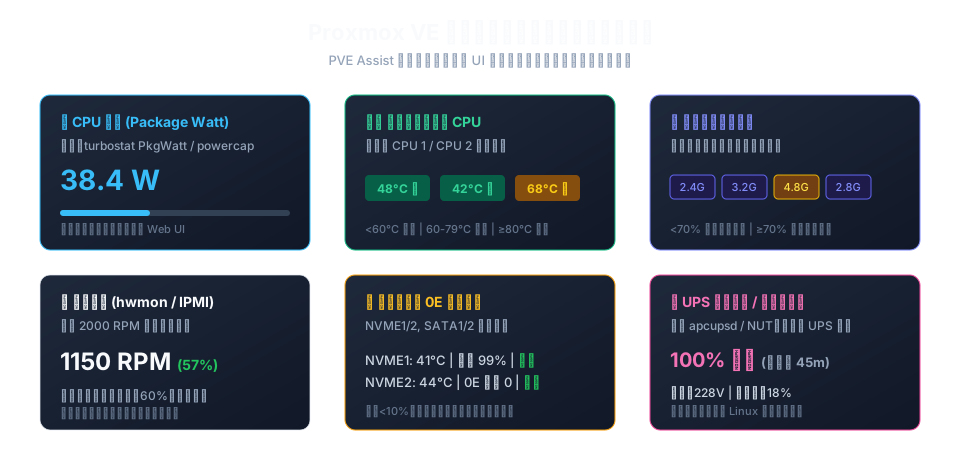
Figure 7: Overview of the enhanced metrics layout, illustrating the clean balance of power, thermal, fan, and storage indicators.
4. Telemetry Rules & Alarm Thresholds
PVE Assist applies carefully tuned industrial thresholds to prevent false alarms:
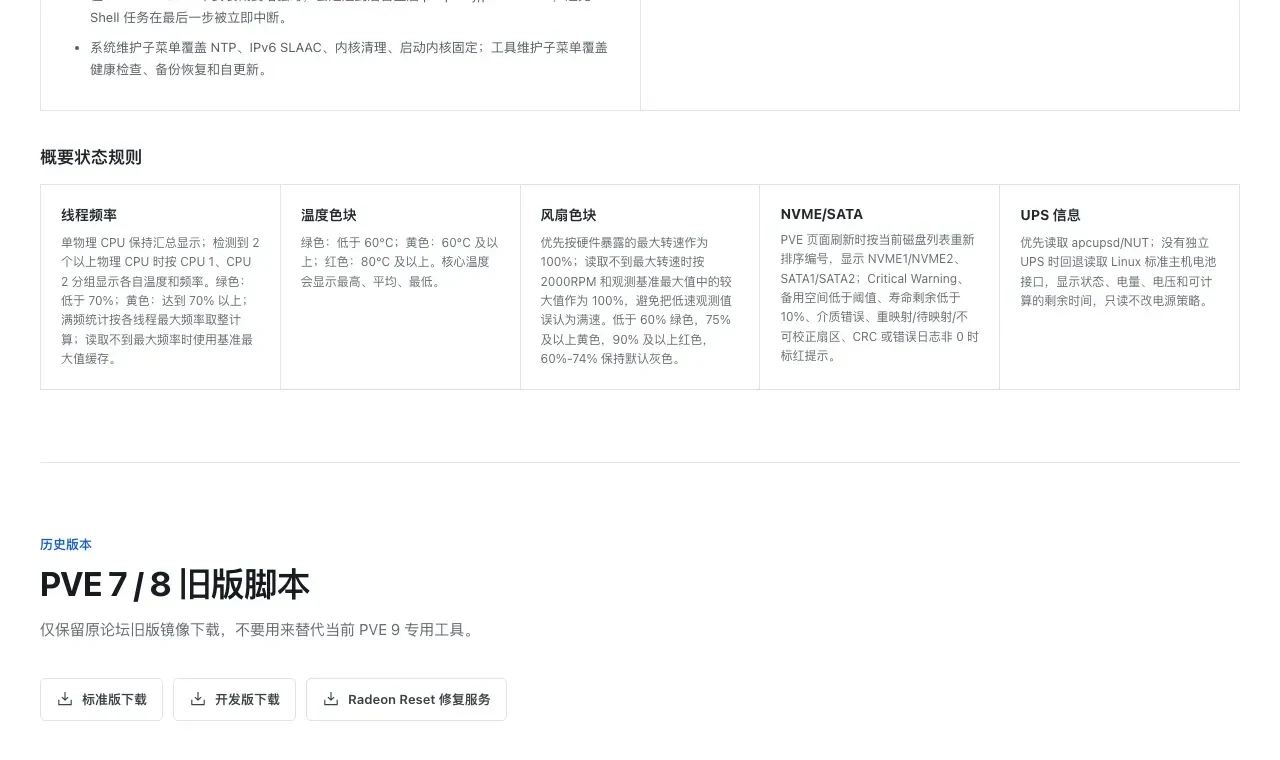
Figure 8: Clear documentation of thresholds for CPU frequencies, temperatures, fan RPM, and SMART health monitoring.
- Core Temperatures: Below 60°C is rendered in tranquil Green; 60°C~79°C in cautionary Yellow; 80°C and above triggers an alert Red. Maximum, average, and minimum core temperatures are shown simultaneously.
- False-Full-Speed Fan Guard: Silent fans running at 800 RPM previously showed 100% Red on older tools because the hardware exposed no max RPM limit. PVE Assist uses the larger of
2000 RPMand the observed baseline as the dynamic 100% scale, keeping normal low-speed cooling in the healthy Green zone (<60%). - NVMe/SATA 0E Health Probes: Drives are dynamically indexed (NVME1/2, SATA1/2). Any critical warning, spare capacity below threshold, remaining life below 10%, or reallocated/CRC errors will trigger an immediate red alert.
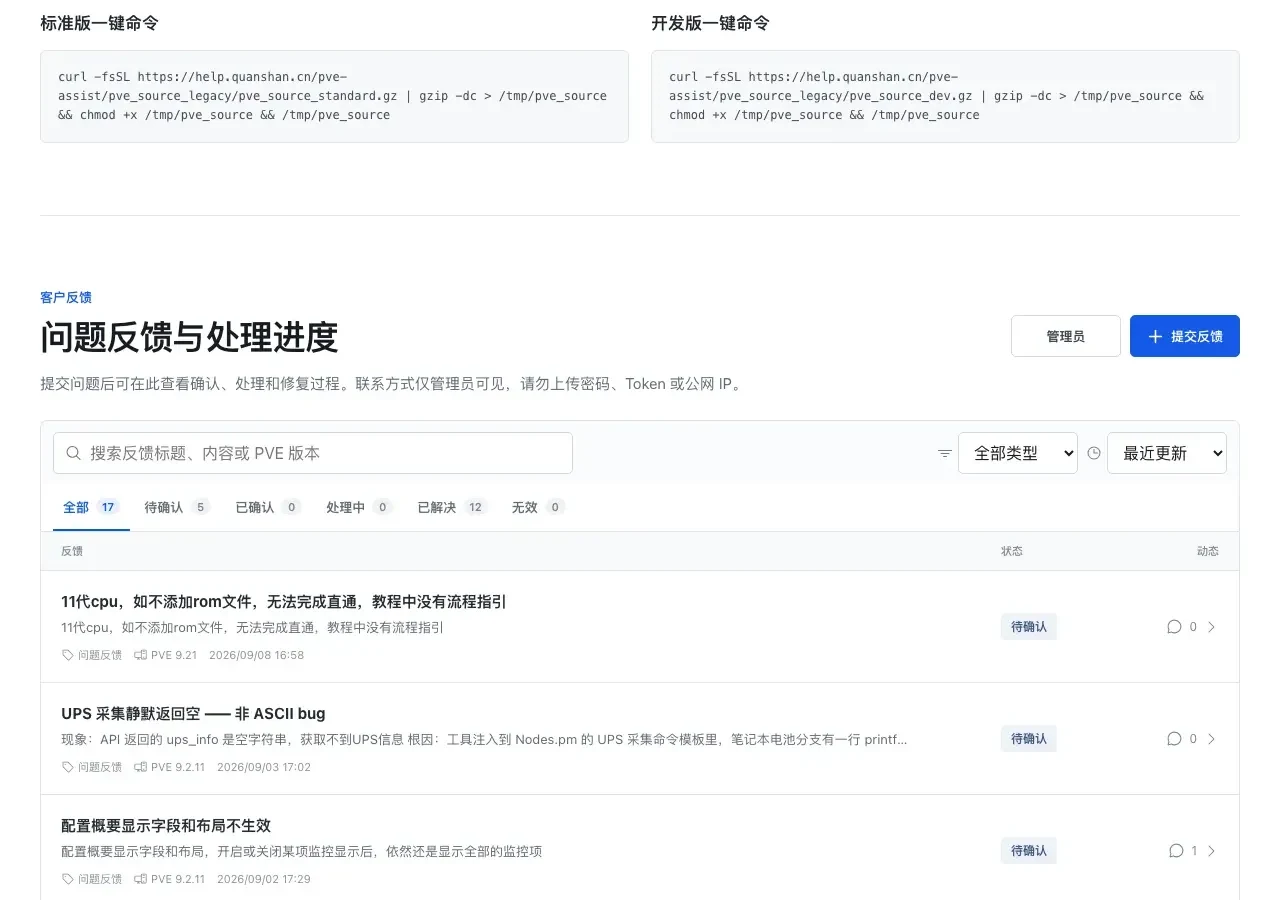
Figure 9: The transparent public issue tracking board, documenting real-world regression tests and developer resolutions.
6. Architecture Comparison: Whole-Card Passthrough vs. SR-IOV
Choosing between whole-card VFIO passthrough and SR-IOV virtual function slicing depends heavily on the intended workload:

Figure 10: Architectural comparison between Whole-Card VFIO Passthrough (Dedicated Highway) and SR-IOV Slicing (Bullet Train Carpool).
| Dimension | Whole-Card VFIO Passthrough | SR-IOV Virtual Function Slicing |
|---|---|---|
| Everyday Analogy | Chartering an entire highway (Exclusive express lane) | Slicing a bullet train into passenger cars (Carpooling) |
| Hardware Footprint | Monopolizes the physical GPU; host and other VMs get zero access | Carves the physical GPU into 1~7 independent Virtual Functions (VFs) |
| Target Workload | Dedicated Windows 3D gaming VM, local LLM inference node | Synology hardware transcoding + Linux media server + Windows VM |
| Setup Complexity | Low (Bind to vfio-pci) |
Moderate (Requires kernel DKMS build, VFIO driver binding) |
| PVE Assist Support | Automated BDF device validation, safe binding, 1-click revert | Auto-builds DKMS for the next boot kernel, wizard for Linux/Win VFs |
| Driver Stability | Flawless native vendor driver support | Requires supported Intel 11th–14th Gen iGPUs and clean guest drivers |
7. Interactive Terminal Experience (TUI)
Running pve-assist directly inside the Proxmox WebShell or SSH terminal launches a clean, keyboard-navigable bubble TUI menu:
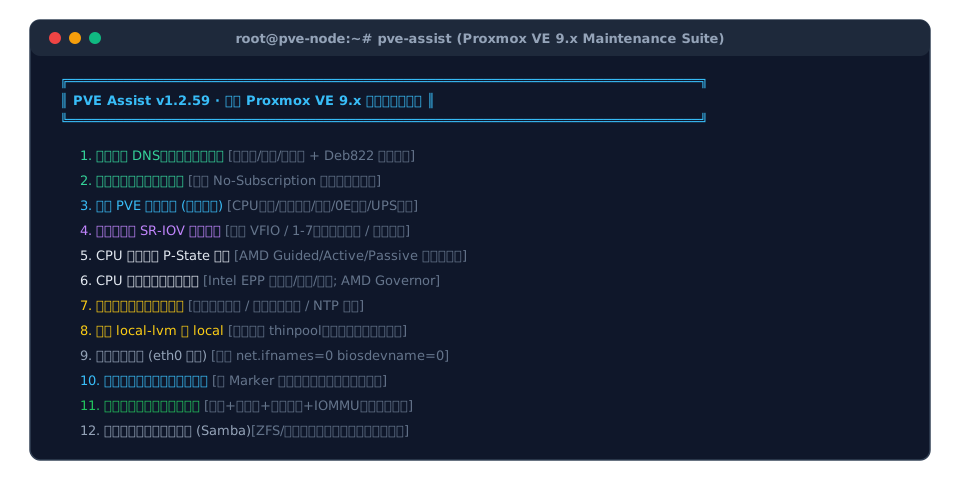
Figure 11: Main TUI menu of pve-assist. All 12 maintenance routines are cleanly presented with context notes.
8. Cross-Platform Automation Toolbox: Win 11 / Ubuntu 26.04 / macOS 26
To empower engineers across different operating systems, we have created an offline, zero-dependency cross-platform automation suite.
Each script supports two execution modes:
- Mode A (Human Interactive): Establishes a secure SSH terminal session and immediately presents the interactive TUI menu;
- Mode B (AI Agent Automated Inspection): Accepts non-interactive flags and outputs structured JSON responses, specifically tailored for autonomous coding agents (e.g., Claude Code, OpenCode, Cline).
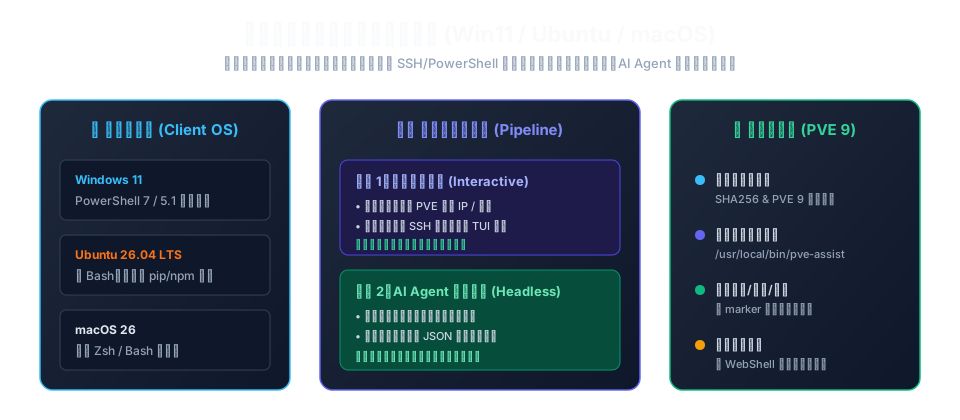
Figure 12: Unified cross-platform delivery pipeline supporting both interactive human operation and programmatic AI Agent integration.
1. Windows 11 Native PowerShell Script (Deploy-PveAssist.ps1)
Leverages Windows 11 built-in PowerShell 5.1/7+ and OpenSSH Client.
<#
.SYNOPSIS
    Windows 11 Native Automation Script for PVE Assist
.DESCRIPTION
    Supports interactive human mode and headless AI Agent inspection mode.
#>
[CmdletBinding()]
param (
    [Parameter(Position = 0)]
    [string]$PveHost = "",

    [Parameter(Position = 1)]
    [int]$PvePort = 22,

    [Parameter()]
    [string]$PveUser = "root",

    [Parameter()]
    [switch]$AgentMode,

    [Parameter()]
    [ValidateSet("status", "install", "quick_setup")]
    [string]$Action = "status"
)

$ErrorActionPreference = "Stop"

function Write-AgentJson {
    param([hashtable]$Data)
    [PSCustomObject]$Data | ConvertTo-Json -Compress
}

# 1. Parameter Validation
if ([string]::IsNullOrWhiteSpace($PveHost)) {
    if ($AgentMode) {
        Write-AgentJson @{ success = $false; error = "PveHost parameter is required in AgentMode" }
        exit 1
    }
    $PveHost = Read-Host "Enter Proxmox VE Host IP (e.g., 10.0.0.100)"
    if ([string]::IsNullOrWhiteSpace($PveHost)) {
        Write-Error "Host IP address cannot be empty!"
        exit 1
    }
}

# 2. Check OpenSSH Client
if (-not (Get-Command "ssh" -ErrorAction SilentlyContinue)) {
    Write-Error "Native ssh command not found. Please enable OpenSSH Client in Windows Settings!"
    exit 1
}

# 3. Execution Pipeline
$Target = "${PveUser}@${PveHost}"
$SshOpts = @("-p", $PvePort, "-o", "ConnectTimeout=8", "-o", "StrictHostKeyChecking=accept-new")

if ($AgentMode) {
    # Mode B: AI Agent Headless Inspection
    try {
        switch ($Action) {
            "status" {
                $cmd = 'if [ -f /usr/local/bin/pve-assist ]; then echo "{\"installed\":true,\"version\":\"$(/usr/local/bin/pve-assist -v 2>/dev/null || echo unknown)\"}"; else echo "{\"installed\":false}"; fi'
                $result = & ssh @SshOpts $Target $cmd
                Write-Output $result
            }
            "install" {
                $cmd = 'bash -c "$(curl -fsSL https://help.quanshan.cn/pve-assist/install.sh)" >/dev/null 2>&1 && echo "{\"success\":true,\"message\":\"pve-assist installed\"}"'
                $result = & ssh @SshOpts $Target $cmd
                Write-Output $result
            }
            "quick_setup" {
                $cmd = 'if [ ! -f /usr/local/bin/pve-assist ]; then bash -c "$(curl -fsSL https://help.quanshan.cn/pve-assist/install.sh)" >/dev/null 2>&1; fi; /usr/local/bin/pve-assist --quick-setup 2>&1 && echo "{\"success\":true,\"message\":\"quick setup complete\"}"'
                $result = & ssh @SshOpts $Target $cmd
                Write-Output $result
            }
        }
    } catch {
        Write-AgentJson @{ success = $false; error = $_.Exception.Message }
        exit 1
    }
} else {
    # Mode A: Human Interactive Mode
    Write-Host "`n>>> Connecting to Proxmox VE Host [$PveHost]..." -ForegroundColor Cyan
    $testConn = & ssh @SshOpts $Target 'echo connected' 2>&1
    if ($LASTEXITCODE -ne 0) {
        Write-Host ">>> Connection failed. Please check network, port, or SSH credentials." -ForegroundColor Red
        exit 1
    }

    Write-Host ">>> Validating PVE Assist runtime..." -ForegroundColor Green
    $remoteScript = @'
if [ ! -f /usr/local/bin/pve-assist ]; then
    echo ">>> Installing Quanshan PVE Assist..."
    bash -c "$(curl -fsSL https://help.quanshan.cn/pve-assist/install.sh)"
fi
echo ">>> Launching PVE Assist TUI..."
exec /usr/local/bin/pve-assist
'@
    & ssh -t @SshOpts $Target $remoteScript
}
2. Ubuntu 26.04 LTS Automation Script (deploy-pve-assist.sh)
Pure POSIX Bash syntax with zero external package manager overhead.
#!/usr/bin/env bash
set -euo pipefail

# ==============================================================================
# Ubuntu 26.04 LTS Automation Script for PVE Assist
# ==============================================================================

PVE_HOST="${1:-}"
PVE_PORT="${PVE_PORT:-22}"
PVE_USER="${PVE_USER:-root}"
AGENT_MODE="${AGENT_MODE:-false}"
ACTION="${ACTION:-status}"

die_json() {
  printf '{"success":false,"error":"%s"}\n' "$*"
  exit 1
}

if [ -z "$PVE_HOST" ]; then
  if [ "$AGENT_MODE" = "true" ]; then
    die_json "Target host IP required."
  fi
  printf "Enter PVE Host IP (e.g., 10.0.0.100): "
  read -r PVE_HOST
  [ -n "$PVE_HOST" ] || { printf "Error: Host IP cannot be empty.\n" >&2; exit 1; }
fi

SSH_OPTS=(-p "$PVE_PORT" -o ConnectTimeout=8 -o StrictHostKeyChecking=accept-new)
TARGET="${PVE_USER}@${PVE_HOST}"

if [ "$AGENT_MODE" = "true" ]; then
  case "$ACTION" in
    status)
      ssh "${SSH_OPTS[@]}" "$TARGET" '
        if [ -f /usr/local/bin/pve-assist ]; then
          printf "{\"installed\":true,\"version\":\"%s\"}\n" "$(/usr/local/bin/pve-assist -v 2>/dev/null || echo unknown)"
        else
          printf "{\"installed\":false}\n"
        fi
      '
      ;;
    install)
      ssh "${SSH_OPTS[@]}" "$TARGET" '
        bash -c "$(curl -fsSL https://help.quanshan.cn/pve-assist/install.sh)" >/dev/null 2>&1 \
          && printf "{\"success\":true,\"message\":\"installed\"}\n" \
          || printf "{\"success\":false,\"error\":\"install failed\"}\n"
      '
      ;;
    *)
      die_json "Unknown action: $ACTION"
      ;;
  esac
else
  printf "\033[36m>>> Connecting to Proxmox host [%s]...\033[0m\n" "$PVE_HOST"
  ssh "${SSH_OPTS[@]}" "$TARGET" '
    if [ ! -f /usr/local/bin/pve-assist ]; then
      printf "\033[32m>>> Installing PVE Assist...\033[0m\n"
      bash -c "$(curl -fsSL https://help.quanshan.cn/pve-assist/install.sh)"
    fi
    exec /usr/local/bin/pve-assist
  '
fi
3. macOS 26 Automation Script (deploy_pve_assist_mac.sh)
Engineered for macOS Zsh/Bash environments with tuned SSH socket options.
#!/usr/bin/env zsh
set -euo pipefail

# ==============================================================================
# macOS 26 Automation Script for PVE Assist
# ==============================================================================

typeset PVE_HOST="${1:-}"
typeset PVE_PORT="${PVE_PORT:-22}"
typeset PVE_USER="${PVE_USER:-root}"
typeset AGENT_MODE="${AGENT_MODE:-false}"

if [[ -z "$PVE_HOST" ]]; then
  if [[ "$AGENT_MODE" == "true" ]]; then
    print '{"success":false,"error":"Host IP required"}'
    exit 1
  fi
  read -r "PVE_HOST?Enter Proxmox VE Host IP (e.g., 10.0.0.100): "
  [[ -n "$PVE_HOST" ]] || { print "Error: Host IP cannot be empty!" >&2; exit 1; }
fi

SSH_TARGET="${PVE_USER}@${PVE_HOST}"
SSH_ARGS=(-p "$PVE_PORT" -o ConnectTimeout=6 -o StrictHostKeyChecking=accept-new)

if [[ "$AGENT_MODE" == "true" ]]; then
  ssh "${SSH_ARGS[@]}" "$SSH_TARGET" '
    if [ -f /usr/local/bin/pve-assist ]; then
      echo "{\"online\":true,\"installed\":true}"
    else
      echo "{\"online\":true,\"installed\":false}"
    fi
  '
else
  print "\033[34m>>> Connecting to Quanshan PVE Assist console...\033[0m"
  ssh -t "${SSH_ARGS[@]}" "$SSH_TARGET" '
    if [ ! -f /usr/local/bin/pve-assist ]; then
      bash -c "$(curl -fsSL https://help.quanshan.cn/pve-assist/install.sh)"
    fi
    exec /usr/local/bin/pve-assist
  '
fi
4. Step-by-Step Execution Examples
Method A: Human Interactive Deployment
On macOS or Linux, grant execution permissions and execute:
chmod +x deploy_pve_assist_mac.sh
./deploy_pve_assist_mac.sh 10.0.0.100
The script verifies network connectivity, fetches the official binary if missing, and allocates a PTY session launching the full TUI menu.
Method B: Programmatic AI Agent Inspection
Autonomous AI agents can invoke the script in headless mode to inspect node readiness before performing operations:
AGENT_MODE=true ACTION=status ./deploy-pve-assist.sh 10.0.0.100
Output:
{"installed": true, "version": "v1.2.59"}
The agent parses this standard JSON response and proceeds with downstream automation without blocking on interactive prompts.
9. Frequently Asked Questions (FAQ)
Q1: Will official Proxmox upgrades break PVE Assist patches?
Answer: No.
- Every file patched by PVE Assist contains unique inline cryptographic markers. When an official update overwrites the Web UI, running
pve-assistagain cleanly reapplies the patches. - If preparing for a major release migration, option 10 includes a “Restore Original” function that cleanly removes all custom modifications, returning the system to pristine upstream state within seconds.
Q2: How does the laptop battery monitoring work without a dedicated UPS?
Answer: In v1.2.59, PVE Assist checks the Linux kernel /sys/class/power_supply/BAT* subsystem. If no external USB/Network UPS is detected, the Web UI automatically displays the internal laptop battery’s charge percentage, voltage, and remaining operational time.
Q3: Is merging local-lvm into local safe? Could I lose virtual disks?
Answer: It is safe on standalone nodes. PVE Assist enforces strict prerequisites:
- Cluster Blocking: The operation is hard-disabled if the node belongs to a Proxmox cluster to prevent breaking shared storage metadata;
- Usage Verification: It scans all VMs and CTs to ensure no virtual disks reside on the
local-lvmthin pool; - Volume Group Verification: Once confirmed, it safely deletes the empty thin pool and runs
lvextend -rto expand the root filesystem.
Q4: What if my Windows guest GPU driver shows Code 43 after SR-IOV configuration?
Answer: Code 43 on Windows typically stems from missing virtual GOP ROMs or driver version incompatibilities. PVE Assist features pre-built profiles for Windows VFs (including UHD 730/770 platforms) and formats clean raw args. Choosing the “Windows VF Passthrough” option in the wizard ensures proper driver initialization without manual INF hacking.
10. Conclusion: Reclaiming Clarity in Homelab Engineering
Self-hosting and homelab virtualization should be about empowerment, not endless frustration with fragile shell scripts and broken dependencies.
Quanshan’s PVE Assist exemplifies engineering restraint—prioritizing version sandboxing, non-destructive telemetry, transaction locking, and deterministic rollbacks over superficial gimmicks.
If you have a fresh Proxmox VE 9 node waiting to be configured, install it with a single command:
bash -c "$(curl -fsSL https://help.quanshan.cn/pve-assist/install.sh)"
Say goodbye to guessing temperatures by touching the chassis, and build on a rock-solid, production-grade foundation!