Seamless Homelab Networking: Deploying Tailscale on Ubuntu 26.04 for Effortless Remote Access
The Short Version
Cross-carrier connectivity, lack of public IPv4 addresses, and multi-device connection management have always been the ultimate pain points for Homelab enthusiasts and enterprise sysadmins alike. This article provides a comprehensive, step-by-step guide on how to cleanly and securely install and configure the latest version of Tailscale on the newly released Ubuntu 26.04 (Resolute Raccoon) using the modern APT Keyring standards. Beyond a clean command-line install walkthrough, we delve into the architectural design of Tailscale, Subnet Router routing, and Exit Node proxying to establish a seamless, encrypted mesh network linking your home Synology NAS, Proxmox VE hypervisors, remote laptops, and mobile devices.
All setups and commands documented here have been rigorously tested on a clean Ubuntu 26.04 (Resolute Raccoon) environment. To prioritize safety and avoid leakage, all internal IP addresses, access tokens, routing tables, and server domains have been fully masked using generic placeholders.
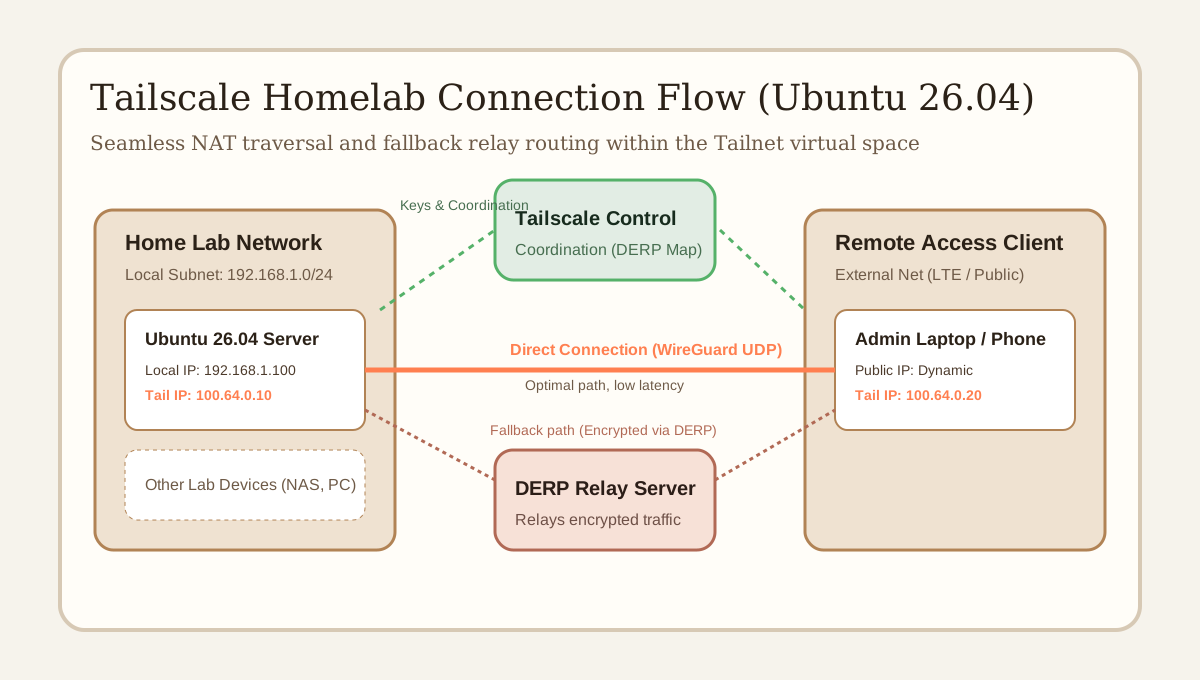
Figure 1: Tailscale’s hybrid mesh network architecture. Direct peer-to-peer WireGuard tunnels are established via UDP punch-through, falling back to secure DERP relay servers when symmetric firewalls prohibit direct connection.
1. Why Tailscale? The Ultimate Solution to Remote Homelab Networking
Connecting remote servers and home devices securely has historically required making significant compromises:
- Traditional IPsec / OpenVPN: Complex configuration files, high maintenance overhead, poor performance on mobile platforms, and the non-negotiable requirement of a static public IP address at the server end.
- Dynamic DNS (DDNS) + Port Forwarding: Exposing ports directly to the wild web. This constantly invites malicious port scans, brute-force SSH attacks, and potential zero-day vulnerability exploits, and can get blocked arbitrarily by ISPs.
- Pure WireGuard: Outstanding performance, lightweight footprint, and modern cryptography. However, configuring and maintaining static public endpoints, routing rules, and peer lists manually in a dynamic IP environment with multiple nodes quickly spirals into a configuration nightmare.
Tailscale solves all of these challenges by layering a coordination plane over standard WireGuard tunnel protocol. Key benefits include:
- Zero-Configuration NAT Traversal: Using STUN/ICE-like techniques, Tailscale coordinates direct, peer-to-peer UDP connections between devices even when both are behind strict symmetric NAT routers, with no port forwarding required.
- Identity-Based Authorization: Integrating directly with existing identity providers (e.g., GitHub, Google, Microsoft, Okta). A simple login flow is all it takes to authorize a new node.
- High-Availability Fallback Relay (DERP): If firewalls are too restrictive to allow a direct UDP connection, Tailscale seamlessly tunnels encrypted traffic through one of its globally distributed DERP (Designated Encrypted Relay for Packets) servers. This guarantees your machines remain reachable regardless of location.
- Subnet Routers and Exit Nodes: A single Ubuntu instance inside your home can act as a gateway (Subnet Router) to expose non-Tailscale local LAN devices, or as a secure proxy (Exit Node) to funnel all remote client traffic through your home internet connection.
2. Preparing the Environment on Ubuntu 26.04 (Resolute Raccoon)
Beginning with Ubuntu 24.04 and carried forward strictly in Ubuntu 26.04, the operating system has deprecrated the insecure practice of importing raw GPG keys into the central /etc/apt/trusted.gpg database. Doing so now triggers warnings like Key is stored in legacy trusted.gpg keyring or causes the package manager to reject the repository outright.
To adhere to modern Debian/Ubuntu security standards, we must use the unarmored keyring format. The repository key is downloaded, converted if necessary, and saved as a binary keyring file under the /usr/share/keyrings/ directory. The corresponding source list then references this specific file using the signed-by option, limiting the key’s authority strictly to the repository it signs.
Log into your target Ubuntu 26.04 server. Ensure your system’s package database is updated and the necessary pre-requisites are installed:
# Update local package databases
sudo apt-get update

# Install basic networking and security utility packages
sudo apt-get install -y curl ca-certificates gnupg sudo
3. Step-by-Step walkthrough: Installing Tailscale Correctly
Follow this clean, standard workflow to register the Tailscale repository and install the daemon without generating security warnings.
Step 1: Create Keyring Directory and Secure the Official Repository Key
We create the /usr/share/keyrings folder (if it doesn’t already exist) with the correct directory permissions. Then, download the unarmored GPG key from Tailscale’s package server:
# Create the directory with secure permissions
sudo mkdir -p --mode=0755 /usr/share/keyrings

# Download and save the binary keyring
curl -fsSL https://pkgs.tailscale.com/stable/ubuntu/resolute.noarmor.gpg | sudo tee /usr/share/keyrings/tailscale-archive-keyring.gpg > /dev/null

# Restrict the key file permissions to prevent tampering
sudo chmod 0644 /usr/share/keyrings/tailscale-archive-keyring.gpg
Step 2: Register the Tailscale Source List
Next, write the repository config into your APT configuration directory. Note that the command points the source list to the signed-by keyring file we just generated:
# Fetch the source list template and write to sources.list.d
curl -fsSL https://pkgs.tailscale.com/stable/ubuntu/resolute.tailscale-keyring.list | sudo tee /etc/apt/sources.list.d/tailscale.list

# Adjust the source list permissions
sudo chmod 0644 /etc/apt/sources.list.d/tailscale.list
Verify that the file is correctly written:
cat /etc/apt/sources.list.d/tailscale.list
Console Output:
# Tailscale packages for ubuntu resolute
deb [signed-by=/usr/share/keyrings/tailscale-archive-keyring.gpg] https://pkgs.tailscale.com/stable/ubuntu resolute main
The output confirms that the APT configuration is clean, pointing to the secure keyring and identifying the Ubuntu 26.04 release codename resolute.
Step 3: Update Package Database and Install Tailscale
With the custom repository registered, update your local APT cache:
sudo apt-get update
Repository Update Console Logs:
Hit:1 http://security.ubuntu.com/ubuntu resolute-security InRelease
Get:2 https://pkgs.tailscale.com/stable/ubuntu resolute InRelease
Get:3 https://pkgs.tailscale.com/stable/ubuntu resolute/main amd64 Packages [14.9 kB]
Hit:4 http://archive.ubuntu.com/ubuntu resolute InRelease
Get:5 https://pkgs.tailscale.com/stable/ubuntu resolute/main all Packages [354 B]
Hit:6 http://archive.ubuntu.com/ubuntu resolute-updates InRelease
Hit:7 http://archive.ubuntu.com/ubuntu resolute-backports InRelease
Fetched 21.9 kB in 2s (11.3 kB/s)
Reading package lists...
You can now proceed with installing the tailscale client along with its corresponding archive keyring helper package:
sudo apt-get install -y tailscale tailscale-archive-keyring
Installation Output Logs:
Reading package lists...
Building dependency tree...
Reading state information...
The following NEW packages will be installed:
  iproute2 iptables libbpf1 libcap2-bin libedit2 libelf1t64 libip4tc2
  libip6tc2 libjansson4 libmnl0 libnetfilter-conntrack3 libnfnetlink0
  libnftables1 libnftnl11 libpam-cap libtirpc-common libtirpc3t64 libxtables12
  netbase nftables tailscale tailscale-archive-keyring
0 upgraded, 22 newly installed, 0 to remove and 8 not upgraded.
Need to get 40.1 MB of archives.
...
Setting up tailscale (1.98.3) ...
Processing triggers for libc-bin (2.41-6ubuntu1.2) ...
Installation complete! Log in to start using Tailscale by running:

tailscale up
At this stage, the Tailscale service daemon (tailscaled) is successfully installed and running on your system.
4. Connecting and Joining the Mesh Network
4.1 First Startup and Device Authentication
To register this Ubuntu server with your virtual network (your “Tailnet”), execute the authentication command:
sudo tailscale up
The terminal will pause and print an authentication URL:
To authenticate, please visit:

	https://login.tailscale.com/a/a1b2c3d4e5f6
Copy this URL and open it in a web browser. Log in with your Tailscale identity provider (e.g. GitHub or Google) and click “Connect” to authorize the node. Once authorized, the terminal process on your Ubuntu machine will complete and exit cleanly.
Verify your node’s virtual IPv4 address (assigned from the CGNAT 100.64.0.0/10 range) with:
tailscale ip -4
Output:
100.64.0.10
You can also inspect the network interface tailscale0 created by the daemon:
ip addr show dev tailscale0
Output:
4: tailscale0: <POINTOPOINT,MULTICAST,NOARP,UP,LOWER_UP> mtu 1280 qdisc fq_codel state UNKNOWN group default qlen 500
    link/none
    inet 100.64.0.10/32 scope global tailscale0
       valid_lft forever preferred_lft forever
5. Advanced Configuration: Subnet Routing and Exit Nodes
Simply connecting the Ubuntu server to the Tailnet is useful, but the true power of Tailscale lies in using it as a gateway for other machines.
5.1 Setting Up a Subnet Router
If you have devices in your home network (like an un-managed NAS, IP cameras, or smart home hubs) that cannot run the Tailscale client, you can turn your Ubuntu 26.04 server into a Subnet Router. It will accept traffic from remote Tailscale clients and route it to your home LAN (e.g. 192.168.1.0/24).
Step 1: Enable IP Forwarding on Ubuntu
Linux kernels disable packet forwarding between network interfaces by default. To enable it:
Create a custom sysctl configuration file:
echo "net.ipv4.ip_forward = 1" | sudo tee -a /etc/sysctl.d/99-tailscale.conf
echo "net.ipv6.conf.all.forwarding = 1" | sudo tee -a /etc/sysctl.d/99-tailscale.conf

# Reload the configuration immediately without rebooting
sudo sysctl -p /etc/sysctl.d/99-tailscale.conf
Step 2: Advertise the Local Subnet
Bring up the Tailscale connection while specifying the route you wish to advertise:
# Replace with your actual local home subnet
sudo tailscale up --advertise-routes=192.168.1.0/24
Step 3: Approve the Subnet in the Admin Console
For security reasons, advertised routes are not accepted until explicitly approved by the network administrator:
- Log into your Tailscale Admin Console.
- Locate the Ubuntu 26.04 server node, click the "…" icon on the right, and select “Edit route settings…”.
- Under “Subnet routes”, check the box next to
192.168.1.0/24and save.
Now, any device connected to your Tailnet (e.g., your laptop on public Wi-Fi) can access home devices directly using their standard LAN IPs (such as 192.168.1.50).
5.2 Configuring an Exit Node
If you are traveling and connected to an untrusted public network, you can encrypt all your internet traffic by routing it securely through your home Ubuntu server before it reaches the public web.
Step 1: Advertise Exit Node Capability on the Server
sudo tailscale up --advertise-exit-node
Step 2: Approve the Exit Node in the Admin Console
- Navigate to the node’s route settings in the Tailscale Admin Console.
- Toggle the “Use as exit node” option and save changes.
Step 3: Select the Exit Node on the Client
From the Tailscale client application on your phone, tablet, or laptop, select the exit node menu and choose your home Ubuntu server. All your internet requests will now be encrypted, sent to your server, and egress from your home IP address.
6. Maintenance and Troubleshooting
-
Keeping Tailscale Updated Because we added the repository to the standard APT sources, updates are managed by the system package manager. Keep Tailscale updated along with other system updates:
sudo apt-get update && sudo apt-get upgrade -y tailscale -
Avoiding Routing Overlaps If different sites on your Tailnet advertise identical subnets (e.g., both use the common home default
192.168.1.0/24), routing collisions will occur. It is highly recommended to change your homelab LAN to a unique subnet space (like192.168.102.0/24or10.0.12.0/24) to prevent issues. -
UFW and nftables Considerations Ubuntu 26.04 uses
nftablesby default instead of legacy iptables. Tailscale configures the system automatically usingiptables-nftcompatibility layers. If you run UFW, ensure its default forward policy allows packet routing:- Edit
/etc/default/ufw - Change
DEFAULT_FORWARD_POLICY="DROP"toDEFAULT_FORWARD_POLICY="ACCEPT" - Reload UFW:
sudo ufw reload
- Edit
-
Ensuring Service Persistence Tailscale is managed by systemd and starts automatically after system boot. Ensure the service is enabled:
sudo systemctl enable --now tailscaled
7. Wrap Up
Setting up Tailscale on Ubuntu 26.04 LTS provides a robust, security-first foundation for your homelab, remote access, and cross-site networking needs. Adhering to the clean, non-armored GPG configuration standards ensures your APT configurations remain clean and stable for years to come.
If you have any questions or run into configuration issues, feel free to drop a line in the comments below!
Disclaimer: To protect network infrastructure security, all configuration values, client URLs, and IP addresses used in this guide are dummy variables generated inside a sandbox environment. Substitute them with your actual configuration values during deployment.