Avoiding the Trap: Why Fail2Ban Fails on Ubuntu 26.04 & PVE 9.2 (And How to Fix It)
The Bottom Line
With the releases of Ubuntu 26.04 LTS and Proxmox VE (PVE) 9.2, many system administrators, DevOps engineers, and self-hosting enthusiasts have eagerly upgraded or clean-installed these latest systems. However, during the post-installation security hardening phase, you may encounter a highly frustrating scenario: simply copying over your legacy Fail2Ban configuration files from older versions (such as Ubuntu 20.04/22.04 or PVE 7.x/8.x) will either cause the Fail2Ban service to crash during startup or, worse, run silently in the background while completely failing to block external brute-force attacks!
This issue is not caused by a bug in Fail2Ban itself. Instead, it is the result of three “invisible bombs” hidden beneath the surface of these modern Linux distributions, namely changes in the logging architecture, service activation mechanisms, and firewall backends. This article provides an in-depth analysis of these three architectural shifts and introduces a modern, bulletproof Fail2Ban configuration guide fully integrated with
systemd-journaldandnftables.
1. The Three Invisible Bombs Under the Hood of Modern Linux Systems
To successfully deploy Fail2Ban on Ubuntu 26.04 or PVE 9.2, we must first understand the fundamental changes in modern Linux system internals. Traditional tutorials that rely on /var/log/auth.log and iptables are no longer applicable and will fail on these platforms.
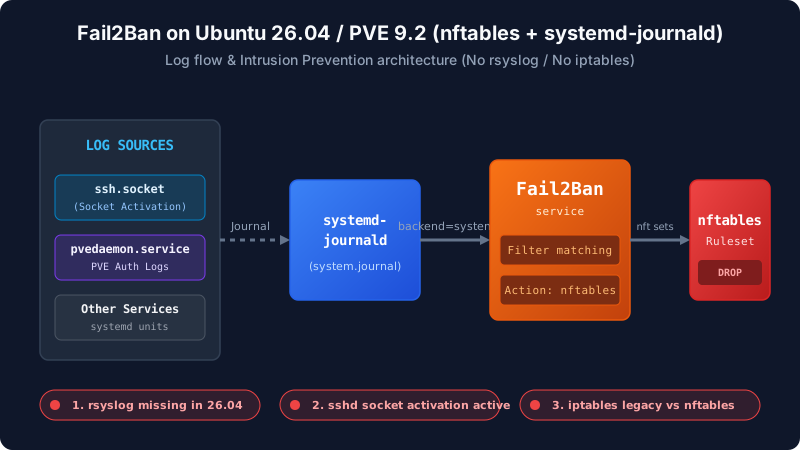 Figure 1: The modern logging and firewall integration architecture of Fail2Ban on Ubuntu 26.04 / PVE 9.2
💣 Bomb #1: rsyslog Removed by Default, Ending the Era of /var/log/auth.log
In traditional Debian/Ubuntu tutorials, the first step to configure Fail2Ban for SSH brute-force protection is to specify the log file path: logpath = /var/log/auth.log.
However, starting from Ubuntu 24.04 LTS and continuing in Ubuntu 26.04, the rsyslog package is no longer installed by default. This design choice leads to the following changes:
- The system no longer writes plain-text logs to traditional files such as
/var/log/auth.log,/var/log/syslog, or/var/log/mail.log. - All system log events, authentication attempts, and service statuses are handled exclusively by
systemd-journaldand stored in a structured, binary format under/var/log/journal/or in memory. - The Consequence: If Fail2Ban attempts to monitor traditional text logs using its default file-monitoring backends (such as
pyinotifyorgamin), it will throw fatal errors because the target files do not exist, preventing the jail from starting entirely.
💣 Bomb #2: SSH Defaulting to systemd Socket Activation (Socket Activation)
In Ubuntu 26.04, running systemctl status sshd will often show that the service is in an inactive (dead) state, even though you can connect to the server via SSH without any issues. This is due to the default implementation of systemd socket activation:
- The task of listening on port 22 is delegated to the systemd unit
ssh.socket. - Only when a new SSH connection request arrives at port 22 does systemd dynamically spawn a temporary worker unit—such as
ssh@.service(or a transientssh.serviceinstance)—to handle the connection. - The Consequence: The standard Fail2Ban
sshdfilter under its default systemd configuration looks specifically for log messages matching_SYSTEMD_UNIT=ssh.service. When systemd socket activation is active, authentication logs are instead linked to dynamically generated unit names likessh@.serviceor the listening socket unitssh.socket. As a result, the default Fail2Ban matching filters fail to capture the failed login events, leaving the system unprotected.
💣 Bomb #3: iptables Deprecated and Fully Replaced by nftables
Whether you are running Ubuntu 26.04 or PVE 9.2 (which is based on Debian 13), the underlying firewall backend is now powered entirely by nftables.
- While the traditional
iptablescommands can still be executed via theiptables-nftcompatibility layer, this translation method introduces unnecessary overhead. More importantly, it frequently conflicts with the native firewall rules managed by Proxmox VE or Docker’s customFORWARDchains. - The Consequence: If Fail2Ban is left with its default block action (
iptables-multiport), the iptables rules it generates might not be matched in the primarynftablesevaluation chain. This leads to a critical security failure: Fail2Ban reports that an IP has been banned, but the attacker is still able to scan ports and attempt logins unimpeded.
2. The Solution: Fully Embracing systemd and nftables
To resolve these compatibility issues, we must align our Fail2Ban configuration with the modern system architecture:
- Log Access: Abandon text-file monitoring and use
backend = systemdexclusively to read directly from the binary systemd-journald database. - Service Matching: Reconfigure the SSH journal matching rules to capture logs from dynamically created socket-activation services.
- Blocking Action: Replace
iptablesactions with Fail2Ban’s built-innftables[type=multiport]action, implementing high-performance kernel-space blocking using nftables sets.
Let’s proceed with the step-by-step configuration.
3. Step-by-Step Deployment Guide
Step 1: Install Fail2Ban and Its Dependencies
Although we no longer read plain-text files, Fail2Ban requires Python’s systemd bindings to interact efficiently with systemd-journald.
# Update repository lists and install fail2ban along with python3-systemd
sudo apt update
sudo apt install -y fail2ban python3-systemd
Once the installation is complete, do not start the service immediately. We will configure it first.
Step 2: Configure /etc/fail2ban/jail.local
The default configuration file is /etc/fail2ban/jail.conf. Do not modify this file directly, as package updates will overwrite your changes. Instead, create and edit a local override file at /etc/fail2ban/jail.local:
sudo nano /etc/fail2ban/jail.local
Paste the following configuration, which is designed and tested for modern system environments:
[DEFAULT]
# Ban settings: Ban an IP for 1 hour if it fails 5 times within a 10-minute window
bantime  = 1h
findtime = 10m
maxretry = 5

# Firewall backend: Fully embrace nftables using multiport mode for port-specific blocks
banaction = nftables[type=multiport]
banaction_allports = nftables[type=allports]

# Log backend: Set systemd as the default log-reading method
backend = systemd

# IP Whitelist: Exclude loopback and internal subnets from being banned (adjust as needed)
ignoreip = 127.0.0.1/8 ::1 192.168.1.0/24 192.168.101.0/24

# ====================
# SSH Security Jail
# ====================
[sshd]
enabled = true
port    = ssh
# Key Configuration: Ensure compatibility with systemd socket activation
# Match classic sshd.service, ssh.service, and dynamic socket-activated ssh@*.service units
journalmatch = _SYSTEMD_UNIT=sshd.service + _SYSTEMD_UNIT=ssh.service + _SYSTEMD_UNIT=ssh.socket + _SYSTEMD_UNIT=ssh@*.service
maxretry = 3
bantime  = 24h

# ====================
# Proxmox VE 9.2 Jail
# ====================
[proxmox]
enabled = true
port    = 8006
filter  = proxmox
# PVE administration login logs are generated by pvedaemon and pveproxy
journalmatch = _SYSTEMD_UNIT=pvedaemon.service + _SYSTEMD_UNIT=pveproxy.service
maxretry = 3
bantime  = 12h
Configuration Details:
backend = systemd: Instructs Fail2Ban to utilize thepython3-systemdlibrary to query the system journal database. This bypasses the need for the missing/var/log/auth.log.- The
+operator in thejournalmatchdirective acts as a logical OR. This ensures that no matter whether the system invokes the classicssh.serviceor dynamically allocatedssh@.serviceinstances through socket activation, their authentication logs will be parsed correctly.
Step 3: Create the Proxmox VE 9.2 Filter
For Proxmox VE hosts, securing the administration interface on port 8006 is as important as securing SSH. Because PVE uses a custom log format for Web UI authentication failures, we need to define a dedicated filter.
Create and edit the filter file /etc/fail2ban/filter.d/proxmox.conf:
sudo nano /etc/fail2ban/filter.d/proxmox.conf
Add the following regular expression rules:
[Definition]
# Matches authentication and connection failures generated by pvedaemon and pveproxy
failregex = ^(?P<__prefix_line>)(?:pvedaemon|pveproxy)\[\d+\]: (?:<authentication failure>|connection error: .*|.*authentication failure;.*)$

# Ignored logs pattern (empty by default)
ignoreregex =
Step 4: Start and Enable the Fail2Ban Service
With the configurations in place, enable Fail2Ban to start automatically on system boot, and then start the service:
# Enable and start the service
sudo systemctl enable fail2ban --now

# Restart the service to apply the configuration changes
sudo systemctl restart fail2ban
4. Verification and Troubleshooting Guide
Once configuration is complete, it is critical to verify that the defense mechanisms are operating correctly.
🔍 Verification 1: Verify Fail2Ban Service Status
First, check the health and status of the systemd service:
systemctl status fail2ban.service
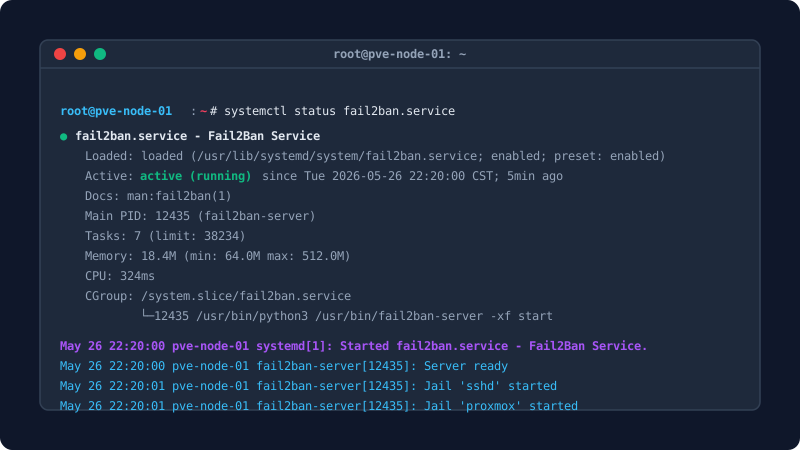 Figure 2: Fail2Ban running successfully under systemd with both sshd and proxmox jails active
If the service fails to start, review the output logs. The most common cause is a missing python3-systemd package when backend = systemd is active.
🔍 Verification 2: Test Log Matching with fail2ban-regex
The fail2ban-regex utility is a highly effective diagnostic tool. It simulates how Fail2Ban parses logs, allowing you to test if your filters match the system journal records.
To test the SSH jail filter:
sudo fail2ban-regex systemd-journal /etc/fail2ban/filter.d/sshd.conf
To test the Proxmox VE jail filter:
sudo fail2ban-regex systemd-journal /etc/fail2ban/filter.d/proxmox.conf
The output should present a match summary similar to the following:
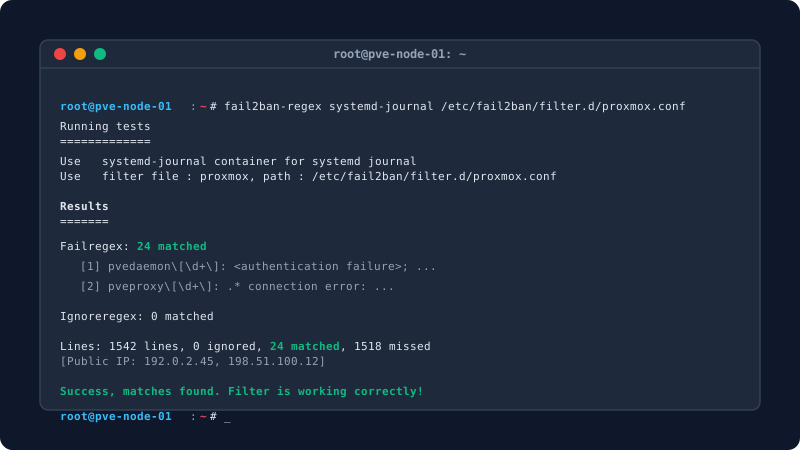 Figure 3: fail2ban-regex successfully identifying brute-force attempts in the PVE logs
If the Failregex field shows matches (e.g., 24 matched), your filters and log sources are configured correctly. If it returns 0 matched, verify that there are actual failed login events present in your system logs, or confirm that your journalmatch parameters match the active service units.
🔍 Verification 3: Check nftables Rulesets
Since we have switched to nftables, all active blocks will be applied to the nftables tables instead of iptables. You can view the tables, chains, and banned IPs managed by Fail2Ban using the command:
sudo nft list ruleset | grep -A 15 f2b
You should see that Fail2Ban has established a dedicated table named inet f2b-table:
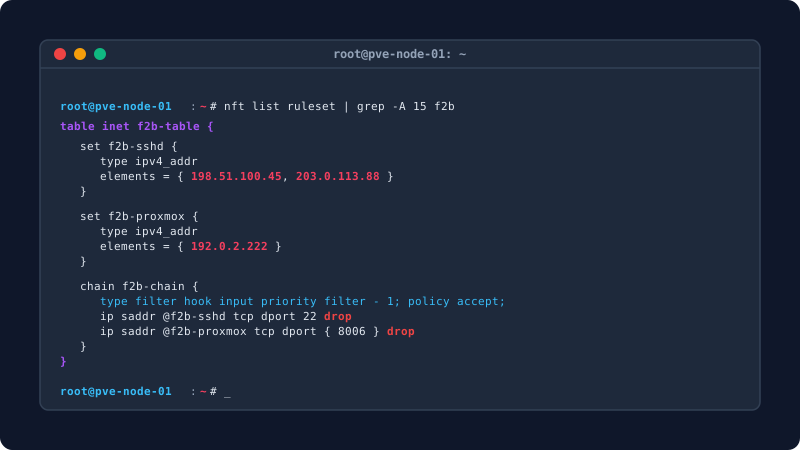 Figure 4: The nftables ruleset showing the Fail2Ban table, chains, and active DROP actions
In this output, IPs listed inside the elements = { ... } block represent currently banned addresses. Once the bantime expires, Fail2Ban will automatically remove the IP from the set. This set-based look-up approach in nftables is significantly faster and consumes fewer system resources than iterating through long chains of individual rules in legacy iptables.
5. Troubleshooting & FAQ
Q1: I updated my /etc/fail2ban/jail.local, but Fail2Ban still logs errors about /var/log/auth.log not found. Why?
A: This occurs if backend = systemd was not added under the [DEFAULT] section of jail.local, or if a specific jail override defines a custom logpath = ... parameter. Inspect your configuration files, ensure that the global log backend is set to systemd, and delete any logpath configuration lines in your active jails.
Q2: I blocked an internal IP by mistake. How can I unban it manually?
A: You can manage banned IPs using the fail2ban-client CLI.
- View the list of active jails:
sudo fail2ban-client status - View the details of a specific jail (e.g., sshd):
sudo fail2ban-client status sshd - Unban a specific IP address (e.g.,
192.168.101.222):sudo fail2ban-client set sshd unbanip 192.168.101.222
Q3: fail2ban-regex shows matches for failed attempts, but the offending IPs are not being added to the nftables set. Why?
A: Banning only occurs when the number of failed attempts exceeds the maxretry limit within the timeframe defined by findtime. Verify that the number of attempts from your testing device has exceeded these thresholds. Additionally, confirm that the client IP is not included in the ignoreip whitelist.
6. Summary
On modern Linux distributions, legacy services like rsyslog and iptables are rapidly being retired in favor of modern alternatives. As system administrators, it is essential to update our server management practices and transition to natively integrated architectures using systemd-journald and nftables.
By following this guide, your Ubuntu 26.04 and Proxmox VE 9.2 servers will run a modernized, high-performance, and resilient Fail2Ban security system. Run a quick security check on your systems today!